Triathlon Bike vs. Road Bike: Seat Tube Angle, Aerodynamics, and Whether Those Extra Ten Minutes Are Worth It
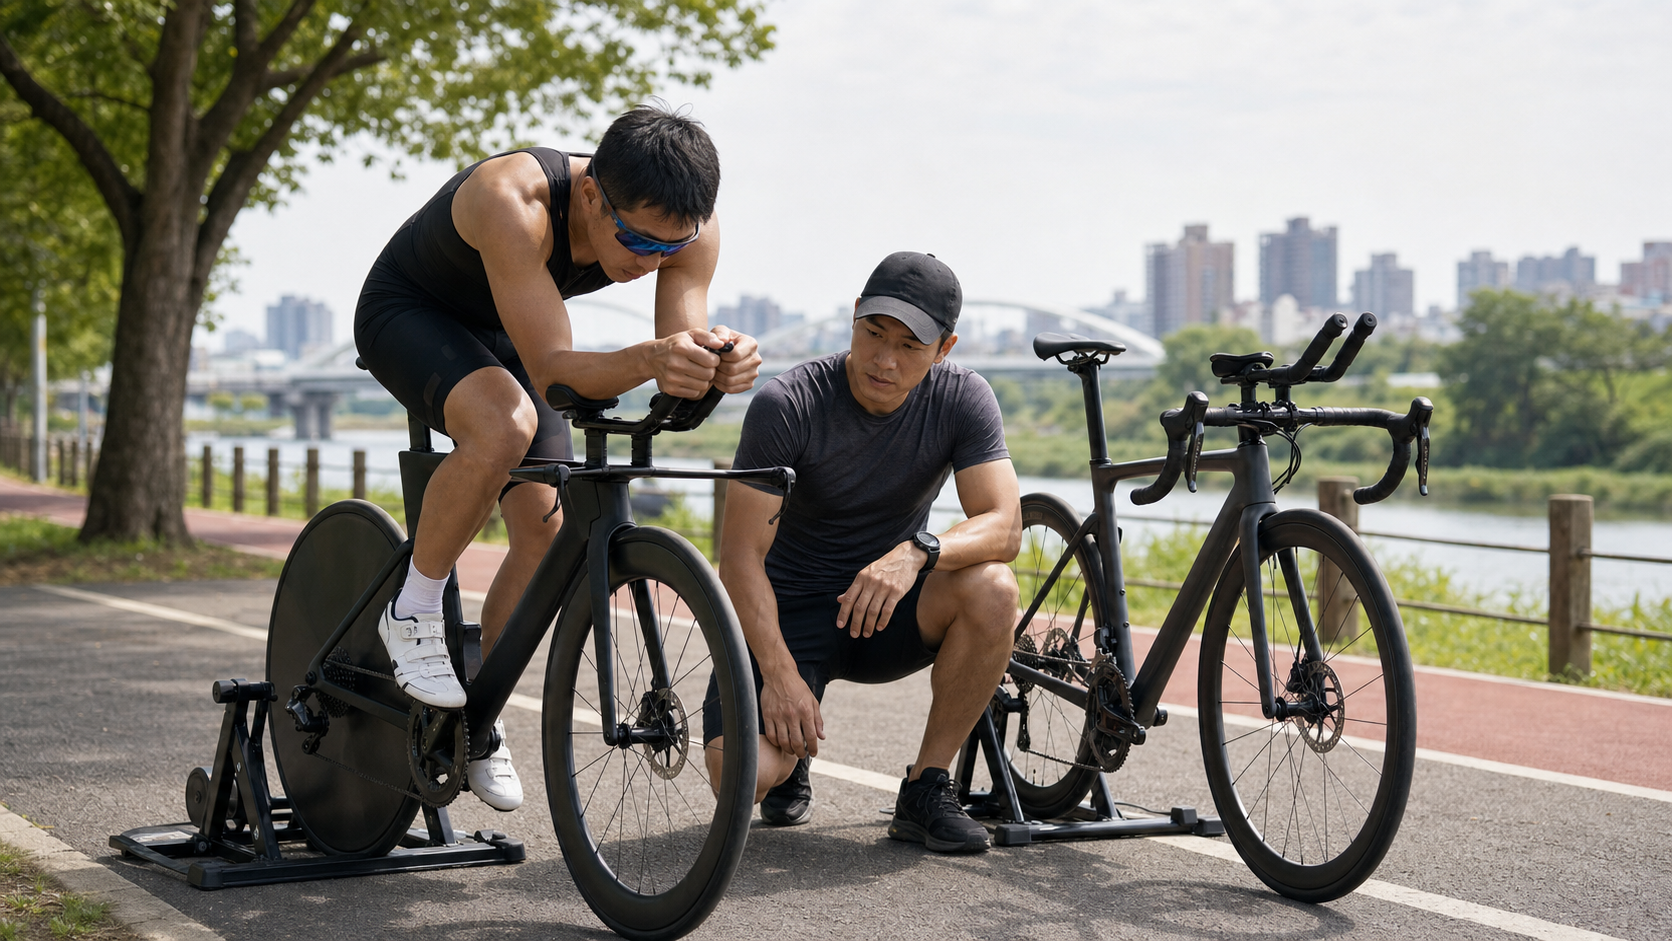
Coach’s Opening: That Triathlon Bike in the Corner, Ridden Only Three Times
Every year at the start of the season, the same kind of message shows up in my training group: “Coach, I signed up for such-and-such triathlon in 2026. Should I buy a triathlon bike?”
I’ve coached triathletes for fifteen years—from helping someone finish their first 1.5 km swim to sending athletes to Kona qualifying. I’ve heard this question hundreds of times. And in the corner of my office, I’ve also seen far too many triathlon bikes bought on impulse and ridden only three times—not because the bike was bad, but because no one had clearly explained the three things: geometry, aerodynamics, and the actual difference.
Let me start with a statement that might offend some bike shops: For many amateur triathletes in Taiwan, a road bike with clip-on aerobars delivers more benefit in the first year or two than a brand-new triathlon bike. But that statement comes with prerequisites, conditions, and exceptions. This article is about laying out those prerequisites, conditions, and exceptions clearly, based on my hands-on experience watching athletes at the Guandu riverside, in the 226 start corrals, and at the moment they dismount in transition.
By the end, you’ll know three things: how seat tube angle secretly affects your run after the bike, roughly what the aerodynamic gap looks like in numbers, and—most importantly—whether this money is worth spending, given your current level and goals.
1. Conceptual Foundation: Where Do Triathlon Bikes and Road Bikes Actually Differ?
Many people think the difference between a triathlon bike and a road bike is simply “whether it has aerobars.” Wrong. Aerobars are just the most superficial layer. The real difference in soul is hidden in a place most people never stare at—the seat tube angle (STA).
What Is Seat Tube Angle?
Simply put, seat tube angle is the angle of the seat tube relative to the horizontal ground. It determines the fore-aft position of your pelvis (sit bones) relative to the bottom bracket (the center of the pedal spindle).
- Road bikes typically have a seat tube angle around 72 to 74 degrees.
- Triathlon bikes / time trial (TT) bikes have a noticeably steeper angle, commonly 76 to 78 degrees, and some setups go even more forward.
A few degrees may sound trivial, but it changes the entire position of your pelvis and hip joint. The steeper the seat tube angle, the further forward your sit bones move, and the closer your hips get to directly above the bottom bracket—you’re essentially being “pushed” forward over the pedals.
What Does This “Push” Do?
Pushing the hips forward triggers a chain reaction:
- Your upper body can get lower and flatter without crushing your stomach against your thighs—this is the key to aerodynamics.
- Your quadriceps (front of the thigh) take on more of the pedaling load.
- Tension in the hamstrings and glutes is partially released.
Point three is the most important sentence in this entire article. Because the more you spare your hamstrings while riding, the fresher those muscles are when you start running. And the hamstrings happen to be among the most heavily used muscle groups in running.
This isn’t my personal speculation—it’s backed by research.
2. The Science: How Seat Tube Angle Affects “the Run After the Bike”
The cruelest part of triathlon is never the swim, the bike, or the run in isolation—it’s the “transition”—especially the first few kilometers of running after dismounting. Anyone who has raced a triathlon knows the feeling: you just got off the bike, your legs feel like lead, everything below the knees doesn’t belong to you, and the pace numbers on your watch are too ugly to look at. This is what’s called “brick legs.”
Seat tube angle is exactly where it delivers its greatest value.
What a Classic Study Says
In a study published in the Journal of Sports Sciences in 2000 by British researchers Garside and Doran, a group of male triathletes who normally rode a shallower seat tube angle (73 degrees) completed a 40 km ride at both 73 degrees and 81 degrees, followed immediately by a self-paced 10 km run.
The results were striking:
- With the steeper 81-degree position, the 40 km ride averaged about 1 minute 16 seconds faster.
- More critically, the first 5 km of the subsequent run averaged about 2 minutes 34 seconds faster.
- The difference in the second half of the run (the second 5 km) was relatively insignificant.
In other words, the benefit of a steeper seat tube angle is most concentrated in the most painful early portion of the run after dismounting—precisely the segment that determines whether many people fall apart in a race. (This study was completed in a controlled laboratory setting on a stationary trainer, so it represents conclusions under controlled conditions; individual differences on real roads will still exist.)
The Muscle-Level Explanation
Subsequent research has also examined muscle activity, looking at how seat tube angle relates to muscle recruitment during pedaling, and the findings generally point in one direction: a steeper seat tube angle reduces the load on the hamstrings (such as the biceps femoris). The more you spare the hamstrings on the bike, the more reserve you have for the run.
This is why triathletes generally prefer seat tube angles of 76 degrees or more—it makes the bike-to-run transition smoother, more efficient, and your legs more obedient.
Coach’s Plain-Language Version: Road bike geometry is designed for “riding comfortably all day, climbing, and changing positions”; triathlon bike geometry is designed for “getting low, sparing the hamstrings, and still being able to run.” These are two completely different jobs.
Why “Running Economy” Is the Hidden Decisive Factor in Triathlon
Let me add one more layer of concept. Running economy refers to the energy or oxygen cost required to run at a given pace—the more economical, the more efficient you are. What makes triathlon unique is this: you’re not running on “fresh legs”—you’re running after dozens of kilometers on the bike, with muscles already pre-fatigued.
In this state, any design that lets your key running muscles (especially the hamstrings and glutes) accumulate less fatigue during the ride will directly show up in your run performance. That’s what seat tube angle does—it’s not just about making you ride faster; it’s about riding in a way that’s “kinder to your run.”
This also explains a phenomenon many beginners don’t understand: why some people don’t have particularly high power on the bike segment, yet can catch and pass a bunch of people who rode aggressively. Because the former knows how to save their legs, while the latter burned up the muscles needed for running while still on the bike. Good geometry multiplied by good pacing discipline—that’s the real engine of a triathlon result.
Does “Getting Low” Itself Hurt the Run?
Some people worry: if you get that low, won’t it compress your breathing and make it harder to run later? That’s a reasonable question. The answer is—as long as your flexibility and core can support it, the low position of a steep seat tube angle is actually relatively friendly, because the forward hip shift means the angle between your torso and thighs isn’t as closed as you might think. But if your flexibility is insufficient and you force yourself low, crushing your stomach against your thighs, that will indeed compress your breathing and digestion, and the cost outweighs the benefit. So it comes back to the old saying: the position has to match what your body can handle.
3. The Aerodynamic Gap: What Are Those Saved Watts Actually Worth?
Now that we’ve covered seat tube angle, let’s talk about what everyone loves to ask—“Coach, how much faster is a triathlon bike, really?”
Air resistance is the biggest enemy of a bicycle on flat roads. In the cruising range of roughly 30 to 40 km/h, which is where most triathletes race, more than 80 percent of the resistance you fight comes from the air, and the vast majority of that comes from your body (not the frame). That’s why “position” matters far more than “frame material.”
How Many Watts Can You Save?
Based on industry aerodynamic data, a triathlon bike (with a proper aero position) can save a significant amount of power at moderate to high speeds compared to a standard road bike position:
| Cruising Speed | Approximate Power Saved with Triathlon Position vs. Road Bike Position |
|---|---|
| ~30 km/h | ~37–49 watts |
| ~45 km/h | ~114–150 watts |
Note the non-linearity of these numbers. The faster you go, the more dramatic the watt savings, because air resistance is proportional to the square of speed (or even higher-order effects). This is why the aero position is most valuable in high-speed, flat time trials.
Translating this into “time” makes it more tangible: over the bike leg of a long-distance triathlon (such as a 113 half or 226 full), maintaining a proper aero position can easily accumulate savings of over ten minutes.
But—Here’s the Huge Catch
Please note the wording in the table above: it’s a triathlon position, not a triathlon bike.
If you can’t get low on a triathlon bike, or you can’t produce power while low, or your neck hurts so much you have to keep your head up, the aero advantage instantly drops to zero—or even becomes negative. I’ve seen too many people spend a fortune on a top-tier triathlon bike, only to ride the entire race propped up on the aerobars with their head held high because of poor flexibility or a bad fit—their frontal area is larger than someone riding a road bike properly tucked.
Aero Priorities: Fix the Rider First, Then the Bike
Many people have it backwards—when they think of aerodynamics, they immediately think of upgrading wheels or frames. But the true engineering priority is actually:
- Body position (how low, stable, and small your frontal area is)—the biggest impact, and it’s free.
- Helmet and clothing—aero clothing and a suitable helmet offer surprisingly high gains.
- Wheels—deep-section rims provide clear benefits, but still come after body position.
- Frame—usually the item with the smallest marginal gain in this list.
In other words, spending zero dollars to train your body to hold a good aero position consistently can save you more watts than spending big money on a frame upgrade. This isn’t saying don’t buy a good bike; it’s about recognizing where your money and effort should go first. Buying a new frame before mastering your position is putting the cart before the horse.
Don’t Overlook That “How Long You Can Hold It” Matters More Than “How Low You Can Get”
Aero data often creates the illusion that as long as you get into a certain low position, you’ll enjoy those watt savings the whole time. In reality, a race is sustained output lasting from tens of minutes to several hours. An extremely low position you can only hold for 10 minutes is far less valuable than a slightly more conservative position you can maintain steadily for the entire race and still run well off the bike. Sustainability is the true deciding factor in aerodynamics for age-group athletes.
This brings us to our core question.
4. Practical Judgment: When Should You “Really” Upgrade?
This section is the heart of the article and the part I spend the most time on during in-person consultations. I’ve organized it into a decision table you can use to assess your current situation.
Decision Checklist for Upgrading to a Triathlon Bike
| Assessment Area | Signals for “No Rush Yet” | Signals for “Seriously Consider It” |
|---|---|---|
| Race Experience | Haven’t finished a sprint (51.5) or half (113) yet | Consistently finishing races and clearly aiming for better times |
| Annual Riding Volume | Less than 2,000–3,000 km per year | Training regularly with long rides every week |
| Flexibility/Core Strength | Back and neck ache after 10 minutes on the aerobars | Can hold the aero position for 30+ minutes and still produce power |
| Race Type | Focus on hilly, technical courses | Focus on flat, long-distance, time-trial style courses |
| Current Equipment | Haven’t even had a proper road bike fit | Road bike + clip-on aerobars are maxed out |
| Budget & Mindset | The purchase would hurt financially and impact other training investments | Have the means and are willing to invest in a fit and training |
How to read it: if you check four or more items in the right column, upgrading to a triathlon bike is a worthwhile investment for you; if the left column still dominates, spend your money elsewhere first—the cost-performance ratio is higher there.
Where Your Money Should Go First
For athletes still in the growth phase, I typically recommend allocating budget in this order:
- A professional bike fit (whether you ride a road bike or triathlon bike, this is the highest-return investment).
- A good set of clip-on aerobars + practice your aero position on your road bike.
- A power meter—quantifying your training is far more useful than changing bikes.
- Swim lessons—for most Taiwanese triathletes, the swim is what’s truly holding back their overall time.
Once you’ve done these, you’ll find that a road bike with clip-on aerobars can already produce excellent results in sprint and even half-distance races. A triathlon bike is the tool for squeezing out that last few percent once you’ve progressed further down this path.
5. Practical Example: An 8-Week Aero Position Adaptation Plan to “Max Out Your Road Bike”
Many people assume that switching to a triathlon bike automatically makes them faster, but “being able to sustain power in a low position” is something that must be trained. Here’s an 8-week adaptation plan I often prescribe to athletes, which can be done on a road bike with clip-on aerobars. The goal is to teach your body to generate power in the aero position—useful whether or not you eventually upgrade to a triathlon bike.
8-Week Aero Position Adaptation Plan
| Week | Main Workout Focus | Aero Position Hold Target | Notes |
|---|---|---|---|
| Weeks 1–2 | Steady flat riding, aero intervals | 3 min × 5 reps | Focus on “holding the position,” not speed |
| Weeks 3–4 | Tempo in aero position | 8 min × 3 reps | Feel your core supporting your upper body |
| Weeks 5–6 | Sweet spot power in aero | 15 min × 2 reps | Maintain low head position and relaxed shoulders while producing power |
| Week 7 | Simulated race segment, long aero hold | Continuous 30–40 min | Add a brick (bike-to-run transition) afterward |
| Week 8 | Taper + testing | Comprehensive assessment | Compare pace and heart rate between aero and upright positions |
Key execution points:
- Between aero intervals, return to the base bars to rest and let your back and neck recover.
- If your neck starts aching severely by the 5th minute, it means your core strength and flexibility aren’t ready yet—this is clear proof that you’re “not ready to upgrade to a triathlon bike.” Fix the body first, then the equipment.
- In Week 7, be sure to include a brick workout (run 2–3 km immediately after riding) to experience firsthand how your legs feel after riding in the aero position.
Complementary Core and Flexibility Mini-Routine
Being able to get low and still produce power depends on core strength and flexibility in the hip flexors and hamstrings. Schedule 2–3 sessions per week, 15 minutes each:
- Plank and side plank: Holding time matters more than reps.
- Bird-dog: Trains anti-rotation core stability.
- Hamstring and hip flexor stretches: Improves pelvic tilt capability in the aero position.
These may seem unremarkable, but they determine whether you can truly “utilize” those tens of watts saved by a triathlon bike.
How to Tell If the 8 Weeks Have Paid Off?
Here are three simple self-assessment metrics to check against during your Week 8 evaluation:
- Aero hold time: Can you progress from “holding 3 minutes” in Week 1 to “sustaining 30 minutes while still producing power”?
- Heart rate at the same power: At the same power output, is your heart rate in the aero position gradually approaching your upright riding level? The closer they are, the more efficient and adapted you are in the aero position.
- Leg feel during the brick run: In the Week 7 brick session, has the “heavy leg” feeling in the first kilometer eased compared to your first experience?
If you see clear improvement in these three areas, it means your body is internalizing “aero riding” as a sustainable capability—this is the fundamental prerequisite that determines whether you should switch to a triathlon bike, and whether you can actually use it effectively once you do. Those who master this will be unstoppable after switching bikes; those who don’t will simply own an expensive ornament they can’t get low on.
6. Common Mistakes and Fixes: Tragedies I’ve Witnessed in Transition Zones
After years of coaching, I’ve seen the same mistakes repeated over and over. I’ve listed them here, hoping you won’t step on these landmines.
Mistake 1: Buying a Triathlon Bike Without Adjusting Saddle Height and Reach
Symptoms: Directly transferring your road bike’s saddle height to the tri bike.
Problem: With a steeper seat tube angle, your sit bones shift forward, changing the effective leg extension. Your original saddle height is almost certainly wrong.
Fix: After switching bikes or significantly changing the seat tube angle, you must get a new bike fit. Saddle height, fore/aft position, and aerobar length all need to be recalibrated.
Mistake 2: Chasing an Extreme Low Position Without Adequate Flexibility
Symptoms: Seeing pros online riding super low, you crank your position to the limit too.
Problem: Your flexibility and core strength can’t support it. Within 20 minutes you’re lifting your head and arching your back, ruining your aerodynamics and hurting your lower back.
Fix: Your position should evolve gradually with your body’s capabilities. Better to ride slightly more conservatively but hold it consistently than to be extreme but unable to sustain it.
Mistake 3: Only Training on the Bike, Never Practicing Bricks
Symptoms: Training rides and runs are always separate, never connected.
Problem: Race day is your first experience with “brick legs,” and your run pacing falls apart immediately.
Fix: Do at least one brick session every two weeks to teach your body the transition feeling. You’ll only appreciate the advantages of triathlon bike geometry when you “regularly practice running off the bike.”
Mistake 4: Putting All Your Budget into the Frame, Ignoring Wheels and Position
Symptoms: Scrimping and saving for the most expensive frame, but pairing it with heavy wheels and skipping a bike fit.
Problem: The frame’s aerodynamic contribution is far less than that of “your wheels” and “your body position.”
Fix: With a limited budget, Position (fit) > Wheels > Frame. Engrave this order in your mind.
7. Actionable Advice for Athletes of Different Levels
Everyone is at a different stage, so the answers naturally differ. I’ve divided athletes into three categories, each with a set of recommendations.
Sprint to Olympic Distance (Goal: Finish)
- Don’t buy a triathlon bike. A well-fitted road bike with clip-on aerobars is more than enough.
- Invest your money and time in a bike fit, swim lessons, and consistent riding volume.
- Focus on “confidence to finish” and “staying injury-free.” Equipment is the last consideration.
Half to Full Distance (Starting to Chase Times)
- First, confirm your road bike + clip-on aerobars setup has been maxed out — you can hold the aero position, you have power data, and you’ve had a bike fit.
- If your target race is flat and long (like many flat 113/226 courses), the aerodynamic benefits of upgrading to a triathlon bike start to become clearly worth it.
- When you upgrade, set aside budget for a professional bike fit. This is worth more than spending extra on a higher-tier frame.
Age-Group Competition to Chasing a Kona Slot
- At this level, a triathlon bike is almost standard equipment. The question is no longer “whether or not” but “how to further optimize the fit and position.”
- Every watt and every second counts. Now you should be looking at wind tunnel or outdoor aero testing, professional fitters, and meticulously calculated pacing strategies.
- But don’t forget the fundamentals: No matter how expensive the bike, it can’t save under-trained hamstrings and a weak core.
8. Case Studies: Two Athletes, Two Different Answers
Principles alone can be too abstract. Let me use two (hypothetical) athlete stories to show you how the same question can have opposite answers. The data is illustrative, used to explain the decision-making logic. The focus is on the thought process, not the precise numbers.
Athlete A: Enthusiastic Newbie, Xiao Chen
Xiao Chen signed up for his first Olympic-distance triathlon. His swimming is barely passable, he’s ridden about 1,500 km in the past year, and running is his weakness. He walked into the shop ready to swipe his card for a triathlon bike. I asked him to do one thing first: Put clip-on aerobars on his road bike and ride in the aero position for 20 minutes so I could watch.
He lasted 8 minutes before he started craning his neck and sat up straight due to back pain. What does this tell us? It means even if I gave him a triathlon bike, he couldn’t hold the position or use the aero advantage. My prescription for him was:
- Get a road bike fit first.
- Do an 8-week aero position adaptation plan.
- Take part of the bike budget and spend it on four swim lessons.
Six months later, he finished his Olympic-distance race faster than he expected, with the most improvement in the swim. A triathlon bike? I told him to wait until he’s chasing times. His left column was fully checked; the answer was “don’t buy it yet.”
Athlete B: Experienced Athlete Chasing a PB, Ah May
Ah May has completed three 113s, trains consistently, does long rides every week, can hold her aero position steadily for 40 minutes, had her road bike fit done long ago, and her goal is to break her personal record at a flat, long-distance race next year. She asked me the same question.
My answer was the complete opposite: You should buy this bike. Because:
- Her engine (fitness) is already in place, and she can hold the aero position.
- Her target course is flat and long — the exact scenario where aerodynamic benefits are maximized.
- She’s willing to get a dedicated triathlon bike fit.
For Ah May, those saved watts, accumulating into those ten-odd minutes, are the final piece of the puzzle she needs to move from “finishing” to “breaking her PB.” Her right column was fully checked; the answer was “buy it, and get a fit to go with it.”
Same question, two opposite answers. The difference isn’t the bike; it’s the athlete.
9. More Than Two Choices: The Bike Spectrum and Transition Options
Many people simplify the question into a binary “road bike vs. triathlon bike” choice, but in practice, it’s a spectrum. Understanding this spectrum reveals smarter transitional options.
Comparison of Four Common Setups
| Setup | Aerodynamics | Handling/Climbing | Run-off-the-Bike Friendliness | Suitable For |
|---|---|---|---|---|
| Pure Road Bike (No Aerobars) | Weaker | Best | Moderate | Beginners, focused on finishing and versatility |
| Road Bike + Clip-on Aerobars | Moderate | Good | Moderate | Early performance chasing, limited budget, best value |
| Triathlon Bike (Conservative Fit) | Good | Moderate | Good | Moderate flexibility, wants a balance of comfort and aerodynamics |
| Triathlon Bike (Aggressive Fit) | Best | Weaker | Best | Solid fitness and flexibility, chasing ultimate performance |
Understanding this table, you’ll see that “road bike + clip-on aerobars” is the most practical starting point for the vast majority of Taiwanese amateur triathletes. It retains the road bike’s versatility and handling while capturing some aero benefits, at a fraction of the cost of a full triathlon bike. Once you’ve maxed out this setup and built up your body, then you make the next jump — that’s when your money is spent where it counts.
An Often-Overlooked Middle Option
If your road bike fit allows, you can actually get closer to the feel of triathlon bike geometry without changing the frame, just by adjusting the aerobar angle and saddle fore/aft position. Of course, this has its limits and risks (if you change too much, you must get a new fit), but for those “still on the fence, wanting to experience long rides in the aero position,” it’s a low-cost way to test the waters.
10. Don’t Forget: When You Upgrade Your Equipment, Your Nutrition and Pacing Strategies Must Upgrade Too
Many people only think about the bike, overlooking that: When you get lower, ride faster, and race longer, your nutrition and pacing strategies must evolve as well.
Three Impacts of Aero Position Riding on Nutrition
- Drinking Becomes Harder: In the aero position, you have to take your hands off the aerobars to reach your bottle, which is awkward and disrupts your aerodynamics. That’s why front-mounted hydration systems are common on triathlon bikes. You need to practice “hydrating without breaking your position” in training.
- Your Gut Becomes More Sensitive: Prolonged aero position compresses your abdomen, and combined with high intensity, your stomach is more prone to issues during long races. You must rehearse your nutrition plan during training — never try anything new on race day.
- Pacing Requires More Discipline: A triathlon bike makes you “feel fast,” making it easy to push too hard on the bike leg, burning up your legs for the run. The energy saved by the aero position is meant to help you “run better,” not to “ride harder.”
Principles for Fueling During a Long-Distance Race (Illustrative)
The following are illustrative principles; actual values should be personalized through training based on your weight, sweat rate, weather, and gastrointestinal tolerance. Do not copy them directly:
| Phase | General Fueling Direction | Reminder |
|---|---|---|
| Early Ride | Steadily replenish carbohydrates and fluids | Don’t start too hard out of excitement |
| Mid-Ride | Maintain carbohydrate rhythm, watch electrolytes | Increase fluid intake in high heat and humidity |
| Late Ride | Gradually ease off, fuel mindfully in preparation for the run | Save your legs for the run segment |
| Run Segment | Small amounts, frequently, adjust based on body feedback | Reduce intake first if you have stomach issues |
The hourly range of carbohydrate intake and sodium supplementation varies greatly between individuals. Please rely on personalized training practice and professional advice; this article only provides a framework for thinking.
11. Frequently Asked Questions (FAQ)
Having led teams for many years, these are the questions I’m repeatedly asked during consultations. Here are the answers, all in one place.
Q1: Can I just buy a road bike, never buy a triathlon bike in my life, and still race triathlons?
Absolutely. Many finishers, and even age-group podium athletes, race on road bikes with clip-on aero bars. A triathlon bike is a tool for “chasing ultimate performance,” not a “ticket to race.”
Q2: Are clip-on aero bars on a road bike dangerous?
With aero bars, your hands are farther from the brakes in the aero position, and handling and reaction times are indeed different. Practice first on safe, simple roads with little traffic (like flat riverside paths), and maintain a sufficient distance from the bike ahead. Never use them recklessly in crowded areas or technical sections.
Q3: Are triathlon bikes at a big disadvantage on climbs?
Relatively speaking, a triathlon bike’s geometry and weight distribution are less agile than a road bike’s on pure climbs and technical descents. If your target race has many climbs and corners, a road bike might actually be the better choice. Look at the course first, then decide on the bike.
Q4: Will my performance definitely improve if I switch to a triathlon bike?
Not necessarily. If you can’t hold the aero position, your fit isn’t dialed in, or your power distribution is poor, your performance might actually decline after switching. Equipment only translates into performance when “your body can use it.”
Q5: With a limited budget, where should I spend first?
Remember this order: Fit > Training (including swim lessons) > Power meter > Wheels > Frameset. The frameset is almost the last item on this list.
12. Real-World Considerations in Taiwan
Finally, let’s talk about the realities you only encounter when training for triathlons in Taiwan.
Course Terrain
The terrain of triathlon races in Taiwan varies greatly. Some courses are relatively flat (suitable for triathlon bikes to shine), while others have rolling hills or technical corners. Before upgrading, research the routes of the races you primarily participate in—if your target race has many climbs and corners, the advantages of a triathlon bike are diminished, and the handling of a road bike might suit you better.
Climate and Fueling
Taiwan’s summers are hot and humid, and triathlons are often held in high heat and humidity. When riding in the aero position, planning for heat dissipation and hydration is more critical than in cooler climates. Spending long periods in the aero position also means you need to practice the skill of “grabbing water and fuel steadily without lifting your head.” Additionally, convenience stores are dense along Taiwan’s roads, making fuel for regular long rides easy, but on race day, strictly follow the race’s aid station plan and the strategy you’ve practiced. Don’t experiment with foods you’ve never tried on the spot.
Training Venues
The riverside bike paths in the north (like the Guandu and Dadaocheng areas) are flat with few traffic lights, making them great for practicing “holding the aero position” and tempo rides. For climbing and handling practice, there are classic mountain roads across the island. Using flat riverside paths to accumulate miles in the aero position is a very practical path for Taiwanese triathletes.
Conclusion: Equipment is an Accelerator, Not the Engine
Let’s return to that triathlon bike sitting in the corner at the beginning, ridden only three times. Its owner wasn’t lacking effort; they just got the order wrong—they bought the accelerator before building up the engine (their own body and training).
The steep seat tube angle of a triathlon bike does indeed allow you to run more comfortably after dismounting; its aerodynamic design does indeed save you significant watts and time on mid-to-high-speed flat roads. These benefits are real. But they all share one common prerequisite: your body needs to be able to use it.
So, if you ask me today, “Should I upgrade?”, my answer is always to first ask you six questions back—the ones in the decision table above. When you’ve checked all the boxes in the right column, this bike will be the final piece of your performance puzzle; when the left column still dominates, spending money on fit, swim lessons, and consistent training will yield much greater returns.
Equipment helps you go faster, but the engine is always you. Strengthen the engine first, and that triathlon bike won’t end up as just a “third ride” in the corner.
See you in transition next time.
This article is for educational purposes and does not replace individual assessment by a physician, physical therapist, or nutritionist.
References
- Garside & Doran (2000), Journal of Sports Sciences related research discussion (seat tube angle 73° vs 81° and running performance) — Slowtwitch: What science says of seat angles
- Seat tube angle and differences in triathlon/time trial bike geometry, and its impact on running performance — Journal of Science and Cycling: The Effects of Bicycle Geometry on Sprint Triathlon Cycling and Running Performance
- Seat tube angle and aero watt savings data for triathlon vs. road bikes — Quintana Roo: Why Triathlon Bikes Are Different
Related Reading
- Triathlon-Specific Bike vs. Road Bike: Geometry, Aerodynamics, and a Purchase Decision Tree
- Triathlon Riding Position Adjustment: The Balance Between Aerodynamics and Power Output—Aero Bars, Hip Angle, and Priority Fitting Parameters
- Triathlon Time Trial (TT) Bike vs. Road Bike: Which Suits Your Race
- Triathlon Bike vs. Road Bike Purchase Decision: Which One to Buy First
風櫃嘴! 現實與虛擬騎乘 會有誤差嗎? 背著iPad邊騎一趟風櫃嘴實際測試一次 | 公路車 | CT Yeh
3 年前
碟煞公路車 優缺點?換車一年半實際經驗分享 / 公路車 / CT Yeh
2 年前
大家都在開箱的...單車用藍芽對講耳機真的有幫助嗎? SENA BiKom 20 長距離旅遊 & 海鷗繞圈賽 實際體驗心得 / 公路車 / CT Yeh
9 個月前
JJSC南台灣單車走春三日行 DAY 1 / 強度 x 美食 x 節慶體驗 / 公路車 CT Yeh
5 個月前
沉浸室內單車練功房開箱! 100吋大畫面,最便宜的花費? 居然還能K歌!? | 公路車 | CT Yeh
3 年前
一日北高前的西濱集訓 | 跟著11小時軍團 | 300W踩不動的大逆風 | 輪車破風差幾瓦?
6 年前
CT 喇低賽) 武嶺牽車 才是王道 西進牽車四小時內秘訣 攝手位置 如何判斷 防抽筋小秘訣
7 年前
公路車 BB培林大升級! / 備戰海鷗繞圈賽 Canyon Aerod & TIME 一起改 / MIT大廠 CEMA對鎖式陶瓷培林BB & 導輪 / 公路車 / CT Yeh
2 年前