The Complete Guide to Squats: A Coach's Practical Handbook from Mechanics, Common Mistakes to Tiered Training Plans
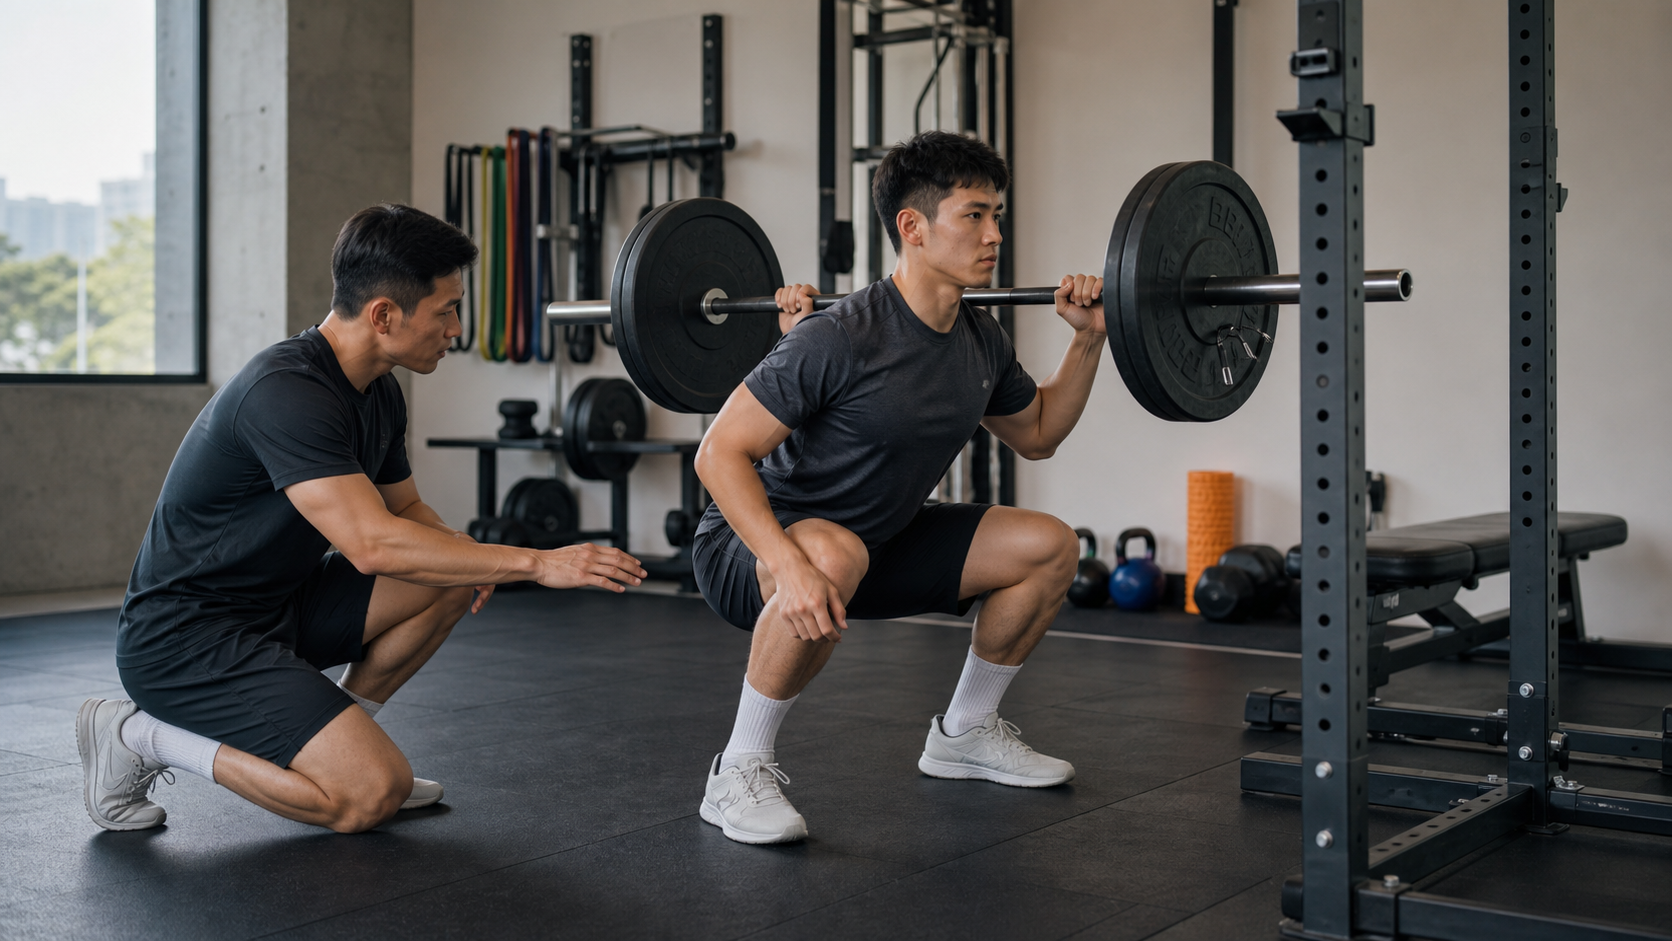
Opening: The Trainee Who “Squatted for Three Years but Still Complained About His Knees”
I still remember the first time A-Zhe walked into the gym to see me. He was a 38-year-old software engineer who enjoyed riding along the riverside on weekends and occasionally ran a half marathon. He’d been squatting for three years, by his own account, yet always felt his knees were “stuck,” his quads always burned out first, and his glutes felt almost nothing. He asked me: “Coach, is it that my knees just aren’t built for squatting?”
I asked him to do three bodyweight squats for me. The problem was obvious at a glance—weight on his toes, knees caving in, excessive forward lean of the lower back, and depth that stopped at about 120 degrees between thigh and floor before he rushed to stand up. His knees weren’t unsuited for squatting; no one had ever taught him how to squat. Three months later, A-Zhe’s back squat went from an empty bar to 60 kg with proper form, his knees stopped complaining, and his endurance on long climbs noticeably improved.
The squat is called the “King of Movements” for good reason. It recruits nearly all the major muscle groups of the lower body and is one of the few exercises that simultaneously builds strength, muscle mass, joint mobility, and functionality. But precisely because it involves so many joints and heavy loads, when form breaks down, the accumulated cost is very real. In this article, I’ll draw on 15 years of coaching experience plus sports science evidence to explain it all clearly: how the squat actually generates force, how deep you should squat, how to fix common mistakes, how to choose advanced variations, and finally, a progressive program you can follow directly.
Foundational Concepts: What’s Actually Happening Mechanically in the Squat
Three Joints, One System
The squat is essentially a coordinated movement of three joints—hip, knee, and ankle—flexing simultaneously and then extending simultaneously. Many people think the squat is a “knee exercise,” but the real main engine is hip extension driven by the gluteus maximus and the hamstrings (posterior chain), while the quadriceps handle knee extension, and the calves and ankles handle stability and center-of-mass adjustment. When the ratio among these three is off—for example, knee-dominant with the hips barely participating—you get the classic picture A-Zhe presented: “quads fried, glutes asleep, knees hurting.”
In a good squat, force should travel like a complete kinetic chain: ground reaction force comes up through the feet, passes through stable ankles and knees, and is finally “pushed” back to standing by a strong hip and trunk core. If any link in the chain loosens, force leaks out or gets transferred to tissues that shouldn’t bear it.
Depth and Knee Joint Loading: Debunking the “Squatting Too Deep Hurts Your Knees” Myth
This is the question I get asked most often, and it’s also where misconceptions run deepest. Many people believe that “squatting below parallel will crush your knees,” so they deliberately stop at a half squat. But the research paints a different picture.
According to biomechanical studies of the knee during the squat, when you squat only to about 90 degrees of knee flexion (between half squat and parallel), the compressive force on the patella (kneecap) is actually at its highest; as you continue deeper past parallel, compressive force actually decreases due to the so-called “wrapping effect.” At the same time, deep squats do not increase shear forces on the anterior cruciate ligament (ACL) or posterior cruciate ligament (PCL)—when knee flexion exceeds 90 degrees, the hamstrings and quadriceps co-contract to stabilize the tibia and reduce anterior-posterior translation, so shear force actually decreases. (Sources listed in the references at the end.)
In other words: provided movement control is good and load progression is sensible, squatting to parallel or slightly below is not only safe for the knees of most healthy adults, it’s actually more “friendly” than getting stuck in a half squat. Of course, there are caveats—if you lack ankle mobility, your heels lift, or your knees cave in significantly, then going deeper is all risk. Depth itself isn’t the problem; uncontrolled depth is.
Depth and Muscle Recruitment
Depth also directly affects which muscles you train. Research has observed that as back squat depth increases, gluteus maximus activation rises significantly; meanwhile, the relative contributions of the quadriceps and hamstrings don’t differ much across depths. In other words, if you want to build your glutes (whether for aesthetics, climbing power, or knee protection), squatting deep enough is key. This also explains why A-Zhe never felt his glutes before—he simply never squatted to a depth that recruited them.
Changes in Knee Joint Moment as Load Increases
Another practically important detail: the external knee flexion moment rises steeply from bodyweight up to about 50% 1RM, but from 50% to 85% 1RM, the slope of increase is gentler. This tells us that the step from no load to adding light weight produces a large change in joint loading. So beginners shouldn’t rush to heavy weights; building solid movement quality at low to moderate loads matters more than anything.
Why “Movement Quality” Should Take Priority Over “Weight on the Bar”
Putting the mechanics together: insufficient depth repeatedly passes through the angle of highest patellar compressive force, knee valgus adds extra stress to soft tissues, and heel lift shifts load forward onto the knees and lower back. These problems share a common trait—at low loads they’re just “minor flaws,” but once you get greedy with weight, they get magnified into real risk. This is why I constantly tell trainees, “Get the movement right first, and the weight will catch up on its own.” A clean 60 kg squat has far more long-term value than a sloppy 100 kg one.
Practical Methods: How to Build a Safe and Effective Squat
Standard Back Squat Movement Checklist
When I coach trainees, I use a mnemonic-style checklist that builds the movement from the ground up:
- Feet: Stance about shoulder-width or slightly wider, toes naturally turned out about 15 to 30 degrees. Imagine “locking” your feet into the floor, creating a stable three-point support (ball of big toe, ball of little toe, heel).
- Knees: As you descend, push your knees out in line with your toes—no caving in, no forced outward push.
- Hips: Imagine “sitting back onto a low stool,” letting hips and knees start together rather than the knees shooting forward first.
- Torso: Brace your core as if someone were about to punch you in the stomach, maintaining a natural chest-up position and neutral spine.
- Breathing: Inhale before descending, hold to create intra-abdominal pressure (Valsalva), and exhale as you stand up. Those with hypertension or cardiovascular conditions need a more conservative breathing strategy, which I’ll discuss later.
- Depth: At least squat to parallel (hip crease below the top of the knee), and slightly lower if your capacity allows.
Progressive Exercise Order from Zero
For complete beginners, I never put a barbell on their back on day one. Here’s the progressive ladder I commonly use:
| Stage | Exercise | Purpose | Suggested Duration |
|---|---|---|---|
| 1 | Bodyweight box squat (sit to a low stool) | Learn hip initiation and depth control | 1 to 2 weeks |
| 2 | Bodyweight full squat | Build full range of motion without load | 1 to 2 weeks |
| 3 | Goblet squat (holding a dumbbell/kettlebell) | Learn core bracing and upright torso | 2 to 4 weeks |
| 4 | Empty bar back squat | Adapt to barbell position and balance | 1 to 2 weeks |
| 5 | Progressive loaded back squat | Begin true strength development | Ongoing |
This ladder isn’t rigid. Some trainees get stuck at stage 3 for a while—that’s normal. The goblet squat fixes more problems than you’d think; if you can’t squat well, don’t rush to the bar.
Major Squat Variations and Who They Suit
The squat isn’t just the back squat. Different variations have different strengths, and choosing the right tool makes all the difference.
| Variation | Key Characteristics | Best Suited For | Cautions |
|---|---|---|---|
| Back squat (high bar) | More upright torso, quads and glutes equally | General strength development, most people | Requires adequate ankle and shoulder mobility |
| Back squat (low bar) | Hip-dominant, can handle heavier loads | Maximal strength, powerlifting-oriented | High demands on upper back and hip mobility |
| Front squat | Bar in front of collarbones, very upright torso | Quads, core, upper chest | Requires wrist and upper back flexibility |
| Goblet squat | Holding weight at chest | Beginners learning the movement, home training | Lower load ceiling |
| Bulgarian split squat | Single-leg focus, mobility-friendly | Knee pain alternatives, leg imbalances, cyclists | Balance requires adaptation |
| Box squat | Sitting to a fixed height | Depth control, learning hip hinge | Don’t “crash” onto the box |
For endurance athletes who cycle or run, I particularly like adding the Bulgarian split squat. It’s gentler on ankle and hip mobility demands than the back squat, while still building unilateral strength and balance—very helpful for correcting the left-right leg imbalances common in cycling, which become especially noticeable after long riverside rides.
How to Structure the Program: Strength vs. Muscle Mass
Different goals call for different variable arrangements. Here’s a practical comparison table based on recent sports science consensus (including the 2026 American College of Sports Medicine ACSM resistance training guideline update, sources at the end):
| Goal | Recommended Intensity | Sets (per exercise) | Weekly Sets per Muscle Group | Effort Level | Rest Between Sets |
|---|---|---|---|---|---|
| Maximal strength | About 80% 1RM and above | 2 to 3 sets | Per program design | Leave 2 to 3 reps in reserve, not to failure | 2 to 3 minutes |
| Muscle mass (hypertrophy) | Broad load range acceptable | 3 to 5 sets | Around 10 sets | Close to but not necessarily to failure | 1 to 2 minutes |
| Muscular endurance/beginner adaptation | Low to moderate load | 2 to 3 sets | Per program design | Conservative, prioritize movement quality | 1 to 1.5 minutes |
Two important conceptual shifts from recent years are worth highlighting:
- Rep range has no independent effect on hypertrophy: As long as “effort level” and “total training volume” are controlled, whether you use a 6-rep weight or a 15-rep weight, muscle growth is similar. This means you can flexibly choose loads based on joint comfort and how you feel that day.
- You don’t need to train to failure: Research shows that stopping 2 to 3 reps short of failure produces no less gain in strength, hypertrophy, or power than taking every set to failure—and it’s kinder to your joints and recovery. For people who also cycle or run, this is especially practical; don’t leave your legs too wrecked to ride the next day.
Warm-Up Before Squatting: The Ten Minutes You Shouldn’t Skip
I’ve seen too many people walk into the gym, scroll their phones, do a few half-hearted leg swings, and then load the bar—only to complain about a tight bottom position and stiff knees. A proper warm-up can dramatically improve your movement quality and safety. Here’s the standard squat warm-up protocol I give my trainees:
| Order | Item | Content | Purpose |
|---|---|---|---|
| 1 | Whole-body warm-up | Brisk walk or spin bike for 5 minutes, heart rate slightly up, light sweat | Raise core temperature and blood flow |
| 2 | Ankle mobilization | Lunge ankle presses, 10 reps per side | Improve dorsiflexion range |
| 3 | Hip mobilization | 90/90 hip rotations, squat rocks, 10 reps each | Open up hips, get into squat position |
| 4 | Glute activation | Banded lateral walks, clamshells, 15 reps each | Wake up gluteus medius, prevent knee valgus |
| 5 | Movement priming | Bodyweight squats 10 reps, empty bar 8 reps | Build movement memory |
| 6 | Progressive warm-up sets | Ramp from about 40% up to working weight | Get the nervous system online |
Taiwan’s summers are hot, so the warm-up time can be slightly shortened; but on cold winter mornings or in heavily air-conditioned gyms, the warm-up needs to be even more thorough. Small joints like the knees and ankles are most prone to issues when trained cold. These ten minutes may seem wasteful, but they’re actually the cheapest injury insurance you’ll ever buy.
Two Sample Programs You Can Follow Directly
Principles alone aren’t enough, so I’ve written out the two programs I most often give trainees. You can use them directly or tweak them.
Beginner Four-Week Introductory Program (2x per week, A/B alternating)
The core philosophy of this program is “engrave the movement into your body first; weight comes second.”
| Week | Main Squat Exercise | Sets x Reps | Intensity Cue |
|---|---|---|---|
| Week 1 | Goblet squat | 3 x 10 | Easy, focus on control |
| Week 2 | Goblet squat | 3 x 10 | Slightly heavier, still leave reps in reserve |
| Week 3 | Empty bar/light bar back squat | 3 x 8 | Learn barbell balance |
| Week 4 | Light bar back squat | 4 x 6 | Leave 3 to 4 reps in reserve each set |
Accessory exercises (add each session): Romanian deadlift 3 x 10, banded lateral walks 3 x 15, plank 3 x 30 seconds. This program isn’t about chasing numbers; the goal is that after four weeks, you can perform a standard-depth back squat steadily and pain-free.
Intermediate Twelve-Week Strength Development Program (Periodization Example)
This is for people who can already back squat steadily and want to get systematically stronger. It progresses in three four-week blocks.
| Block | Weeks | Main Lift Intensity | Sets x Reps | Focus |
|---|---|---|---|---|
| Accumulation | 1 to 4 | 70 to 75% 1RM | 4 x 6 | Build volume, lay foundation |
| Intensification | 5 to 8 | 78 to 83% 1RM | 4 x 4 | Raise intensity, refine technique |
| Peak | 9 to 11 | 85 to 90% 1RM | 3 x 3 | Touch near-maximal loads |
| Deload | 12 | 60% 1RM | 2 x 5 | Recover, prepare for 1RM testing |
In the first week of each block, I suggest slightly reducing volume before building back up—don’t add load every single week. Pair with front squats or Bulgarian split squats as a secondary squat pattern, around 3 x 8 per week. After running this program, most trainees who execute it seriously see their back squat improve by 10 to 20%, though individual variation is large.
Three Real-Life Case Studies: Problems and Solutions
Case One: Leg Imbalance in a Cyclist
Xiao-Yu was an avid road cyclist who loved climbing and had tackled Wuling twice. When she came to me, she said her right leg felt “weaker” when riding. I had her do Bulgarian split squats, and sure enough, her right leg was noticeably weaker and less stable. We didn’t start by loading up heavy bilateral back squats; instead, we used single-leg exercises to build up the weak side first—adding one extra set on the weak side each session. After eight weeks, the imbalance had visibly narrowed, and she reported that her right leg “finally keeps up” on long climbs. This is exactly why I always program single-leg training for endurance athletes.
Case Two: Anterior Knee Pain in a Middle-Aged Office Worker
Old Chen, 45, worked at a desk. Squatting to the bottom caused anterior knee pain. Examination revealed tight ankle dorsiflexion and a habit of stopping at a half squat—right in the zone of highest patellar compressive force. We did two things: first, elevated his heels to reduce ankle mobility demands; second, deliberately taught him to squat deeper, passing through that high-pressure angle. Combined with regular ankle mobilization, within six weeks he could squat pain-free below parallel. He couldn’t believe at first that “squatting deeper hurt less than a half squat”—but that’s exactly what the mechanics we discussed earlier predict.
Case Three: A Young Man Who Blew Himself Up Training to Failure
A-Hong, 24, took every squat set to hard failure. The result: crippling delayed onset muscle soreness the next day, barely able to train twice a week, and never recovering enough. I had him switch to leaving 2 to 3 reps in reserve on every set and spreading his weekly volume across more sessions. He ended up training more frequently with less soreness. Three months later, both his leg size and squat weight had improved more than during his previous “grind-it-out” phase. This is the best real-world demonstration of “you don’t need to train to failure.”
Common Mistakes and Fixes: The Six Problems I See Most in the Gym
Mistake One: Knee Valgus (Knees Caving In)
Knees collapsing inward during the descent or at the moment of standing up is the most common problem I see, and the one that needs the most attention. Over time, it places extra stress on the knee joint and surrounding soft tissues.
Fix: Reduce the load first and relearn the feeling of “pushing your knees toward your toes.” You can place a resistance band around your knees and deliberately push your knees outward against it as you squat (this is an external cue, which usually works far better than just yelling “knees out” verbally). Also check whether your gluteus medius is weak, and add hip abduction activation work like lateral walks and clamshells.
Mistake Two: Heels Lifting, Weight on Toes
This is usually caused by insufficient ankle dorsiflexion. Once the heels lift, your center of mass shifts forward, increasing stress on both knees and lower back.
Fix: Short-term, you can place a small plate under your heels or wear weightlifting shoes to reduce ankle mobility demands; long-term, do calf and ankle mobilization and stretching. With Taiwan’s desk-bound office culture, tight ankles are very common. Don’t rush; it will improve with consistent work.
Mistake Three: Insufficient Depth (Ego Half Squats)
Like A-Zhe, many people sacrifice depth to add more weight. The result: the glutes never get recruited, and you repeatedly train the zone of highest patellar compressive force.
Fix: Drop the weight and squat to true parallel or slightly below. You can place a box or yoga block as a depth reference, lightly touching it before standing up. Better to squat 40 kg beautifully than to half-squat 80 kg and fool yourself.
Mistake Four: Excessive Lower Back Rounding (Butt Wink)
At the bottom of the squat, the pelvis tucks under and the lower back rounds. A slight posterior pelvic tilt at very deep positions is normal, but if you’re visibly rounding under load, it needs addressing.
Fix: First check whether your depth exceeds your current mobility. Temporarily limit depth to the range where you can maintain a neutral spine. Pair this with hip flexor and hamstring mobility work, gradually extending your controllable depth.
Mistake Five: Forcing a “Standard” Stance Width and Toe Angle
No single stance works for everyone. Hip joint structure (femoral neck angle, acetabular depth) varies from person to person. Forcing someone else’s stance will only make your squat feel awkward.
Fix: Spend 10 minutes doing a “stance experiment”—try narrow, medium, and wide stances with different toe angles bodyweight, and find the combination where you squat most smoothly, deepest, and pain-free. Only your own body knows your anatomy.
Mistake Six: Misapplied Breath-Holding Strategy (Especially for Those with Cardiovascular Risk)
The Valsalva maneuver increases trunk stability, but it also causes a temporary, significant spike in blood pressure. For people with hypertension, heart disease, or cerebrovascular risk, this requires caution.
Fix: This population should adopt a more conservative breathing strategy, use lighter loads, avoid prolonged breath-holding, and must consult a physician and a qualified coach or physical therapist before starting resistance training. This is not something to decide on your own after watching videos online.
Accessory Exercises for the Squat: The Best Helpers for Weak Points
No matter how diligently you train the main lift, if weak links aren’t addressed, progress will stall quickly. Here are the accessory exercises I most often pair with squats and the problems they solve:
| Accessory Exercise | Primary Strengthening | Weak Point Addressed | Recommended Sets x Reps |
|---|---|---|---|
| Romanian deadlift | Hamstrings, glutes | Weak hip extension, weak posterior chain | 3 x 8 to 10 |
| Bulgarian split squat | Single-leg strength, balance | Left-right imbalance, knee stability | 3 x 8 per side |
| Hip thrust | Gluteus maximus | Insufficient glute recruitment | 3 x 10 |
| Leg curl | Hamstrings | Bottom-position shear control | 3 x 12 |
| Plank/farmer’s carry | Core stability | Trunk can’t hold, rounded back | 3 sets |
| Calf and ankle mobilization | Ankle dorsiflexion | Heel lift, insufficient depth | Daily or pre-training |
You don’t need to do all of these every session—pick 2 to 3 targeted ones based on your weaknesses. For cyclists, I always include Romanian deadlifts and Bulgarian split squats, because posterior chain and unilateral strength are so critical to riding performance.
Debunking Four Common Squat Myths
Beyond the depth myth discussed earlier, here are a few claims I get asked about nearly every month and have to clarify nearly every month:
Myth One: “Squatting will wear down your knee cartilage, and you’ll regret it when you’re older.”
With appropriate loads and good form, squatting is actually a positive stimulus for joint health—regular loading maintains the health of cartilage and surrounding tissues and strengthens the muscles that support the knee. What truly harms knees is uncontrolled form, reckless load jumps, and prolonged complete inactivity. The lower-body weakness caused by years of sedentary sitting is a far greater long-term threat to your knees than regular training.
Myth Two: “A squat only counts if you go ass to grass.”
That’s a high standard from the powerlifting and weightlifting world, not a necessary goal for everyone. How deep you can squat is largely limited by the bony structure of your acetabulum and femur—that’s genetic and can’t be trained. For the general trainee, squatting to parallel or slightly below, fully controlled, is already a very good squat. Chasing extreme depth while sacrificing a neutral spine is not worth it.
Myth Three: “Wearing knee sleeves and a belt is the safest way to train.”
These are assistive equipment, not talismans. A belt can help build intra-abdominal pressure at heavy loads, but it shouldn’t become a crutch where you can’t use your core without it. Beginners should first develop their own core stability before talking about equipment. Light-weight training doesn’t need a belt at all.
Myth Four: “Squats only train the legs; upper body core doesn’t matter.”
Completely wrong. During a squat, your trunk core must resist the load to maintain stability. A weak core is the root cause of many people’s instability and rounded backs. That’s why I pair squats with planks, farmer’s carries, and other anti-rotation core work—its contribution to squat performance is often underestimated.
Recovery and Nutrition: The Other Half of Training Results
Many people think everything is decided in the moment of training, but actually you get stronger during recovery; training is just the signal telling your body “it’s time to get stronger.” A few practical points:
- Sleep: Sleep deprivation directly impairs strength recovery and muscle protein synthesis. Taiwanese people generally sleep too little. If you’re training hard but not progressing, and you’re constantly tired and sore, fixing your sleep will do more than changing your program.
- Protein: Muscle repair requires adequate protein. For generally training adults, a common practical recommendation is about 1.6 to 2.0 grams of protein per kilogram of body weight per day. For a 70 kg person, that’s roughly 110 to 140 grams per day. For those eating out, you can hit this by spreading beans, fish, eggs, meat, dairy, and soy milk across meals.
- Training frequency and soreness: Delayed onset muscle soreness (DOMS) is normal, but if it’s severe enough to interfere with daily life or your next session, it means your training volume jumped too fast. Progress gradually; don’t add too much at once.
- Hydration and electrolytes: Taiwan’s climate is humid and hot, so training causes heavy sweating. Hydration and adequate electrolytes are important, especially in summer.
One reminder here: no supplement is a necessity; balanced nutrition is always the foundation. If you’re considering any nutritional supplement, especially if you have a chronic condition or are on medication, consult a physician or dietitian first. Don’t blindly follow product marketing.
Actionable Advice for Readers at Different Levels
Complete Beginner (Never Seriously Trained the Squat)
- Spend the first 2 to 4 weeks getting bodyweight and goblet squats smooth; don’t rush to the bar.
- Train 2 times per week, 3 sets of 8 to 12 reps each, at an intensity where you “could still do 3 to 4 more reps.”
- Focus on movement quality, not the number on the bar.
- Taiwan’s community sports centers and civil sports centers usually have affordable, qualified coaching resources. Spending a few private sessions to build your foundation is well worth it.
Intermediate (Can Back Squat Steadily, Wants to Get Stronger or Bigger)
- Apply the program comparison table above to set intensity and sets based on your goal.
- Add front squats or Bulgarian split squats as variations to avoid fatigue and weakness accumulation from a single movement.
- Schedule a deload week every 4 to 6 weeks to let joints and the nervous system recover.
- If you also cycle or run, schedule heavy squat sessions on days far from important rides to avoid recovery conflicts.
Advanced (Pursuing Maximal Strength or Sport-Specific Performance)
- Periodize intensity and volume; don’t grind at 85%+ indefinitely.
- Use low-bar back squats, pause squats, tempo squats, and other variations to target weak points.
- Regularly review your form on video, or have a coach “dissect” your technique. The stronger you get, the more you need an external eye.
Endurance Athletes (Cycling, Running, Triathlon)
- Squatting helps climbing power, running economy, and injury prevention, but don’t train your legs so hard that it compromises your sport.
- Do 1 to 2 strength sessions per week, at moderate-to-high intensity with not too many reps, to avoid excessive muscle soreness.
- Bulgarian split squats and single-leg training are especially worth including to correct left-right imbalances.
Taiwan-Specific Context Reminders
A few very practical local details: Taiwan’s summers are hot and humid. If your gym has poor ventilation, long heavy training sessions can easily lead to dehydration and fatigue accumulation—remember to hydrate and don’t push through. On the diet side, hitting your protein target while eating out isn’t hard—add an extra serving of beans/fish/eggs/meat at a buffet, convenience store tea eggs and unsweetened soy milk, or fitness meal boxes are all convenient options. Try to get a meal with adequate protein after training to support recovery.
Regarding healthcare, Taiwan’s National Health Insurance is convenient. If you experience persistent knee pain, swelling, or inability to bear weight after squatting, don’t self-diagnose online or slap on medicated patches and delay. Go directly to an orthopedist or rehabilitation specialist, and arrange a physical therapy evaluation if needed. Early treatment saves far more trouble than waiting until it becomes a chronic problem.
FAQ
Q: How many times a week should I squat?
A: Beginners 2 times; advanced trainees can go 2 to 3 times. The key is balancing total volume with recovery, not maximizing frequency.
Q: Is it wrong if my knees go past my toes?
A: That’s an old myth. For most people, the knees naturally moving forward in line with the toes during the descent is normal, especially in the front squat. What you should actually avoid is knee valgus and heel lift, not forward knee travel itself.
Q: Do I have to squat very deep?
A: At least to parallel recruits the glutes and is relatively kind to the knee joint. Whether you can go deeper depends on your mobility and control. Work within your limits; don’t sacrifice a neutral spine for depth.
Q: Does squatting really relate to cycling power?
A: Strength training (including squats) helps maximal power for sprints and climbs, as well as fatigue resistance during long rides, and is widely adopted in endurance athlete training. But it’s a supplement to sport-specific training, not a replacement for riding itself.
Q: My knee hurts the day after squatting. Am I injured?
A: You need to distinguish between “muscle soreness” and “joint pain.” Delayed onset muscle soreness (DOMS) in the thighs and glutes after training is normal and usually resolves within one to three days. But if it’s sharp pain in the knee joint itself, swelling, catching, noticeable discomfort on stairs, or pain that persists, that’s not simple soreness. Reduce volume and get evaluated; don’t push through it.
Q: Do I have to use a barbell? Can I use dumbbells or kettlebells at home?
A: Absolutely. Goblet squats and dumbbell Bulgarian split squats can produce excellent training results at home, especially for beginners and those looking to maintain. Equipment is a tool, not the goal; what matters is movement quality and progressive overload. When you need heavier loads and home equipment isn’t enough, then consider a gym and a barbell.
Q: I’m older (55+). Is squatting still appropriate for me?
A: Very appropriate—in fact, I’d say “even more necessary.” Maintaining lower-body strength and function is critical for independence and fall prevention in middle-aged and older adults. Just start more conservatively: begin with bodyweight squats or assisted squats holding onto a stable object, choose depth within your limits, and add load slowly. If you have chronic conditions (such as hypertension, heart disease, arthritis, osteoporosis, etc.), consult a physician before starting, and ideally train under the guidance of a qualified coach or physical therapist.
Q: Will squatting make my legs huge?
A: Muscle growth is a relatively slow process that requires substantial training volume and caloric support. You won’t “accidentally” end up with bodybuilder legs. For most people, regular squatting brings firmer, more functional lower limbs, plus better metabolism and bone density support. If you want to control muscle size, adjust training volume and diet—not by avoiding squats.
Conclusion
Back to A-Zhe’s story. The sentence he later said to me most often was: “So it turns out my knees weren’t the problem—I was just squatting wrong all along.” The squat was never a dangerous movement. What’s dangerous is uncontrolled form, greedy weights, and no one teaching you how to generate force.
Put movement quality before weight, progression before impatience, and recovery before volume—these three things matter more than any fancy program. Find the right depth, fix your knee track, and choose the variation that suits your body. The squat will become a movement you can use for life, whether you want to get stronger, get bigger, or simply ride more comfortably up those long riverside climbs.
If you’re struggling with knee pain or form issues, don’t tough it out—find a qualified coach or physical therapist to actually watch you squat. Often a single session can pinpoint the problem that’s been stuck for three years.
This article is educational content and does not replace individual diagnosis or treatment advice from a physician, physical therapist, or dietitian. If you have cardiovascular, joint, or other health concerns, consult a professional before starting resistance training.
References
- Knee biomechanics of the dynamic squat exercise (compilation of research on squat knee biomechanics): https://www.lookgreatnaked.com/articles/the_biomechanics_of_squat_depth.pdf
- Comparison in Joint Angles and Joint Forces Between the … (research comparing joint angles and forces at different squat depths): https://scholarworks.calstate.edu/downloads/c534ft828
- ACSM 2026 Resistance Training Guideline Update (American College of Sports Medicine, first update in 17 years): https://acsm.org/resistance-training-guidelines-update-2026/
Related Reading
- Squat Variations Every Cyclist Should Train: A Complete Guide from Basics to Advanced
- The Revival of Isometric Training: The Underrated Science of Static Contractions, from Tendon Repair to Pain Management
- The Mechanics of Strength Training: Why “Form” Matters More Than “Weight”
- The Value of Squatting for Cyclists: How Deep, How Heavy, and How Often to Transfer to Pedal Power
一日北高常見問題大集合 | 攻略 | 路線 | 訓練 | 補給 | 自行車 單車 | 一日雙城 | 雙塔 | TWB北高360 | 屁股痛
6 年前
西進武嶺 免費訓練分析服務 Intervals | 練不夠還是練過頭?你哪一種類型選手?AI模型告訴你! | 備戰神器 | 公路車 訓練 | CT Yeh
4 年前
一日北高/長距離團騎 常見問題補充篇 / 組團或跟團的眉角 / 壯車友容易被瘦車友慢性拉爆 / 原來屁股痛可能是這個原因...? / 風場配速法 / 公路車 / CT Yeh
2 年前
台北闊瀨陡坡 騎旅 / 日本單車雜誌編輯車友臨時加入!/ 髮香才是最強的 / feat. 北迴歸線小隊 / 公路車 CT Yeh
6 個月前
大禹嶺 到 武嶺牌樓 全程前後實況錄影 | 北進武嶺 | 東進武嶺 | KOM | 訓練台 | 坡度分析 | Taiwan KOM Last 10 km HARD | 公路車
6 年前
滑雪新手們慘摔學習全紀錄(請開字幕),滑雪好好玩 | Snowboard + Ski | 岩原 スキー場 | 滑雪APP使用 | GoPro Max
6 年前
Never Stop 西進武嶺 前後雙機 完整全程錄影 訓練台 實境
8 年前
實景訓練台) 彰化經典百K 高強度喵團 90分鐘 跟著一起練功 2019 Indoor workout Changhua Classic 100 Taiwan
7 年前