The Complete Deadlift Guide: The Most Comprehensive Strength Movement—Technique, Variations, and Safety Explained All at Once
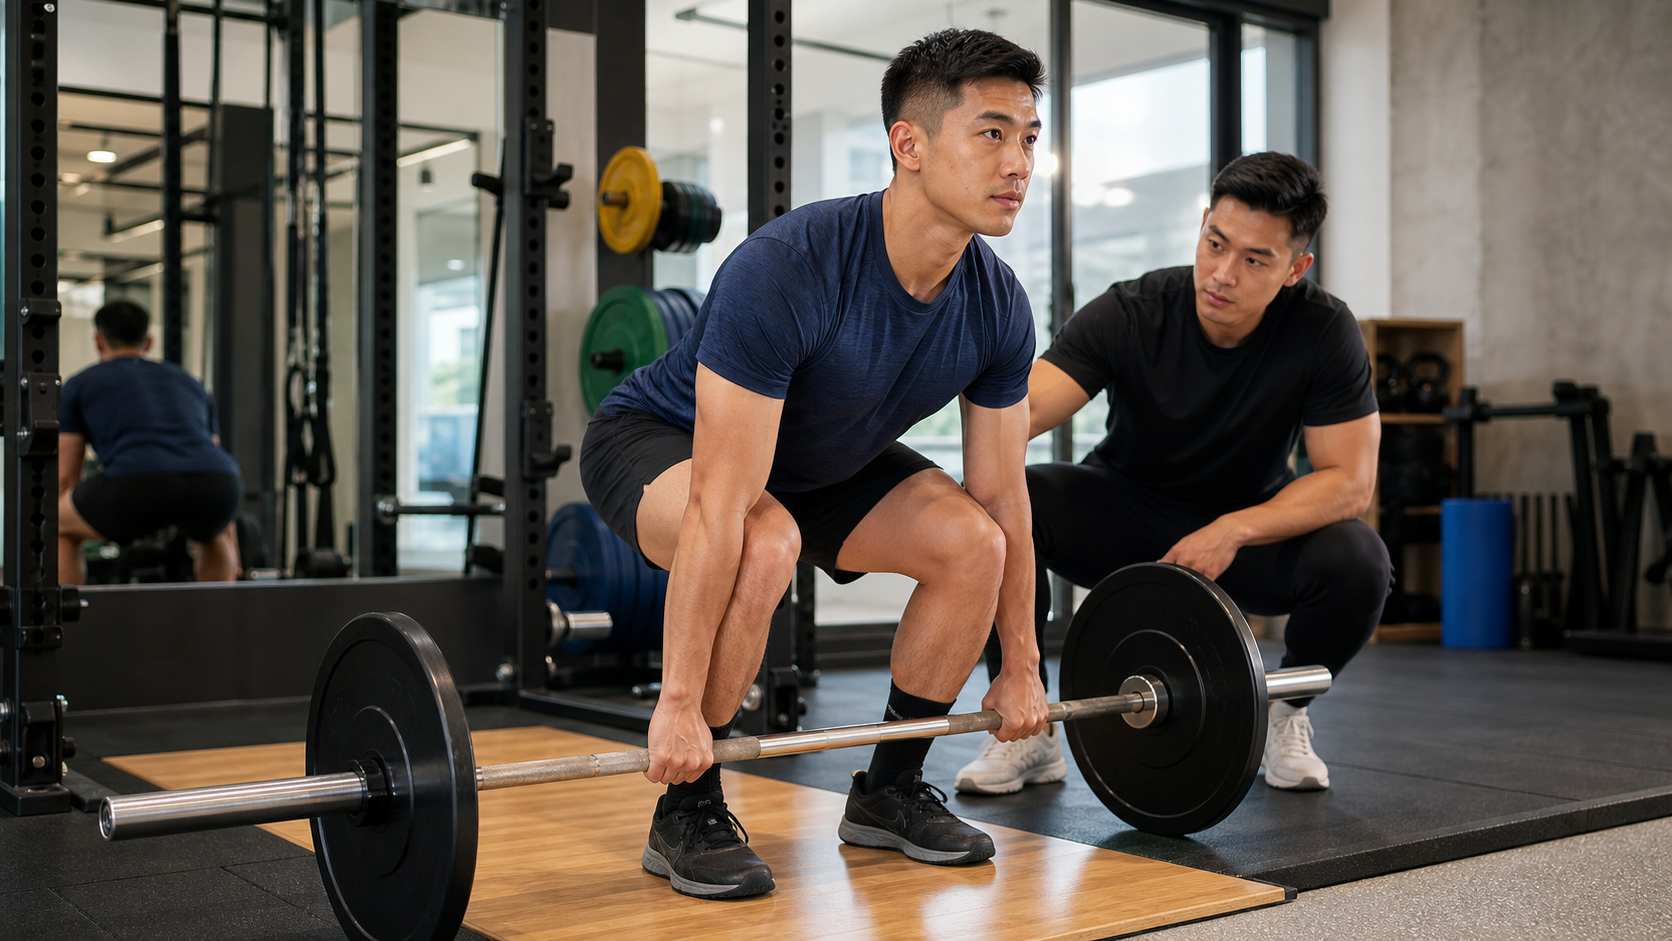
Starting with a Case of Lower Back Pain
I still remember that 42-year-old engineer in the tech industry. When he first came to me, he was frightened by his company health check report. High body fat, borderline blood pressure, and neck and shoulder tension so tight that turning his head hurt. He told me: “Coach, I don’t want anything fancy. I just want to train one most useful movement.”
Without hesitation, I told him: the Deadlift.
In fifteen years of coaching—from elementary school track athletes to people in their sixties who just want to “still be able to get around when they’re old”—if I had to keep only one movement out of all strength exercises, I would keep the deadlift. It recruits nearly every muscle of the posterior chain—gluteus maximus, hamstrings, erector spinae, latissimus dorsi, grip strength—while teaching your body the single most important movement pattern: how to safely pick something up off the ground. This isn’t just a gym skill; it’s an ability you’ll use your whole life to carry water jugs, pick up children, and haul furniture.
But the deadlift is also the movement I’ve seen the most people perform incorrectly, training their way into lower back pain. In this article, I’ll lay out fifteen years of experience, combined with the exercise physiology and biomechanics literature I’ve read in recent years, all at once. Whether you’re a complete beginner who’s never touched a barbell or an intermediate stuck at a plateau, you’ll walk away with something you can use immediately.
Let me state the conclusion first: the deadlift doesn’t injure your back—a deadlift performed incorrectly injures your back. And doing it right is simpler than you think.
I know many people have a psychological shadow around the word “deadlift.” Maybe it’s hearing a coworker say “he threw out his back doing deadlifts,” maybe it’s the scary injury videos online, or maybe it’s your own memory of bending over to lift something and feeling a “pop.” I completely understand that fear. But fear usually comes from “not understanding.” People who throw out their backs lifting things usually aren’t injured because they did a deadlift—they’re injured because they never learned how to properly pick something up. The deadlift, precisely, is the method that systematizes this ability, makes it trainable, and allows you to improve. Rather than fearing it, learn it—that’s the sentiment I most want to convey in writing this article.
Why the Deadlift? The Scientific Foundation of Strength Training
Strength Training Itself Is the Most Cost-Effective Health Investment
Before talking about the deadlift, I want to defend “weight training” itself. Many Taiwanese people—especially the older generation—hear “weight training” and immediately think it’s for young people building physiques, that it’s dangerous, that it causes injuries. The truth is exactly the opposite.
According to the World Health Organization (WHO) guidelines on physical activity, adults should, in addition to weekly aerobic exercise, perform muscle-strengthening activities targeting major muscle groups at least 2 days per week. The American Heart Association also recommends strength training at least twice a week. These recommendations aren’t to turn you into a bodybuilder; they exist because strength training has been repeatedly shown to improve bone density, joint function, metabolic rate, and the ability to perform activities of daily living.
An even more important concept comes from the American College of Sports Medicine (ACSM), which in recent years consolidated evidence from over one hundred systematic reviews covering more than thirty thousand participants: for most adults, the most critical factor isn’t training frequency, equipment type, or exercise selection—it’s “whether you do it consistently” and “whether you put in real effort.” The step from “not doing anything at all” to “doing any form of resistance training” yields the greatest health benefit.
I want you to remember that statement. It’s also the core philosophy I use with my clients: a training program you can sustain and perform without injury is a good training program. The deadlift is powerful precisely because a single movement covers a huge number of muscle groups—an extremely high return on investment.
The Posterior Chain: The Area Modern People Lack Most and Need to Train Most
For Taiwanese office workers and students, sitting eight to twelve hours a day is the norm. Prolonged sitting makes the glutes “forget” how to work, shortens the hamstrings, and causes the lower back to overcompensate. This kind of body is a breeding ground for lower back pain.
The core of deadlift training is called the “hip hinge”—folding the upper body forward using the hip joint as the axis, letting the glutes and hamstrings drive the effort rather than bending through the lower back. Learning the hip hinge is equivalent to recalibrating the movement patterns that prolonged sitting has broken. I often tell my clients: the deadlift isn’t just training muscles; it’s teaching your body to relearn how to move.
What Exactly Does the Deadlift Train?
Let me make it clear at a glance with a table. Here are the primary muscles recruited during a standard conventional deadlift and their functions:
| Muscle Group | Role in the Deadlift | Corresponding Daily-Life Ability |
|---|---|---|
| Gluteus maximus | Primary driver of hip extension | Standing up, climbing stairs, walking uphill |
| Hamstrings | Assist hip extension, stabilize the knee joint | Brisk walking, running, braking/deceleration movements |
| Erector spinae | Maintain spinal neutrality, resist flexion | Maintaining posture, lifting heavy objects without bending the back |
| Latissimus dorsi | Stabilize the barbell close to the body | Carrying heavy items, pulling movements |
| Quadriceps | Extend the knees during the initial break off the floor | Squatting down, standing up |
| Forearms and grip | Grip the barbell securely | Carrying bags, opening jars, grip strength as a longevity marker |
| Core (intra-abdominal pressure) | Support the spine, transmit force | Protecting the lumbar spine, stabilizing the torso |
See the grip strength row? Grip strength is one of the “longevity markers” that sports medicine has placed great emphasis on in recent years, and the deadlift is one of the few movements that can train grip strength heavily at the same time. That’s what “comprehensive” means.
How Much Load Does the Spine Bear? Know the Risk Before You Can Manage It
I’m not going to tell you the deadlift is “absolutely safe”—that would be dishonest. Every loaded movement carries its mechanical cost, and facing that honestly is the only way to manage it well.
According to recent biomechanical review studies, during heavy deadlifts, the compressive load on the lumbar spine (especially the L5-S1 segment) can reach approximately 5 to 18 kN, with shear loads of about 1.3 to 3.2 kN. These numbers sound alarming, and they do approach or even exceed some literature estimates of spinal segment injury thresholds. This is exactly why technique matters so much.
But the same body of research also gives us a crucial insight. Studies point out that the correlation between lower back injury and “workload spikes” in training is stronger than the correlation with minor technical flaws. In other words, compared to whether your back is slightly rounded on a given rep or whether your form is perfect, “suddenly adding too much weight or training too much this week” has greater predictive power for injury.
This has given me two principles I’ve used with clients my entire career:
- Technique should be good, but you don’t need textbook perfection—the body has the capacity to adapt and tolerate error. The spine grows stronger under training, and moderate variations in posture are not a disaster.
- Progressive overload matters more than anything—better to add weight slowly than to gamble on an injury for the sake of a number on the bar.
The research also specifically notes that for beginners or those with lower back concerns, the trap bar deadlift is mechanically friendlier and safer because it allows a more upright torso and a neutral grip. I’ll expand on this later.
For that engineer client, I didn’t even let him touch a barbell at first. We spent three weeks purely on hip hinge work and the trap bar. That’s “managing risk,” not “avoiding risk.”
The Spine Isn’t Glass—It’s Adaptive Tissue
I want to emphasize another commonly misunderstood concept. When people see numbers like “compressive load of 5 to 18 kN,” their instinct is “then I should stay far away from it.” But that’s the wrong conclusion. Your spine, intervertebral discs, ligaments, and muscles are all “living, adaptive tissue.” Just as bone becomes denser under load and muscle becomes stronger under resistance, your spine and its surrounding structures also become more tolerant and stronger under progressive loading.
What actually causes problems is bearing a load that exceeds your current capacity “without preparation”—for example, someone who never trains suddenly moving a refrigerator one day. Conversely, a person who regularly and intelligently builds up their deadlift weight slowly will have far greater load tolerance than the average sedentary person. This is why I believe appropriate deadlift training isn’t a “risk to your back”—it’s an “investment in protecting your back.” The key word is always those four characters: progressive overload.
Practical Methods: Breaking the Deadlift Down into Trainable Steps
Step One: Learn the Hip Hinge with Bodyweight
This is the step I consider most important, yet it’s the one most often skipped. The method is simple and can be done at home:
- Wall Test: Stand with your back to a wall about one foot-length away, hands on your hips (both sides of the pelvis), knees slightly bent and stationary. Push your butt “backward” to touch the wall, letting your upper body naturally lean forward. Throughout, the feeling should be “hips going back,” not “lower back bending down.”
- PVC Pipe Three-Point Contact: Hold a PVC pipe or broomstick against your back, keeping the back of your head, upper back, and tailbone in contact with the pipe at all times while performing the hip hinge. If any point loses contact, your spine has drifted out of position.
I require my clients to reach the point where “they can feel the glutes tightening with their eyes closed” before progressing to loaded work.
Step Two: Learn “Breathing and Intra-Abdominal Pressure”
Many people injure themselves deadlifting not because of posture, but because they “didn’t brace their belly.” The correct approach is a simplified version of the “Valsalva-like bracing” technique:
- Before lifting the bar, take a deep breath into your “belly” (not by shrugging your shoulders up to your chest).
- Imagine someone is about to punch your stomach. Brace the entire circumference of your abdomen (front, sides, back) outward, as if you’ve wrapped an air cushion around it.
- Hold that breath through one full repetition, then exhale and re-breathe after lowering the bar.
That “breath” is your natural weight belt protecting your lumbar spine. Core stability is often more critical than how many degrees your back bends.
Step Three: Standard Conventional Deadlift Technique Checklist
| Phase | Key Checkpoints | Common Cues |
|---|---|---|
| Starting stance | Bar against shins, mid-foot under the bar, feet hip-width apart | “Bar against legs” |
| Grip the bar | Hands outside the legs, scapulae directly above or slightly in front of the bar | “Shoulders over the bar” |
| Before lifting | Inhale and brace core, squeeze lats to “pull the bar toward you,” hips slightly lowered | “Brace, squeeze armpits” |
| Breaking off the floor | Push the floor away, bar travels vertically close to the body, hips and legs move together | “Push the floor” |
| Lockout | Stand tall, squeeze glutes, don’t overextend or lean back | “Stand tall, squeeze glutes” |
| Lowering | Push hips back first, bar stays close to the legs returning to the floor | “Hips back” |
The cue I remind people of most often is “push the floor, don’t pull the bar.” This mental image automatically helps most people get their center of gravity right and brings the legs into the movement, preventing them from pulling purely with the lower back.
Step Four: Don’t Skip the Warm-Up
Many people in Taiwan are pressed for time and go straight to heavy weights the moment they walk into the gym—something I really dislike seeing. The warm-up before deadlifting doesn’t need to be long, but it must be done. Here’s the standard warm-up protocol I give my clients, about ten minutes total, and well worth it:
| Phase | Content | Time/Sets | Purpose |
|---|---|---|---|
| Whole-body warm-up | Brisk walking, stationary bike, or jump rope | 3–5 minutes | Raise core body temperature, wake up the nervous system |
| Dynamic stretching | Hip circles, deep squats, leg swings | 10 reps each | Open up hip and ankle mobility |
| Glute activation | Glute bridges, clamshells | 2 × 12 | Get the “forgotten” glutes online first |
| Empty-bar warm-up | Hip hinge with just the empty bar | 1 × 8 | Build movement motor memory |
| Ramp-up sets | Build up from about 50% of working weight | 3–4 ascending sets | Let the body adapt to the day’s load |
Ramp-up sets are especially important. Don’t jump straight from warm-up to working weight. Climb up in steps of roughly 50%, 70%, 85% to give your nervous system and connective tissue time to prepare. Doing this step thoroughly is the habit I’ve seen most reduce injury rates while also letting you perform better on the day.
Six Variations: Find the One That Suits You Best
“Deadlift” isn’t just one movement. Different variations differ in training focus, how back-friendly they are, and which populations they suit. These are the six I’ve used most over fifteen years, organized into a comparison table:
| Variation | Primary Training Target | Lower Back Friendliness | Suitable For | Coach’s Notes |
|---|---|---|---|---|
| Conventional Deadlift | Full posterior chain, heavy erector spinae involvement | Moderate | Those with a foundation, those chasing heavy weights | Most comprehensive but higher technical barrier |
| Trap Bar Deadlift | Primarily glutes and legs, more quadriceps involvement | High | Beginners, those with sensitive lower backs, sedentary office workers | My first choice for beginners |
| Sumo Deadlift | Inner glutes, quadriceps | Moderate-high | Those with open hips, long legs with short torso | Shorter range of motion, more upright back angle |
| Romanian Deadlift (RDL) | Primarily hamstrings | Moderate | Those wanting to strengthen hamstrings, runners | Doesn’t touch the floor, constant tension, excellent for building mind-muscle connection |
| Stiff-Leg Deadlift | Maximum hamstring stretch | Moderate-low | Advanced lifters, those with good flexibility | Very demanding on hamstrings; keep volume conservative |
| Single-Leg Deadlift (Single-leg RDL) | Unilateral glutes and legs, balance | High | Correcting left-right imbalances, preventing falls | Excellent for fall prevention in older adults; can be very light |
How Would I Help You Choose?
- Complete beginner, sedentary office worker, or someone with previous lower back discomfort → I almost always start with the trap bar. It lets you stand more upright, keeps the bar at your body’s midline, and has a gentler learning curve—the best tool for “safely bringing someone through the door.” This also aligns with the research recommendations for beginners.
- Want to strengthen hamstrings and glutes specifically for running or cycling → Romanian Deadlift (RDL) is my favorite. Since many people here at CTYeh are cyclists and runners, the RDL is especially valuable for converting posterior chain endurance and power.
- Want to pursue absolute strength or compete in powerlifting → Conventional or sumo deadlift, depending on your body proportions.
- Older adults, poor balance, fear of falling → Single-leg deadlift. A pair of light dumbbells or even bodyweight is enough, and the fall-prevention benefit is very real.
For that engineer, I had him train the trap bar for two months. Once he developed the mind-muscle connection and his lower back no longer felt tight, we gradually transitioned to RDLs and conventional deadlifts. Six months later, his health check showed blood pressure back in the normal range, body fat down nearly 5%, and he had noticeably more energy. That’s not deadlift magic—it’s the compound interest of “consistent strength training.”
Don’t Overlook Assistance Exercises
Whether your deadlift improves is actually half determined by assistance exercises “outside the deadlift.” These movements reinforce your weak links, making the main program safer and more progressive. A few I commonly pair:
- Glute Bridge / Hip Thrust: Directly strengthens gluteal contraction, especially effective for people weak at lockout.
- Good Morning: Light-weight training for the erector spinae and hip hinge anti-flexion capacity—an excellent deadlift assistance exercise, but keep the weight conservative.
- Farmer’s Carry: Walking while carrying heavy objects trains grip, core, and overall rigidity. Easy to set up in Taiwanese gyms.
- Bird Dog / Dead Bug: Foundational core anti-rotation and anti-extension work, especially important for sedentary office workers.
These assistance exercises don’t need to be heavy. The point is to “fill in the weakest link in your deadlift.” Strengthen wherever you’re weak—that’s also the value of having a good coach assess you.
Common Errors and Fixes: These Are the Ones I’ve Watched for Fifteen Years
Error One: Rounded Back at the Start
Symptom: The moment the bar leaves the floor, the entire lower back arches.
Cause: Usually the core isn’t braced, the bar is too far from the body, or the hips start too high and you’re pulling with the lower back from the start.
Fix: Go back to “inhale and brace the core, pull the bar toward you with the lats,” and confirm that your shoulders are directly above or slightly in front of the bar at the start. Drop the weight first, get the pattern right, then add weight. Remember: a slightly rounded thoracic spine isn’t the end of the world, but the lumbar spine repeatedly flexing under load should be avoided.
Error Two: “Whipping” It Up with the Lower Back and Overextending at Lockout
Symptom: At the moment of standing up, the lower back hyperextends backward and the belly pushes forward.
Cause: Thinking you need to “stick your chest out all the way” to achieve lockout.
Fix: Lockout means “stand tall, squeeze glutes, tuck the ribs down.” Squeezing the glutes is the endpoint, not leaning back through the lower back. Excessive hyperextension is very unfriendly to the shear forces on the lumbar spine.
Error Three: The Bar Is Too Far from the Body
Symptom: The bar is in front of the feet, a fist-width away from the shins.
Cause: Fear of scraping the legs, or the starting stance wasn’t set up correctly.
Fix: The bar should travel almost in contact with the shins and thighs as it rises. Worried about scraping? Wear long socks. Every centimeter the bar drifts away from your body, your lower back carries more moment arm. This is one of the most cost-effective technique fixes there is.
Error Four: Training Too Much in a Week, Adding Weight Too Fast
This is the error I consider most dangerous, yet it’s the least discussed. It echoes the research mentioned earlier—injury correlates more strongly with “workload spikes” than with minor technical flaws. Many people actually have decent technique, but this week they see someone else pulling heavy, so they force it themselves—and that’s when something goes wrong.
Fix Principle: Keep the weekly increase in total volume (weight × reps) within roughly 10%. Stop when you feel you “could do about 2 more reps” (the RIR concept). The deadlift doesn’t need to be taken to failure every session.
Error Five: Ignoring the Lowering (Eccentric) Phase
Symptom: Very focused on pulling up, but on the way down the bar is “dropped” all at once.
Fix: The lowering phase should also be controlled—push the hips back, keep the bar close to the legs. Of course, if you’re doing heavy multi-set, multi-rep work, deliberately “dropping” the bar to avoid repeated eccentric loading on the spine is also a strategy—it depends on your training goals. Discuss it with your coach.
Action Plans for Readers at Different Levels
Below are the introductory program directions I actually give to clients at three different levels. These are frameworks, not rigid prescriptions—adjust them according to your own recovery status.
Complete Beginner (First 8 Weeks)
| Week | Exercise | Sets × Reps | Intensity Perception |
|---|---|---|---|
| Weeks 1–2 | Bodyweight hip hinge + PVC pipe | 3 × 10 | Pure movement learning, no load |
| Weeks 3–4 | Trap bar deadlift (light) | 3 × 8 | Easy, focus on form |
| Weeks 5–6 | Trap bar deadlift | 3 × 6 | Moderate, leave 3–4 reps in reserve |
| Weeks 7–8 | Trap bar deadlift + RDL | Deadlift 3×5, RDL 3×10 | Moderate, leave 2–3 reps in reserve |
- Frequency: 1–2 sessions per week is sufficient, aligning with the WHO direction of at least 2 days of muscle-strengthening per week.
- Focus: The goal of these eight weeks is “building the pattern and confidence,” not chasing weight.
Intermediate (Already Able to Perform Conventional Deadlifts with Standard Form)
- Main program: Conventional or sumo deadlift, 1–2 sessions per week, using linear progression, e.g., 5×5 or 3×5, adding small weight increments weekly.
- Assistance: RDL or trap bar as a variation on the second day to reinforce hamstrings and glutes.
- Key: Schedule a “deload week” roughly every 4–6 weeks, dropping the weight to 60–70% of normal to let the body absorb and adapt, avoiding workload spikes.
Older Adults / Sedentary Office Workers / Those with Previous Lower Back Discomfort
- Start with the trap bar or single-leg RDL, with very light loads, or even bodyweight first.
- 2 sessions per week, 2–3 sets per session, 8–12 reps per set, with intensity based on “feeling like you’ve exercised but not breathless or in pain.”
- Those with a medical history (e.g., disc problems, osteoporosis, poorly controlled hypertension) must consult a physician or physical therapist first and obtain individualized advice before starting. Breath-holding during loaded lifting (Valsalva) temporarily raises blood pressure; those with poorly controlled blood pressure need to be especially cautious. This absolutely must be confirmed with your medical team.
Special Notes for Cyclists and Runners
Many people here at CTYeh are cyclists and runners, and I especially want to say a few words to you. Endurance athletes are the most likely to neglect strength training, thinking “I’m not trying to get big, why do this?” But the truth is, a strong posterior chain directly translates into better pedaling power and running economy, and it significantly reduces injury risk over long distances.
Principles for arranging deadlifts for endurance athletes:
- Low volume, high quality: Your main sport is cycling or running; the deadlift is supplementary. 1–2 sessions per week, 2–4 working sets per session is enough. Don’t train so hard that it compromises the quality of your next day’s ride or run.
- Avoid scheduling around key sessions: Don’t do heavy deadlifts the day before a long ride or interval run. Give your legs time to recover. Ideally, schedule them after an easy day or a rest day.
- RDL is your best friend: It’s especially valuable for strengthening the hamstrings and glutes and preventing the hamstring strains common in runners, while placing relatively manageable stress on the lower back.
- Reduce volume in-season: As competition approaches, lower both the volume and intensity of deadlifts. Maintain the stimulus, but don’t let strength training steal the fresh legs you need for race day.
Treat strength training as “insurance that lets you ride farther, run longer, and get injured less.” You’ll find it’s a very worthwhile investment.
Local Context in Taiwan: Practical Details for Training the Deadlift Well
Choosing a Venue
The fitness environment in Taiwan is actually quite mature. Chain gyms, community-based strength training studios, and even many national sports centers all have barbells and trap bars available. My advice:
- Beginners should prioritize venues with coaches or busy hours. When you’re first learning the movement, having someone watch your back angle and give cues makes progress much faster.
- National sports centers offer great value for money and suit those on a budget who want to get started.
- If you truly can only train at home, a pair of adjustable dumbbells can handle RDLs, single-leg deadlifts, and trap bar alternatives—just as effective.
Taiwan’s Climate and Hydration
Taiwan’s summers are humid and hot. During strength training, you sweat heavily, and grip can slip due to sweaty hands. Recommendations:
- Use chalk (magnesium carbonate) or lifting straps to assist grip so you don’t have to end your session early because of slippery hands—but don’t let straps become an excuse to avoid training grip. Train bare-handed at lighter weights whenever possible.
- Hydrate before and after training. A single high-intensity session can result in fluid loss of several hundred milliliters to over a liter. By the time you feel thirsty, you’re already slightly dehydrated.
Nutrition Essentials for People Who Eat Out
For strength training to produce results, protein is key—and eating out in Taiwan makes it surprisingly easy to hit your targets:
- One palm-sized portion of protein per meal: A bento’s main dish, two braised eggs, a serving of unsweetened soy milk, or a serving of chicken breast are all good options. A general reference range for trainees is about 1.6 to 2.0 grams of protein per kilogram of body weight (this is a range, not a precise prescription—consult a dietitian for individual needs).
- Don’t fear carbohydrates: Appropriate amounts of rice or noodles on training days support recovery and performance.
- Buffet restaurants and convenience stores can both put together solid training meals. The key is “choosing deliberately.”
What to Do If Injured: Making Good Use of Taiwan’s Medical Resources
If you experience persistent pain, numbness, or lower-limb weakness after training, don’t self-diagnose online and tough it out. Taiwan’s National Health Insurance offers excellent accessibility—rehabilitation, orthopedics, and sports medicine clinics are all very convenient. For acute strains, follow relative rest first and seek medical evaluation if necessary. If you have neurological symptoms (numbness, tingling, weakness), seek medical attention promptly. Physical therapists can provide more precise movement assessments and progressive return-to-training plans.
FAQ
Q: Will deadlifting make my waist thicker or make me look bulky like a bodybuilder?
A: No. Muscle hypertrophy requires enormous training volume, caloric surplus, and time. For the average person, regular deadlifting produces a firmer physique and stronger functionality, not exaggerated size. Women especially need not worry—their natural hormonal environment makes it difficult to build massive muscles.
Q: I have mild lower back pain. Can I still deadlift?
A: For many people with lower back pain, appropriate hip hinge and deadlift training is actually part of recovery—but only on the condition that “you’ve been professionally assessed and you progress gradually from light loads.” During the acute phase or with neurological symptoms, seek medical attention first. Don’t confuse “mild discomfort” with “actively being injured.” That line should be judged by your physician or physical therapist.
Q: Do I need to pull maximum weight or train to failure every session?
A: No. Both research and experience tell me that training with 1–3 reps in reserve (RIR) leads to more stable long-term progress and fewer injuries. The deadlift especially is not recommended for routine training to failure.
Q: How many times a week should I deadlift?
A: For most people, 1–2 sessions per week of deadlifts or their variations is sufficient. Remember the ACSM’s core message: consistency and effort matter more than frequency and equipment.
Q: Can I use lifting straps? Is that cheating?
A: No. Using straps at heavy weights so you can focus on the legs, glutes, and back is a reasonable strategy. But at light to moderate weights, train bare-handed as much as possible to build grip strength along the way.
Q: Do I need a lifting belt?
A: Beginners don’t need one yet. A belt helps people who “can already brace their core on their own” gain a bit more intra-abdominal pressure support at heavy weights—it’s not a substitute for core work. First master bracing your core with bodyweight, then consider a belt at moderate-to-heavy weights. Relying on a belt too early actually lets your core slack off.
Q: Is it better to train in the morning or evening?
A: For deadlifting, most people have higher body temperature and more strength from afternoon to early evening, so performance is usually slightly better. But this difference is small for the average trainee. The time slot you can attend consistently long-term is the best time slot. Many people in Taiwan only have time early morning or after work—so warm up properly, get the work done, and don’t obsess over the clock.
Q: My lower back is a bit sore the day after deadlifting. Is that normal?
A: Muscle soreness (DOMS) 1–2 days after training is a normal adaptation response, typically “symmetrical on both sides, sore rather than sharp, and relieved by movement.” But if it’s “sharp pain on one side, numbness or electric sensations, worsening with movement,” that’s not simple soreness—stop and consider seeking medical evaluation. Learning to distinguish between the two is a self-protection skill every trainee should have.
Q: Is deadlifting unsuitable or unflattering for women?
A: Quite the opposite. The deadlift is one of the most efficient movements for building firm glute and leg lines. Many female clients who started deadlifting saw significant improvements in physique and strength, along with more daily energy. Gender has never been a barrier to the deadlift.
Conclusion: One Movement, a Lifetime of Benefit
Let’s return to that engineer from the beginning. Six months later, he said something to me that I loved: “Coach, now when I carry bottled water up the stairs, my back doesn’t even cross my mind.”
That’s the most precious thing about the deadlift. It doesn’t just give you strength in numbers—it gives you trust in your own body: trust that you can safely bear load, that you can move well, and that you won’t be defeated by all the “carrying, lifting, hauling, and holding” that life throws at you.
No matter how old you are today or what your starting point is, the deadlift is worth the time to learn properly. Take it slow. Start with the hip hinge. Start with the trap bar. Get the technique right, and add load more slowly than you think you need to. You’ll find that this “most comprehensive strength movement” gives back far more than just muscle.
Next time you’re at the gym, go find that barbell. Your posterior chain has been waiting too long.
Finally, I want to distill fifteen years of coaching into three sentences for you to paste on the first page of your training notebook:
- Learn the hip hinge first; talk about weight later. Once the movement pattern is right, weight is just a matter of time. If the pattern is wrong, adding weight is just accumulating injury.
- Progress gradually; slow is better than fast. Injuries almost always come from workload spikes, not from one imperfect rep. Give your body time to adapt.
- When in doubt, seek a professional. Coaches, physical therapists, and sports medicine clinics are easy to find in Taiwan. One professional assessment can save you six months of rehabilitation.
Keep these three sentences in mind, and the deadlift will become one of the best training partners of your life. Train safely, train for the long haul, and build that grounded trust in your own body. See you at the bar.
This article is educational content and cannot replace individual diagnosis and treatment advice from a physician, physical therapist, or dietitian. If you have lower back pain, disc problems, osteoporosis, hypertension, heart disease, or other chronic conditions, consult your medical team before beginning any loaded training program to obtain an individualized assessment.
References
- World Health Organization Guidelines on Physical Activity and Sedentary Behaviour: https://www.ncbi.nlm.nih.gov/books/NBK566046/
- American College of Sports Medicine — 2026 Resistance Training Guidelines Update: https://acsm.org/resistance-training-guidelines-update-2026/
- American Heart Association — Strength and Resistance Training Exercise: https://www.heart.org/en/healthy-living/fitness/fitness-basics/strength-and-resistance-training-exercise
- Low Back Biomechanics during Repetitive Deadlifts: A Narrative Review: https://pmc.ncbi.nlm.nih.gov/articles/PMC9837526/
- Beyond the Neutral Spine: A Narrative Review and Modern Framework for Low Back Injury Prevention in Deadlifting: https://www.mdpi.com/2075-4663/14/4/151
Related Reading
- Flexibility and Injury: Does Stretching Really Prevent Injury? A Coach’s Evidence and Practice from 15 Years of Coaching
- The Importance of Deadlifts for Runners: Building a Stronger Posterior Kinetic Chain
- Pain Doesn’t Mean Broken: Using Exercise to Manage Chronic Pain—Mechanisms, Graded Exposure, and Breaking Fear-Avoidance
- The Complete Squat Guide: A Coach’s Practical Manual from Mechanics and Common Errors to Level-Based Programming
Never Stop 西進武嶺 前後雙機 完整全程錄影 訓練台 實境
8 年前
CT 喇低賽) 武嶺牽車 才是王道 西進牽車四小時內秘訣 攝手位置 如何判斷 防抽筋小秘訣
7 年前
一日北高常見問題大集合 | 攻略 | 路線 | 訓練 | 補給 | 自行車 單車 | 一日雙城 | 雙塔 | TWB北高360 | 屁股痛
6 年前
CT趣訪 西進武嶺 2小時組 EP2 全村的希望 蔣緯緯! 訓練菜單&技巧公開 |公路車 |CT Yeh
4 年前
滑雪新手們慘摔學習全紀錄(請開字幕),滑雪好好玩 | Snowboard + Ski | 岩原 スキー場 | 滑雪APP使用 | GoPro Max
6 年前
一日北高/長距離團騎 常見問題補充篇 / 組團或跟團的眉角 / 壯車友容易被瘦車友慢性拉爆 / 原來屁股痛可能是這個原因...? / 風場配速法 / 公路車 / CT Yeh
2 年前
一個測試有沒有認真練車的方法😂 #公路車
10 個月前
大禹嶺 到 武嶺牌樓 全程前後實況錄影 | 北進武嶺 | 東進武嶺 | KOM | 訓練台 | 坡度分析 | Taiwan KOM Last 10 km HARD | 公路車
6 年前