Shikoku Karst Sky Road Practical Guide: 13.6 km of Scenic Highland, Top-Tier Views for Moderate Effort
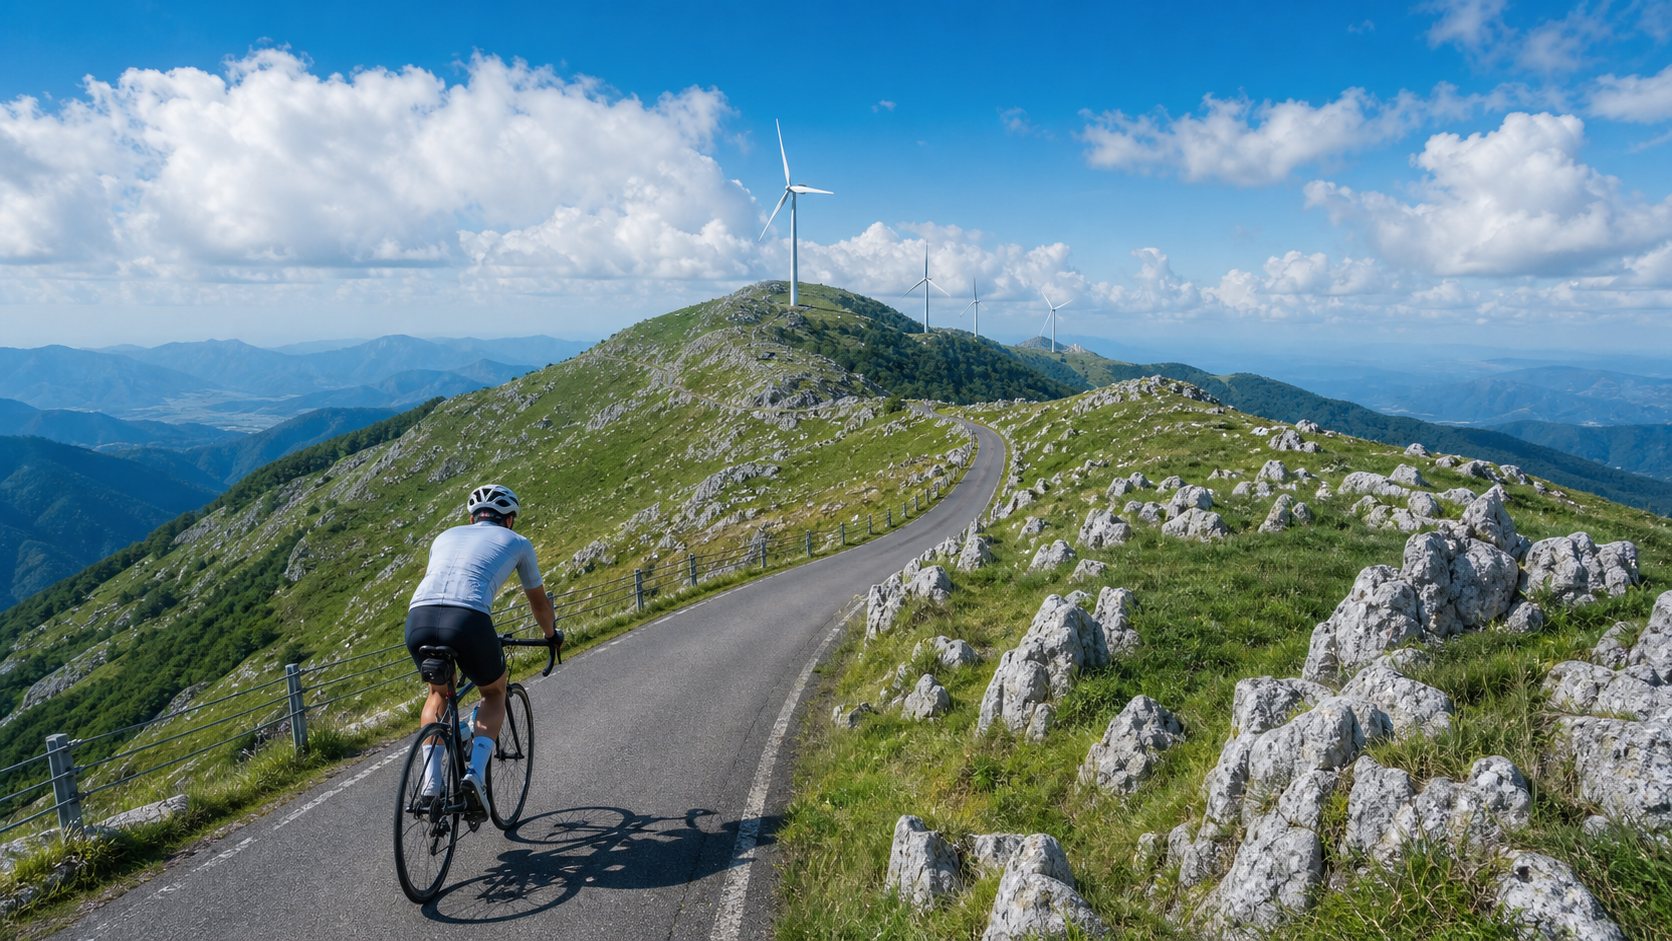
If Mount Tsurugi is a grueling battle against gravity, then the Shikoku Karst (四国カルスト) is a scenic journey to the sky. This mountain route, located in Kumakōgen Town, Ehime Prefecture and straddling the border between Ehime and Kōchi Prefectures, is hailed as the “Roof of Shikoku” and the “Road to the Sky.” Its riding difficulty is moderately challenging, but the visual impact it rewards with is enough to leave every cyclist with an unforgettable memory.
Let’s lay out the core data first. The most representative Strava climb segment on the Shikoku Karst is: a segment distance of approximately 13.60 km, a total elevation gain of approximately 897 m, and an average gradient of approximately 6.6%. To put it in perspective, 13.6 km accumulating nearly 900 meters of climbing means an average of about 66 meters of elevation gain per kilometer—a climbing density that falls into the “moderately solid” tier. It’s not as brutal as Mount Tsurugi, but it’s by no means an easy sightseeing route. An average gradient of 6.6% means this is a route that demands your full attention and climbing skills, yet its intensity distribution is relatively forgiving, leaving you with enough energy to look up and admire the unparalleled karst scenery.
The charm of the Shikoku Karst lies in its exceptional “value for effort”: pay a moderate climbing price, and you get the top-tier scenery of one of Japan’s three great karst terrains. This is a dream route “worth riding for the views.”
What makes this route most alluring is its unique landform. The Shikoku Karst is one of Japan’s three great karst terrains, with elevations ranging from about 1,000 to 1,400 meters. White limestone rocks are scattered sparsely across an endless green grassland, and with the massive wind turbines standing along the ridgeline, the scene forms a surreal picture that seems to come from another world. When you climb up to this highland, the vista unfolding before your eyes will make you wonder whether you’re still in Japan—or even still on Earth.
Route Overview and Real Data Analysis
The Shikoku Karst spans both Ehime and Kōchi Prefectures, and the route can be approached from different directions, each with varying intensity and length. Below are several key data points to give you a comprehensive understanding of the route.
| Route / Segment | Distance | Elevation Gain | Average Gradient | Characteristics |
|---|---|---|---|---|
| Strava representative timed segment | Approx. 13.60 km | Approx. 897 m | Approx. 6.6% | Moderately solid, continuous spectacular views |
| Kōchi side (starting from Michi-no-Eki Fusegazaka) | Approx. 32 km one way | Approx. 1,650 m cumulative gain | — | Long and demanding, suited for advanced riders |
| Himezuru-daira to Tengu Highlands | Approx. 4 km | — | Gentle undulations | The highlight scenic section of the Shikoku Karst |
One thing that needs special explanation is the meaning behind the “total elevation gain” figure. Taking the route from the Kōchi side starting at Michi-no-Eki Fusegazaka as an example, the one-way distance is about 32 kilometers with a cumulative elevation gain of about 1,650 meters—a considerably long and tough journey. The Strava 13.60 km representative segment, on the other hand, focuses on the core climbing essence. Here, it’s important to remind riders of a key concept: “cumulative elevation gain” (accumulated climbing) is different from the “net elevation difference” between start and finish. The karst highland itself is undulating terrain, and the route goes up and down repeatedly across the plateau, so the cumulative climbing figure often exceeds the simple elevation difference between start and finish. The work your legs have to do is closer to the cumulative climbing number.
The Highlight Section: Himezuru-daira to Tengu Highlands
If you had to pick one section of the entire Shikoku Karst route that is “absolutely unmissable,” it would undoubtedly be the core highlight segment of approximately 4 km between Himezuru-daira and the Tengu Highlands. The gradient in this section is relatively gentle, yet it concentrates the most extreme scenery of the Shikoku Karst: verdant grasslands dotted with white limestone, leisurely grazing cattle, giant wind turbines turning in the breeze, and the “Road to the Sky” stretching endlessly as if meeting the heavens.
Precisely because this section has friendly gradients and overwhelming scenery, it is the golden zone on the entire route—“for enjoying, not for pushing hard.” Smart riders save their energy for this stretch, then slow down and, with the most composed demeanor, etch this spectacular scenery deeply into their memory.
Stage-by-Stage Guide from Start to Finish
Below, following the logic of “climb to the highland first, then enjoy the highland highlight section,” the route is broken down into several stages for analysis. Regardless of which side you enter from, this alternating structure of “climbing segments” and “highland scenic segments” is the core of riding the Shikoku Karst.
Stage 1: Climbing from the Foothills (Establishing a Rhythm)
Departing from the starting point at the foothills, the route immediately enters a climb. This section is pure climbing “work zone,” with gradients falling in the normal range of around 6%. The strategy, as with all long climbs, is: be conservative in the early stages, keep your heart rate in the aerobic zone, and find a pedaling rhythm you can sustain for a long time. Although the Shikoku Karst is of moderate intensity, if you approach from the Kōchi side on the long route, the total distance and cumulative elevation gain are considerable, and surging too hard early on will cost you.
In terms of gear usage, maintain a comfortable cadence of 75 to 85 rpm, allowing your legs to output steadily with low load and high efficiency. There isn’t much scenery in this section, so treat it as the necessary path leading to paradise, and steadily grind your way up in elevation.
Stage 2: Approaching the Highland (Scenery Gradually Improving)
As elevation rises, the views begin to open up, and you’ll notice changes in vegetation and terrain—forests gradually recede, replaced by increasingly open grassland landscapes. This is an exhilarating signal: you’re approaching that legendary karst highland.
The gradient in this section may still have ups and downs, but your mood will grow more and more excited with the changing scenery. It’s recommended to start “adjusting your breathing and mindset” here, preparing to welcome the spectacular views about to unfold. At the same time, this is a good opportunity to assess your physical condition and decide at what pace you want to enjoy the highlight section.
Stage 3: Himezuru-daira to Tengu Highlands (Scenic Highlight, Slow Down and Enjoy)
Welcome to the heart of the Shikoku Karst. This approximately 4 km stretch from Himezuru-daira to the Tengu Highlands has gentle gradients and is the visual climax of the entire route. The riding philosophy here is just one word: slow.
Slow down, and even stop from time to time. Watch how the white limestone dots the verdant grassland, watch how the giant wind turbines turn slowly beneath the blue sky, watch how the leisurely cattle graze with heads lowered on the highland. This is a “Road to the Sky,” and every meter you ride feels like walking along the boundary between heaven and earth. Turn off the bike computer, forget about your times, and use your eyes and your heart to savor and store away this spectacular scenery. This is the real reason you traveled all the way to the Shikoku Karst.
On the highlight section from Himezuru-daira to the Tengu Highlands, the biggest mistake is “riding too fast.” You’re not here to set records; you’re here to witness Japan’s most magnificent highland scenery. Slowing down is the greatest respect you can pay to this landscape.
Stage 4: Extension Toward Ōnogahara (A Continuous String of Scenic Spots)
The spectacular scenery of the Shikoku Karst doesn’t end at the Tengu Highlands. Heading toward Ōnogahara, the scenic spots continue without interruption. Tengu Highlands, Himezuru-daira, and Ōnogahara—this series of highland attractions strung together forms the complete and richly varied scenic gallery of the Shikoku Karst. Riders with extra energy and ample time will find it well worth extending the route to explore this highland more thoroughly.
However, it’s also worth noting that extending the route means more mileage and more cumulative elevation gain. Be sure to assess your physical condition and available time, and save enough energy for the return trip.
Gear Ratio and Equipment Recommendations
The average gradient of the Shikoku Karst is 6.6%, which is moderate but with some substance. The gear ratio selection doesn’t need to be as extreme as Mount Tsurugi, but it’s still recommended to bring a sufficiently wide gear range, especially if you choose the longer route on the Kochi side.
| Rider Level | Recommended Chainring | Recommended Cassette | Notes |
|---|---|---|---|
| Advanced/Strong | 50-34 (Compact) | 11-30 or 11-32 | More than enough for the rolling terrain |
| General Enthusiast | 50-34 (Compact) | 11-32 or 11-34 | The most mainstream and safe setup |
| Conservative/Long-distance | Compact or Semi-Compact | 11-34 and above | Lighter gearing recommended for the long Kochi-side route |
Key points on equipment:
- Wheels: Since this is primarily a climbing route, mid-to-low profile wheels are more suitable. However, note that the Karst plateau is open terrain where winds can be strong (remember, those large wind turbines stand there precisely because it’s windy). Excessively deep rims will make handling more difficult in crosswinds.
- Clothing: The plateau sits at approximately 1,000 to 1,400 meters above sea level, with large temperature swings between morning and evening. Winds on the mountain can also be quite strong and cold. Be sure to carry a windproof and insulated jacket, even in summer.
- Sun Protection: The Karst plateau is open with little shade, and sunlight is direct and intense. Sunscreen and sunglasses are absolutely essential.
- Camera: This is the most “special” piece of essential gear for the Shikoku Karst. This breathtaking scenery deserves to be captured in the best possible way—don’t let a dead battery or full memory card become your only regret.
Nutrition and Hydration Strategy
Supply points on the plateau are relatively scarce, and this must be planned in advance. The stunning views of the Shikoku Karst are captivating, but they also mean you’re in highlands far from urban areas—you can’t expect convenience stores around every corner.
- Water: Make sure your bottles are full before you start climbing. With strong sunlight and dry winds on the plateau, dehydration can set in faster than you think. Even if the weather isn’t particularly hot, remember to hydrate regularly.
- Energy: For long rides (especially the Kochi-side route), glycogen depletion is significant. Prepare ample energy supplies and refuel every 30 to 40 minutes.
- Supply Point at Himezuru Pass: It’s worth noting that there’s a bicycle rental station near Himezuru Pass (operating roughly from early April to early November). This means the area has relatively established infrastructure and visitor traffic, making it a good node to plan for resupply and rest.
Weather and Seasonal Considerations
The best season to visit the Shikoku Karst is closely tied to the nature of its scenery.
- Late Spring to Early Autumn (approximately April to November): This is the best season to visit the Shikoku Karst. The grasslands are lush green, the weather is relatively stable, and the bicycle rental station at Himezuru Pass operates during this period. The verdant summer grasslands and the clear autumn skies each offer their own charm.
- Watch for Plateau Weather: With its high elevation and open terrain, weather conditions can change dramatically. Clear skies and thick fog, warmth and cold winds, can alternate within a short span of time. Be sure to check real-time forecasts and carry both warm and rain gear.
- Winter: The plateau may experience snow accumulation and icy conditions. Both road conditions and climate are unsuitable for general riders, and some facilities may cease operations. It’s not advisable to go during this time.
Common Mistakes and DNF Risks
- Underestimating Total Distance and Elevation Gain: Especially for those choosing the long Kochi-side route—if you assume “moderate gradient means easy,” you’ll often run out of energy in the latter half. The one-way distance is approximately 32 kilometers with about 1,650 meters of elevation gain—absolutely not to be taken lightly.
- Pacing Too Fast in the Early Section: Being lulled by the moderate gradient, riders push too hard at the start, leaving themselves without the energy to properly enjoy the highlight sections—or even blowing up entirely.
- Ignoring Plateau Warmth and Strong Winds: The temperature swings and wind conditions on the plateau are often underestimated. Insufficient clothing can easily lead to getting chilled.
- Insufficient Supplies: Misjudging how sparse supply points are on the plateau, riders don’t bring enough water and energy.
- Prioritizing Photos Over Safety: With such stunning scenery, getting overly distracted by photography while ignoring road conditions and oncoming traffic actually increases risk. Always stop in a safe spot to take photos.
Target Time Estimates for Different Rider Levels
The following provides rough target completion times for the representative 13.60-kilometer timed segment on Strava. Actual times vary by individual, weather, and road conditions. The core value of this route lies in “enjoying the breathtaking scenery”—don’t lose sight of that by obsessing over performance:
| Rider Level | 13.6 km Climb Target Time | Profile |
|---|---|---|
| Elite Competitive | Under 45 minutes | High power-to-weight ratio |
| Advanced Enthusiast | 50 to 60 minutes | Regular training |
| General Enthusiast | 65 to 80 minutes | Steady completion, enjoying the scenery |
| Conservative/Scenic | Over 80 minutes | Prioritizing the views above all |
And if you’re tackling the long Kochi-side route of approximately 32 kilometers one way, treat it as a half-day to full-day cycling journey when planning your time. Allow ample time for rest, refueling, and photos, and be sure to assess the total hours and energy required for the round trip.
The Shikoku Karst is a dream route that “rewards moderate effort with top-tier scenery.” It doesn’t brutally push you to your limits like Mount Tsurugi does; instead, it invites you up to the roof of Shikoku with a relatively friendly demeanor, to witness firsthand the surreal beauty of one of Japan’s three great karst landforms. Pace yourself well, bring the right gear, have your camera ready—then, on the Sky Road from Himezuru Pass to Tengu Highlands, slow down and let this otherworldly landscape become the brightest page in your cycling story.
What the Shikoku Karst teaches riders is this: cycling doesn’t always have to be about giving your all. Sometimes, slowing down and truly taking in the scenery before you is the most precious gift this sport has to offer.
Deep Dive: How Karst Topography Shapes Your Riding Experience
To truly understand what makes the Shikoku Karst route unique, you first need to understand “karst topography” itself. Karst is a distinctive landform created by the long-term dissolution of soluble rocks (primarily limestone). Rainwater and groundwater slowly dissolve the limestone, and over vast geological timescales, this process sculpts solution grooves, limestone pinnacles, depressions, and those exposed rock formations scattered across the grasslands like a white megalithic array.
The Shikoku Karst is an outstanding representative of this landform, which is why it ranks among Japan’s three great karst regions. As you ride across this plateau, those white rocks scattered sparsely across the emerald grasslands aren’t randomly placed stones—they are geological artworks carved by millions of years of dissolution. Understanding this, the scenery before your eyes becomes more than just “beautiful”; it gains a layer of awe for the power of nature.
The direct impact of this topography on your riding experience is: extremely open sightlines. Because the karst plateau has sparse trees and vast grasslands, your line of sight is almost unobstructed, allowing you to see all the way to the distant horizon. This sense of openness is the origin of the “Sky Road” moniker and the biggest difference between the Shikoku Karst and typical tree-lined climbing routes. You’re not climbing while surrounded by forest—you’re riding as if along a dividing line between heaven and earth, with boundless grassland and sky on both sides.
Wind Turbines and Wind: Two Sides of the Open Plateau
The massive wind turbines standing along the ridgeline of the Shikoku Karst are among the most recognizable landmarks of this plateau. They stand upon the grasslands, slowly turning in the wind, adding another touch of otherworldly romance to this surreal landscape.
But as a rider, you must clearly understand: the wind turbines are here precisely because it’s windy here. The open plateau terrain offers no barriers to shield you from the wind. Just as you’re leisurely enjoying the scenery on the highlight sections, strong crosswinds or headwinds can appear at any moment. This affects riding in two ways: first, the wind significantly lowers the perceived temperature, so it can feel cold even in summer; second, crosswinds affect bike handling stability, especially when riding deep-section wheels—extra caution is required.
So, the “wind” of the Shikoku Karst is a double-edged sword: it creates the beautiful wind turbine landscape and the open Sky Road, yet it’s also a challenge riders must seriously address. Bringing adequate warm clothing, choosing appropriate wheels, reducing speed and gripping the handlebars firmly in strong wind sections—these are essential practices for riding safely on this plateau.
Grazing Cattle: A Gentle Landscape Coexisting with the Grasslands
Another unforgettable scene on the Shikoku Karst is the cattle grazing leisurely on the highland pastures. These cattle roam and graze freely across the grassland, creating a serene and healing pastoral tableau that adds a touch of warmth and vitality to this highland.
For riders, the presence of the cattle also serves as a gentle reminder: this is their home, and you are the visitor. When riding, please slow down, maintain a safe distance, and do not disturb them. If cattle appear near the road, be sure to reduce speed, ride cautiously, and yield patiently. Coexisting harmoniously with the life on this highland is also the proper attitude for riding the Shikoku Karst.
When you slow down, watching the cattle at ease among the white rocks and emerald grasslands, watching the wind turbines slowly turning in the distance, watching cloud shadows drift across the meadows—at that moment, you will deeply understand what it means to “enjoy peaceful times.” This tranquility and vastness are precisely the rarest and most precious healing that urban life lacks.
Photography Tips: How to Bring the Spectacular Views Home
The Shikoku Karst is a route “born for photography.” Such breathtaking scenery deserves to be captured with the utmost care. Here are some practical photography tips to make your trip truly worthwhile.
First, make good use of light. The low-angle light of early morning and late afternoon can bring out the layers of the grassland, the three-dimensionality of the rocks, and the silhouettes of the wind turbines more distinctly—these are the golden hours for shooting. Although the overhead light at noon is bright, it offers weaker depth and can make images look flat.
Second, use the terrain and landmarks for composition. Using the winding “Road to the Sky,” the standing wind turbines, the scattered white rocks, or the leisurely cattle as visual guides or subjects can give your photos more narrative depth and a sense of space. A road stretching toward the horizon can often produce images with striking impact.
Third, don’t forget to include yourself and your bike in the frame. Against such a magnificent backdrop, a small figure of a rider can actually accentuate the vastness of the sky and earth, while leaving you with the most memorable shots of the journey.
Finally, and most importantly: safety always comes before photography. Be sure to park your bike in a safe location that does not obstruct traffic before taking photos, and never linger in the middle of the road, on curves, or in areas with poor visibility. No matter how beautiful the photo, it is never worth more than your safe return home.
To the Riders Who Dream of the Road to the Sky
The Shikoku Karst is a route that will overturn your imagination of what “cycling” can be. It trades a moderate climbing difficulty for top-tier scenic rewards; it uses its open Road to the Sky to heal every soul worn down by urban life.
When you decide to take on the challenge, bring ample physical preparation, sufficient warm and sun-protective gear, and a heart willing to “slow down.” Because the most precious thing about the Shikoku Karst is never the speed at which you conquer it, but the pure emotion that wells up inside you when you slow your pace on the Road to the Sky and gaze breathlessly at that otherworldly scenery.
Climb to the rooftop of Shikoku, stand at the boundary between heaven and earth, let the mountain wind blow past, let the wind turbines turn slowly in the distance, let the white rocks and emerald grasslands stretch endlessly before your eyes—at that moment, you will understand that every drop of sweat and every ounce of effort on this journey was utterly worthwhile. May you ride out your own dream leading to the sky on this Road to the Sky.
Training and Physical Preparation: Making Your Body Worthy of This Scenery
Although the Shikoku Karst is of moderate difficulty, if you choose the longer route—approximately 32 kilometers one-way from the Kochi side with about 1,650 meters of elevation gain—the demands on your endurance are actually considerable. To ensure your body is “worthy of” this scenery, allowing you to complete the challenge with ease and still have energy to enjoy the views, here are some directions for preparation.
Building long-distance endurance is the top priority. If you take the long route on the Shikoku Karst, the total distance and cumulative elevation gain are substantial; you need a solid aerobic endurance base to still have the strength to enjoy the highlight sections and return safely after completing the climbs. It is recommended to schedule several long-distance rides at a steady intensity during your training cycle before the challenge, so your body becomes accustomed to sustained exercise over extended periods.
Climbing endurance on moderate gradients is equally crucial. The gradients on the Shikoku Karst mostly fall in the 6% to 7% range—a gradient that is “not too steep, but lasts a long time”—which tests whether you can sustain a steady output over an extended period. Finding similar gradient sections near your home and performing longer, steady climbing training is the most direct way to prepare.
Adaptation to the highland environment is also worth noting. The Shikoku Karst sits at an elevation of approximately 1,000 to 1,400 meters. While it is unlikely to trigger severe altitude sickness, the reduced oxygen content in the air, combined with strong highland winds and temperature swings, will make riding feel more strenuous than at sea level. If conditions allow, accumulating some high-altitude riding experience beforehand will help you feel more at ease during the actual challenge.
A well-prepared rider can maintain composure through every climb on the Shikoku Karst and pause leisurely before every scenic vista; an under-prepared rider, however, may be worn down by the mileage and elevation, missing the chance to fully appreciate this Road to the Sky. Don’t let your fitness become the distance between you and the scenery.
May you reach the rooftop of Shikoku in your best condition, and take the magnificent scenery of one of Japan’s three great karst plateaus—deeply and completely—into your memory and your heart.
Related Reading
- Riding the Line Between Sky and Earth: The Spectacular Views, Wind Turbines, and Peaceful Moments of the Shikoku Karst Sky Road
- UFO Line Sky Road Practical Guide: Don’t Be Fooled by the 3.9% Average—The Endurance Truth of 42 km of Ridge Undulations
- Mount Tsurugi Hill Climb Practical Guide: Nearly 2,000 Meters of Climbing in 15 km—A Complete Analysis of Shikoku’s Hardcore Sacred Mountain
- Hachimantai Aspite Line (Iwate Side) Complete Guide: Data Analysis of a 19 km, 1,083-Meter Elevation Gain Volcanic Sky Corridor Climb
台北闊瀨陡坡 騎旅 / 日本單車雜誌編輯車友臨時加入!/ 髮香才是最強的 / feat. 北迴歸線小隊 / 公路車 CT Yeh
6 個月前
台灣登山王之路 KOM 全程參賽4K臨空錄影 PART1 穿越峽谷地形! #東進武嶺 太魯閣 / 燕子口 / 天祥 / 西寶 PART1 (公路車 / CT Yeh)
3 年前
2025 乘鞍岳登山賽 比賽全紀錄篇 / 完整路線攻略介紹 / 日本版武嶺 公路最高點 / 高山空拍絕景 / 明年會開團! / 公路車 / CT Yeh
10 個月前
新竹羅平 x 天湖部落 大禹嶺級變態陡坡! 4K超高畫質 空拍 | 公路車
5 年前
2025 乘鞍 KOM 登山賽挑戰實錄 / 日本公路最高 ! 賽前探路篇 / 比富士山厲害,無敵絕景!/ 40週年 / 中文YT首發 / 公路車 / CT Yeh #乘鞍ヒルクライム
10 個月前
大禹嶺 到 武嶺牌樓 全程前後實況錄影 | 北進武嶺 | 東進武嶺 | KOM | 訓練台 | 坡度分析 | Taiwan KOM Last 10 km HARD | 公路車
6 年前
爬坡ITT實境)台中 魔王 松鼠坡 首航 6:12 大肚山 大三元 科福路
8 年前
萬年峽谷! 30% 超激陡坡 里佳部落DAY2 還是很硬! | 公路車 | CT Yeh
3 年前