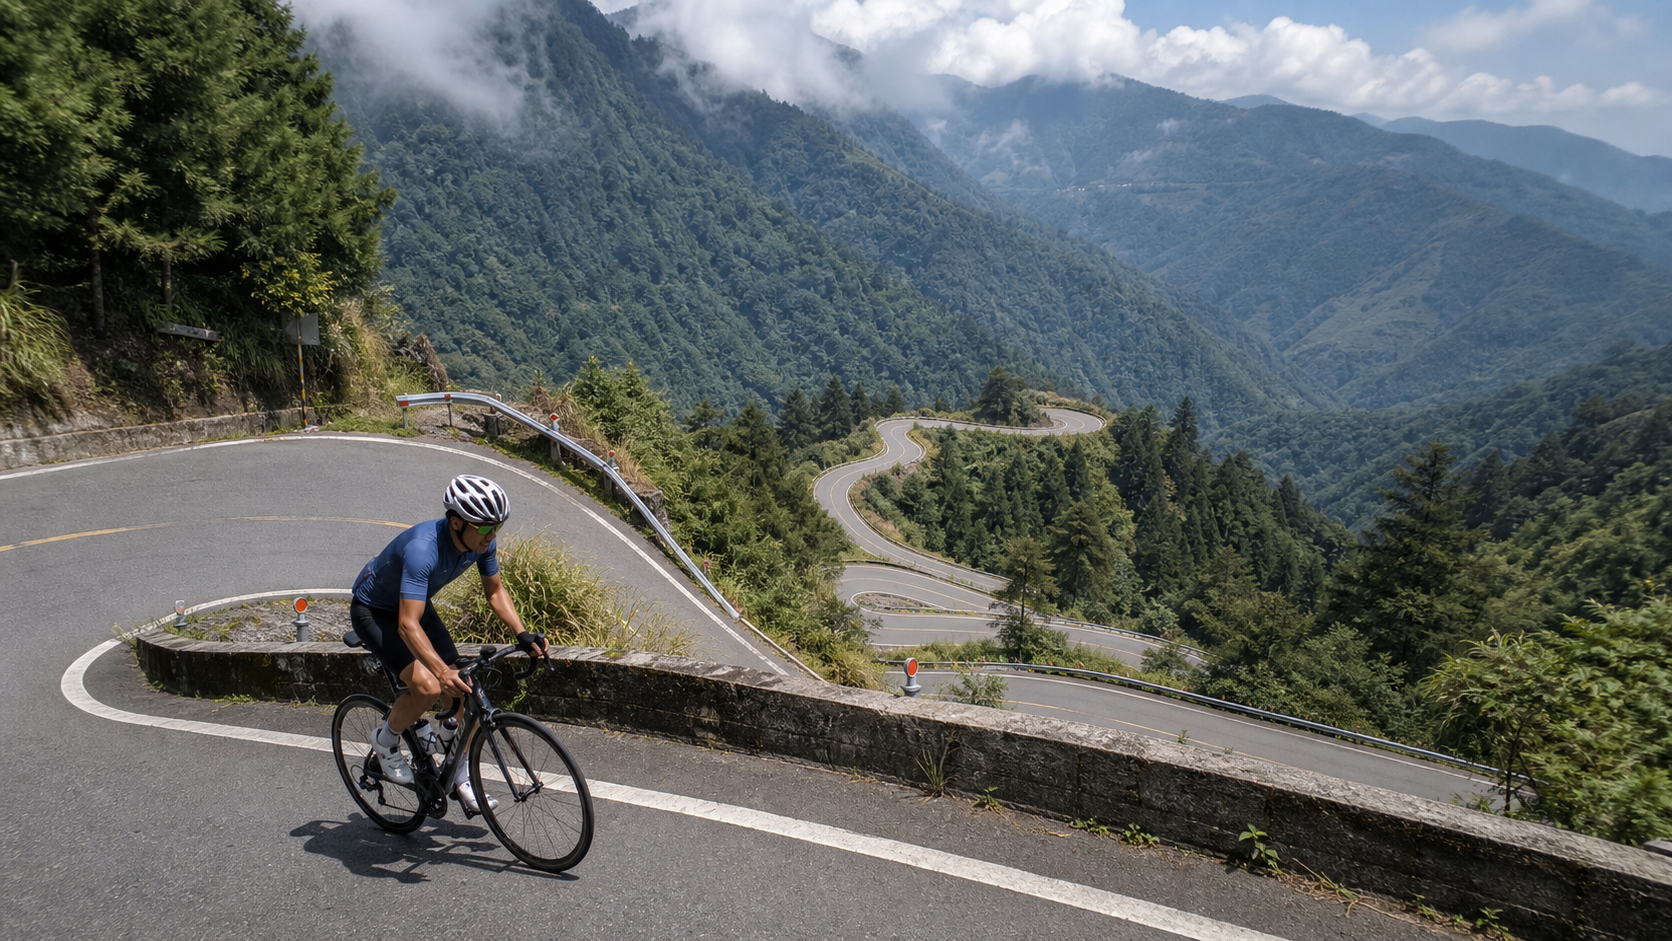
This long route up Bamboo Mountain Sunlinksea is widely recognized in Nantou’s climbing scene as a “classic of consecutive hairpin bends.” At approximately 26.9 km in length, 1,434 meters of cumulative elevation gain, and an average gradient of 5.3%, it’s rated Category 5 on Strava, making it the longest route with the greatest total elevation gain in this batch. Starting from the low elevation of Bamboo Mountain, it climbs all the way into Sunlinksea, with its signature being the continuous series of big switchback bends named after the twelve zodiac animals—Rat, Ox, Tiger, Rabbit, Dragon, Snake, Horse, Goat, Monkey, Rooster, Dog, Pig—with “Pig Bend” being one of them.
26.9 km, 1,434 meters of climbing—this is a genuine long-distance climbing endurance battle. The average gradient of 5.3% may seem gentle, but it averages together the “gentle warm-up of the Bamboo Mountain section” with the “high-altitude steep climbs of the Sunlinksea section,” meaning the actual difficulty distribution is highly uneven. This article takes an engineer’s perspective to break this long route down into several tactical segments.
Route Overview: A Long Climb That Starts Easy and Gets Steep
| Item | Data |
|---|---|
| Distance | Approx. 26.9 km |
| Cumulative Elevation Gain | Approx. 1,434 m |
| Average Gradient | 5.3% |
| Strava Rating | Category 5 |
| Bamboo Mountain Section Entrance | Low elevation (approx. a few hundred meters) |
| Sunlinksea Highway Section | Climbs from approx. 1,100 m to approx. 1,600 m |
Sunlinksea Highway (commonly known as the “17 km”) starts from the entrance near Mengzong Villa in Xitou at an elevation of about 1,100 meters, climbing to the Sunlinksea resort area at about 1,600 meters. Along the way, each roughly 180-degree switchback bend is named sequentially after the twelve zodiac animals. But before entering these zodiac bends, there’s a long stretch of road climbing up from Bamboo Mountain. This structure of “long and gentle first, steep and high later” dictates the core of the pacing strategy: restrain yourself in the front section and save your energy for the hairpin bends of the Sunlinksea section.
Why the 5.3% Average Is Misleading: An Engineering Interpretation of Gradient Distribution
From an engineering perspective, “5.3% average gradient” is a highly misleading statistic. Spreading the 1,434 meters of total elevation gain across 26.9 km gives you a “hypothetical straight line of constant gradient,” but the real gradient profile is nothing like that. On the long stretch from Bamboo Mountain to the entrance of Sunlinksea Highway, measured gradients mostly fall in the gentle 3–5% range; whereas on the “17 km” Sunlinksea Highway section—especially at the apex of the twelve zodiac bends—instantaneous gradients can push into 8–12%. In other words, the proportion of elevation gain consumed in the first 20 km or so is far lower than in the latter section; the real “climbing density” is concentrated in that Sunlinksea Highway stretch.
Using a rough mental model: think of this road as “two roads strung together”—the first is a long gentle climb starting from Bamboo Mountain (low climbing density, good road conditions, high cruising speed possible), and the second is the high-mountain steep climb of Sunlinksea Highway (high climbing density, dense bends, high altitude). All pacing strategy is built on the fact that “these two sections are roads of different natures.” If you use the same power, the same mindset, and treat both sections as one, you will almost certainly blow up at the zodiac bends.
| Section Nature | Approximate Gradient Range | Climbing Density | Tactical Role |
|---|---|---|---|
| Bamboo Mountain warm-up long gentle section | Approx. 3–5% | Low | Save energy, keep heart rate in check |
| Sunlinksea Highway entrance transition | Approx. 5–7% | Medium | Shift gears and adjust breathing |
| Twelve zodiac bends (including apexes) | Approx. 8–12% (instantaneous) | High | Rhythmic cornering, milestone mindset |
| Longfeng Gorge finish | Medium-high, fatigue compounding | Medium-high | Steady cadence, stay warm and close out |
Power and Heart Rate Zone Reference Table
Climbing is the perfect scenario for managing effort with power/heart rate zones. Using “% of FTP” and “% of max heart rate” as the framework, here are zone usage recommendations for this long route (actual numbers should be based on your personal FTP test and max heart rate):
| Zone | %FTP | %Max HR | How to Use on This Route |
|---|---|---|---|
| Z2 Endurance | 56–75% | 70–80% | Primary zone for the Bamboo Mountain warm-up section |
| Z3 Tempo | 76–90% | 80–87% | Cruising on Sunlinksea Highway |
| Z4 Threshold | 91–105% | 88–92% | Zodiac bend apexes, short steep sections |
| Z5 and above | >105% | >92% | Final sprint only; use sparingly on long routes |
The core discipline boils down to one sentence: no Z4 in the first 20 km. If your heart rate drifts to the upper edge of Z3 or even Z4 during the Bamboo Mountain warm-up, it means you’re stealing from the energy reserves meant for the Sunlinksea section. The ideal energy distribution is “Z2 in the front section, Z3 on the highway section, brief Z4 at the bend apexes, and actively returning to Z3 the rest of the time.”
Gear Ratio Reference Table: Cadence Determines Life or Death
Eight out of ten cases of cramping and blowing up on long climbs come from “gears not light enough, forcing low-cadence grinding.” Below is a comparison of common front chainring setups against what’s needed at the zodiac bend apexes (estimated at about 10% gradient, speed around 8–10 km/h) in terms of rear sprockets:
| Front Chainring | To Maintain 70 rpm | Suitable For |
|---|---|---|
| 50/34 standard compact | Needs 32–34T rear sprocket | Those with a training base |
| 48/32 sub-compact | Needs 30–34T rear sprocket | Recommended for general enthusiasts |
| 46/30 or gravel gearing | 28–36T all manageable with ease | Long routes / heavier riders |
The criterion is simple: at the steepest apex, can you stay seated and maintain 60 rpm or above without losing speed? If not, your gearing is too heavy, and over a long route both your knees and cardiovascular system will be depleted prematurely. Better to have gearing that’s too light and trade cadence for efficiency than gearing that’s too heavy and trade torque for cramps.
Segment Guide 1: Warm-Up Section from Bamboo Mountain
Starting from Bamboo Mountain, connecting via the county road system onto the highway toward Sunlinksea, the front section is a relatively gentle warm-up. The biggest trap of this stretch is that it’s “too comfortable”—because the gradient is mild and the road conditions are good, many people unconsciously ride fast, burning up the energy meant for later before they even get there.
- Gearing: Middle chainring with middle cassette, maintaining a comfortable 85 rpm cadence.
- Heart rate: Strictly hold at 70–73% of max heart rate—this is the “save energy” zone, not the place to chase speed.
- Discipline: Tell yourself—the real test of this route comes after 20 km; the more you save in the front, the stronger you’ll be in the back.
Segment Guide 2: Entering Sunlinksea Highway (Elevation Starts to Rise)
After passing the Xitou area and entering the start of the “17 km” Sunlinksea Highway (at about 1,100 meters elevation), both gradient and altitude begin to ramp up simultaneously. This is the “turning point” of the entire route—switching from a gentle long climb into a serious high-altitude ascent.
- Gearing: Drop to the larger rear sprockets (28–30T), holding cadence at 72–75 rpm.
- Pacing: Settle into your climbing cruise heart rate (78–82% of max HR), and be aware that at elevations above 1,100 meters, power output is discounted and heart rate runs higher—adjust accordingly.
- Hydration: From here on, the mountain air is dry and breathing quickens; take small sips of water every 15 minutes.
Segment Guide 3: The Twelve Zodiac Bends (Signature Section, Including Pig Bend)
This is the soul of the entire route—the consecutive zodiac hairpin bends. Each roughly 180-degree switchback has its steepest gradient at the apex (inside line), with the outside of the bend being more gradual. In terms of landmark order, after “Horse Bend” comes “Chufeng Ridge,” and after “Pig Bend” comes “Xiangsi Terrace” and then Longfeng Gorge.
- Cornering technique: Brake and downshift before entering the bend, following an “outside–inside–outside” line; the inside of the apex is steepest—if you can’t turn the pedals seated, stand up and power through with two or three strokes at the apex, then sit back down and resume your cadence after exiting.
- Mental game: The zodiac bends are the perfect “milestones”—with each bend passed, silently count “one fewer animal,” breaking the endless climb into twelve manageable mini-goals. This is a powerful weapon against mental fatigue.
- Pacing: This section has the highest elevation and the densest bends. Brief heart rate spikes at the apexes are allowed, but you must actively recover after exiting each bend—don’t let your heart rate stay pinned at the ceiling the whole way.
Cornering Technique Breakdown: Hairpin Turn Lines and Pedaling
Each of the Twelve Zodiac Turns is a near-180-degree switchback, and cornering technique directly affects both efficiency and safety:
- Line (Outside—Inside—Outside): Position wide before the turn, clip the apex close to the inside but don’t hug it completely (the inside is steepest and most prone to stalling), then drift back outside on exit, using the largest cornering radius to minimize the actual gradient.
- Sort out your gearing before the turn: Shift down to the gear you need before you brake—don’t force a shift at low speed in the apex; shifting under heavy load at low speed is the easiest way to drop the chain or jam the cassette.
- Timing for standing climbs at the apex: If you can’t turn the pedals seated, stand up at the apex and power through two or three strokes to carry the bike past the critical point, then sit back down immediately to resume spinning—avoid long standing efforts that spike your heart rate.
- Look where you want to go: Keep your eyes on the exit, not on the front wheel, and your body will naturally carve a smooth arc.
Braking and Stall Prevention on Uphill Corners
The biggest risk on climbing corners isn’t going too fast—it’s “stalling at the apex from going too slow.” Key points:
- Use the rear brake primarily for minor speed adjustments entering the turn; a light touch is enough. Avoid the front brake locking the wheel on a steep apex.
- Carry momentum through the apex: Don’t kill your speed too much before the corner. Rolling through the steepest point with a bit of momentum is far easier than restarting from a dead stop.
- If you stall: If you genuinely can’t turn the pedals, unclip and stop at the wider, shallower outside of the corner. Never stop or walk your bike at the inside of the apex—that’s the steepest and most dangerous spot.
High-Altitude Physiological Effects and Countermeasures
The Xitou (Shanlinxi) area sits at about 1,600 meters above sea level—not extreme by mountaineering standards, but already enough to measurably affect climbing performance. As altitude rises, the partial pressure of oxygen in the air drops, reducing both VO₂max and sustainable power output. At the same power, your heart rate will run higher than at sea level, and perceived exertion will feel noticeably harder.
Three practical takeaways: First, for your cruising range set by heart rate or power, at altitude you must “accept lower power at the same heart rate”—don’t force more watts just because the number drops; that’s a fast track to blowing up. Second, mountain air is dry and cold, and faster breathing accelerates fluid loss, so drink more frequently than you would at sea level. Third, if you normally train at low altitude and rarely ride high, mild dizziness and rapid breathing at 1,600 meters are normal—just ease off the pace and breathe deeply; there’s no need to push through it.
Weather Risk Classification
On a long mountain route, weather is the variable that decides between a “great ride” and a “disaster.” Here’s a tiered way to assess it:
| Risk Level | Weather Signs | Recommended Action |
|---|---|---|
| Green (Rideable) | Clear morning, good visibility, no convective cloud development | Start as planned, but still carry warm layers |
| Yellow (Caution) | Afternoon cloud buildup, light mountain fog | Pick up the pace, descend before the fog sets in |
| Orange (Shorten) | Dense fog, poor visibility, light rain | Shorten the route or turn back early |
| Red (Abort) | Thunder, significant rain, strong winds | Stop immediately—mountain lightning strikes are no joke |
Summer afternoon convection is extremely active in central Taiwan’s mountains, which is why “start early, no exceptions” is an iron rule—get the climbing and the most dangerous long descent done before the afternoon fog and weather move in.
Nutrition Schedule (Long-Route Pace Management)
On a 26.9 km route that takes two to three hours, you can’t wait until you’re hungry or thirsty to eat and drink—by then it’s already too late. Use a “time-driven” rather than “feeling-driven” fueling rhythm:
| Time Point | Hydration | Energy | Notes |
|---|---|---|---|
| At the start | Take a few sips first | — | Pre-hydrate |
| Every 15 minutes | Small sips | — | Even more important in dry mountain air |
| Every 30–45 minutes | — | One serving of energy (gel/bar/rice ball) | Don’t wait until you’re empty |
| Before entering the Zodiac Turns | One drink | One serving of fast carbs | Pre-fuel for the hardest section |
| During heavy sweating | — | Salt tablet/electrolytes | Prevent long-route cramping |
Training Advice: How to Prepare Your Body for This Route
To complete this Category 5 long climb with confidence, schedule targeted training in the weeks before the challenge:
- Long slow distance (LSD): At least one 2+ hour Zone 2 ride per week to build the endurance base for “long hours in the saddle”—this is the foundation for surviving 26.9 km.
- Climbing specifics: Find a sustained climb and repeat it to simulate the “low cadence, seated grinding” muscle recruitment of the Zodiac Turns, and get used to brief standing efforts at the apex.
- Threshold intervals: One Zone 4 interval session per week (e.g., 4×8 minutes) to raise your FTP and make the same gradients feel relatively easier.
- Dress rehearsal: Two weeks before the challenge, do a simulation ride with similar total elevation gain to validate your gearing, fueling, and pacing strategy—don’t leave your first test for the actual event day.
Descending Technique: The Return Leg Demands More Focus Than the Climb
Many riders put all their attention on the ascent and forget that long descents are where accidents are most likely. From Shanlinxi all the way down to Zhushan, you’re dropping over a thousand meters with numerous consecutive corners, and the road surface can be slick at higher elevations:
- Brake cooling: On a long descent, never drag the brakes continuously. Use “pulse braking”—intermittent application—to give the rims/discs time to cool and avoid brake fade (disc brakes are clearly superior to rim brakes here).
- Brake before the corner, accelerate out: Finish your braking on the straights, carry a controlled speed through the turn, and avoid hard braking mid-corner.
- Body position and vision: Shift your weight slightly back and lower, look far ahead to guide the bike, and proactively slow down on wet or gravel-strewn sections.
- Stay warm: Wind chill is severe on long descents. Put on your windbreaker before starting down—hypothermia at high speed can dull your reactions.
Common Mechanical Issues and Pre-Ride Checks
On a remote mountain route, the worst thing is a breakdown halfway. Pre-ride mechanical checks and carrying the right tools are your last line of defense:
| Item | Check Points | Tools to Carry |
|---|---|---|
| Drivetrain | Smooth shifting, no skipping (low-speed, high-load is where it fails most) | Multi-tool, quick link |
| Brakes | Pad thickness, hydraulic feel, no noise | — |
| Tires/Tubeless | Pressure, no cuts on the tread | Spare tube/patch kit, pump or CO₂ |
| Chain | Lubricated, no rust or stiff links | Quick link, chain tool |
| Bolts | Seatpost, handlebar, pedals secure | Torque/hex tool |
The two most common mechanical issues on this route are “chain drop from shifting at low speed on steep grades” and “brake overheating on the long descent”—the former is prevented by shifting early plus regular maintenance, the latter by pulse braking plus disc brakes.
Segment Guide 4: Longfengxia Finish
After the Pig Turn and Xiangsi Terrace, the section around Longfengxia is the final stretch. By now you’re at high altitude with fatigue at its peak—stay calm, keep a steady cadence, and close out the last few kilometers cleanly. Once you arrive, be mindful of the cold at elevation and add layers during rest.
Gearing and Equipment Recommendations
For a 26.9 km route with 1,434 meters of climbing, the core equipment priorities are “efficiency” and “warmth”:
| Equipment Item | Recommendation |
|---|---|
| Chainrings | Sub-compact 48/32 or lighter—the lighter, the better for long climbs |
| Cassette | 32–34T largest cog—a lifesaver on the steep Zodiac Turn apexes |
| Tires | 28c or wider, balancing efficiency and grip |
| Brakes | Disc brakes preferred—critical for heat management on the long descent back |
| Warmth | Windbreaker is mandatory—wind chill is significant at altitude and on descents |
| Fuel | At least two bottles, plus energy gels and salt tablets—long routes invite cramping |
Food, Hydration, and Seasons
Zhushan is famous for sweet potatoes and bamboo shoots; the signature snack “sweet potato bun” combines a sweet potato skin with a bamboo shoot filling. The Shanlinxi area is a high-mountain tea region (Yangzaiwan, Longfengxia, Fanzihtian are all well-known tea areas). For food, stick to local specialties and choose specific shops on site. Zhushan Old Street and the Zinan Temple area work well as supply stops before or after the ride.
Seasonally, this is a high-mountain route—watch for afternoon fog and thunderstorms in any season. Summer is the top choice for escaping the heat, but afternoon convection is strong; winter is cold and damp, so guard against hypothermia. Start early, no exceptions, and finish the climbing and the most dangerous descent before the afternoon fog rolls in.
Common Mistakes and DNF Risks
- Starting too fast: Burning too much energy on the Zhushan warm-up section leads to a collapse entering the Zodiac Bend—this is the most common cause of DNF.
- Gearing not low enough: On the steepest parts of the Zodiac Bend, you can’t turn the pedals and are forced to dismount.
- Insufficient fueling: On the 26.9 km long route, cramping and bonking are common; salt tablets and energy intake must be adequate.
- Cold and time management: Hypothermia at higher elevations or on descents, or delaying the descent until afternoon fog rolls in.
Target Times for Different Rider Levels (26.9 km Full Route Reference)
| Rider Level | Gearing Strategy | Reference Finish Time |
|---|---|---|
| Finish as a challenge | Grind in low gear throughout, take breaks in sections | Over 3 hours |
| General athlete | Extremely conservative early, steady climb on Zodiac Bend | 2–2.5 hours |
| Advanced enthusiast | Steady power cruising, sprint out of corners | 1.5–2 hours |
| High-intensity rider | Threshold power throughout | Under 1.5 hours |
Section Pacing and Power Allocation Table (26.9 km Broken Down Segment by Segment)
The most common mistake on long climbs is thinking of “pacing” as a single number. In reality, this 26.9 km route should be split into at least five distinct power/heart-rate zones to manage. Below is a segment-by-segment breakdown as a reference framework for planning cruising intensity (actual kilometer markers may vary slightly depending on the starting point; adjust based on road conditions and how you feel):
| Distance Range | Segment Characteristics | Suggested %FTP | Suggested Heart-Rate Zone | Tactical Focus |
|---|---|---|---|---|
| 0–8 km | Zhushan warm-up, long gentle slope | 60–68% | Mid Z2 | Deliberately slow down; resist the urge to ride fast on good roads |
| 8–14 km | Continued warm-up, approaching Xitou area | 65–72% | Upper Z2–Lower Z3 | Begin to feel the altitude gain; progressively rein in power |
| 14–18 km | Transition section at the Sunlinksea entrance | 72–80% | Z3 | Gear changes complete; settle into cruising rhythm |
| 18–24 km | Main body of the Twelve Zodiac Bend | Brief 90–105% at apex, dropping to 75–82% between corners | Z4 at apex, Z3 between corners | Repeat the “surge at apex, ease off on exit” cycle; never hold Z4 the entire way |
| 24–26.9 km | Longfeng Gorge finish | 70–78% | Z3 | Hold back final reserves; close steadily without sprinting |
The logic behind this table is simple: concentrate your limited anaerobic reserves on the Zodiac Bend apexes—the highest “cost-performance” spots—and return to an aerobic rhythm everywhere else. Many riders fail not because they lack fitness, but because they waste their reserves on the first 14 km of gentle slopes, leaving nothing for the apexes where explosive power is truly needed.
Debunking Common Myths
Myth 1: “An average grade of 5.3% is easy, so I can use one gear the whole way.” Wrong. The average masks a highly uneven grade distribution—instantaneous gradients at the apexes can reach more than double the average. Riding the entire route in a single gear means your gear is too heavy on the gentle sections and too light on the steep ones—losing out at both ends.
Myth 2: “The later you reach the Zodiac Bend, the better—surge early to build an advantage.” Quite the opposite. The climbing density is concentrated in the latter half of this route. Any time gained by “surging early” will almost certainly be paid back double at the Zodiac Bend—because you’ll be forced to slow down or even dismount and walk, making you slower overall.
Myth 3: “High altitude just makes you breathe harder; push through and it’ll pass.” The effect of altitude on performance is continuous, not a brief discomfort you can simply push through. If you still try to maintain sea-level power output on the Sunlinksea Highway section, you’ll likely see a significant slowdown or even cramping in the latter part of the Zodiac Bend. The correct approach is to proactively lower your power target.
Myth 4: “Just refuel when you feel hungry or thirsty.” On a 26.9 km route, by the time you feel hungry or thirsty, you’re already in both an energy and hydration deficit, and recovery takes longer. A time-driven fueling schedule is always more reliable than a feeling-driven one.
Myth 5: “A lighter frame matters more than pacing discipline.” On this route, bike weight certainly has an effect, but what truly separates finish times has never been that one or two kilograms of frame weight—it’s whether you hold your pacing discipline in the early section. Rather than spending big money on upgrades, it’s far better value to study your power meter numbers and train your rhythm for the first 14 km.
Myth 6: “The descent back is easy—just cruise.” This is one of the most dangerous myths. The accident risk on long descents is actually far higher than on climbs. Accumulated fatigue, diminished attention, and overheated brakes all make the return leg the section requiring the most focus of the entire ride—not a reward segment where you can switch off.
Advanced Challenge: PR-Level Power and Time Allocation
For advanced riders who have already completed the route once and want to challenge their personal best, the PR strategy for this route centers on “compressing loose time on the gentle sections, not forcing the Zodiac Bend.” If you can hold the lower end of Z3 (rather than a conservative Z2) on the Zhushan warm-up, you can save several minutes without overdrawing your reserves for the latter half. The real difference in results often comes from whether the warm-up section is ridden solidly enough—without riding to the edge of depletion. The power ceiling at the Zodiac Bend apexes should be set so that “heart rate returns to Z3 within 30 seconds after exiting the corner”—if your heart rate stays elevated after the exit, it means your apex output exceeded the day’s reserves, and you should lower your target on the next attempt. Advanced riders are advised to bring a power meter rather than relying on heart rate alone, because higher altitude delays and distorts heart-rate response, while power numbers reflect true output in real time.
Conclusion
This 26.9 km route from Zhushan to Sunlinksea is a long-distance classic that tests endurance, pacing discipline, and cornering technique all at once. Its Twelve Zodiac Bend is not just scenery—it’s a psychological milestone that marks the rhythm of a long climb. As you count the Rat, Ox, Tiger… all the way to the Pig, you’ll realize you’ve climbed over 1,400 meters. Remember the one iron rule of this route: the more you save in the early section, the stronger you’ll be in the latter. Store up your energy on the Zhushan warm-up, use the lightest gear and the steadiest rhythm to take on the Zodiac Bend, and this hard Category 5 line will reward your patience and discipline with a stretch of high-mountain clouds and the exhilaration of corner after corner.
Related Reading
- The Romance of the Twelve Zodiac Bend: Riding from Zhushan Sweet Potato Buns into the Sea of Clouds at Sunlinksea
- Xitou Sunlinksea Mountain Guide: The Hidden Difficulty of 5% at 1,600 Meters Altitude
- Yunlin Xiluo Bridge River-Crossing Route: The Complete Guide to Riding Taiwan’s Longest Bridge
- Meishan 36 Bends Complete Guide: How to Tackle the Hairpin Battle of 11.84 km at 6.4% Average Grade
2026紫南宮環線99.9K挑戰Vlog 多視角第一集團 跟看看.. / CT Yeh 公路車
1 個月前
台北闊瀨陡坡 騎旅 / 日本單車雜誌編輯車友臨時加入!/ 髮香才是最強的 / feat. 北迴歸線小隊 / 公路車 CT Yeh
6 個月前
萬年峽谷! 30% 超激陡坡 里佳部落DAY2 還是很硬! | 公路車 | CT Yeh
3 年前
大武山後門26%歡樂陡坡!JJSC南台灣單車行Day2 / 被颱風追著跑 / 公路車 / CT Yeh
2 年前
一定要騎一次!阿里山最深處:里佳部落!單車旅行 | 2800m爬升 | 深度部落體驗:嗨翻晚會、螢火蟲、銀河 | feat. JJSC & 廢物伙伴 | 公路車 CT Yeh
9 個月前
藤枝二集團 單車行 Day1 | 南部小武嶺 | 爬坡爬到罵罵叫 | JJSC | 公路車 | CT Yeh
3 年前
大武山20%魔王陡坡【JJSC南台灣遊騎Day2】!屁股真的要裂開了...凡士林抹滿也沒用?神秘金教堂還有超便宜夜市
3 個月前
新竹羅平 x 天湖部落 大禹嶺級變態陡坡! 4K超高畫質 空拍 | 公路車
5 年前