Wugong Mountain Climb Full Analysis: The 14% Truth Hidden Behind the Official 9.7% Gradient (Maolin, Kaohsiung)
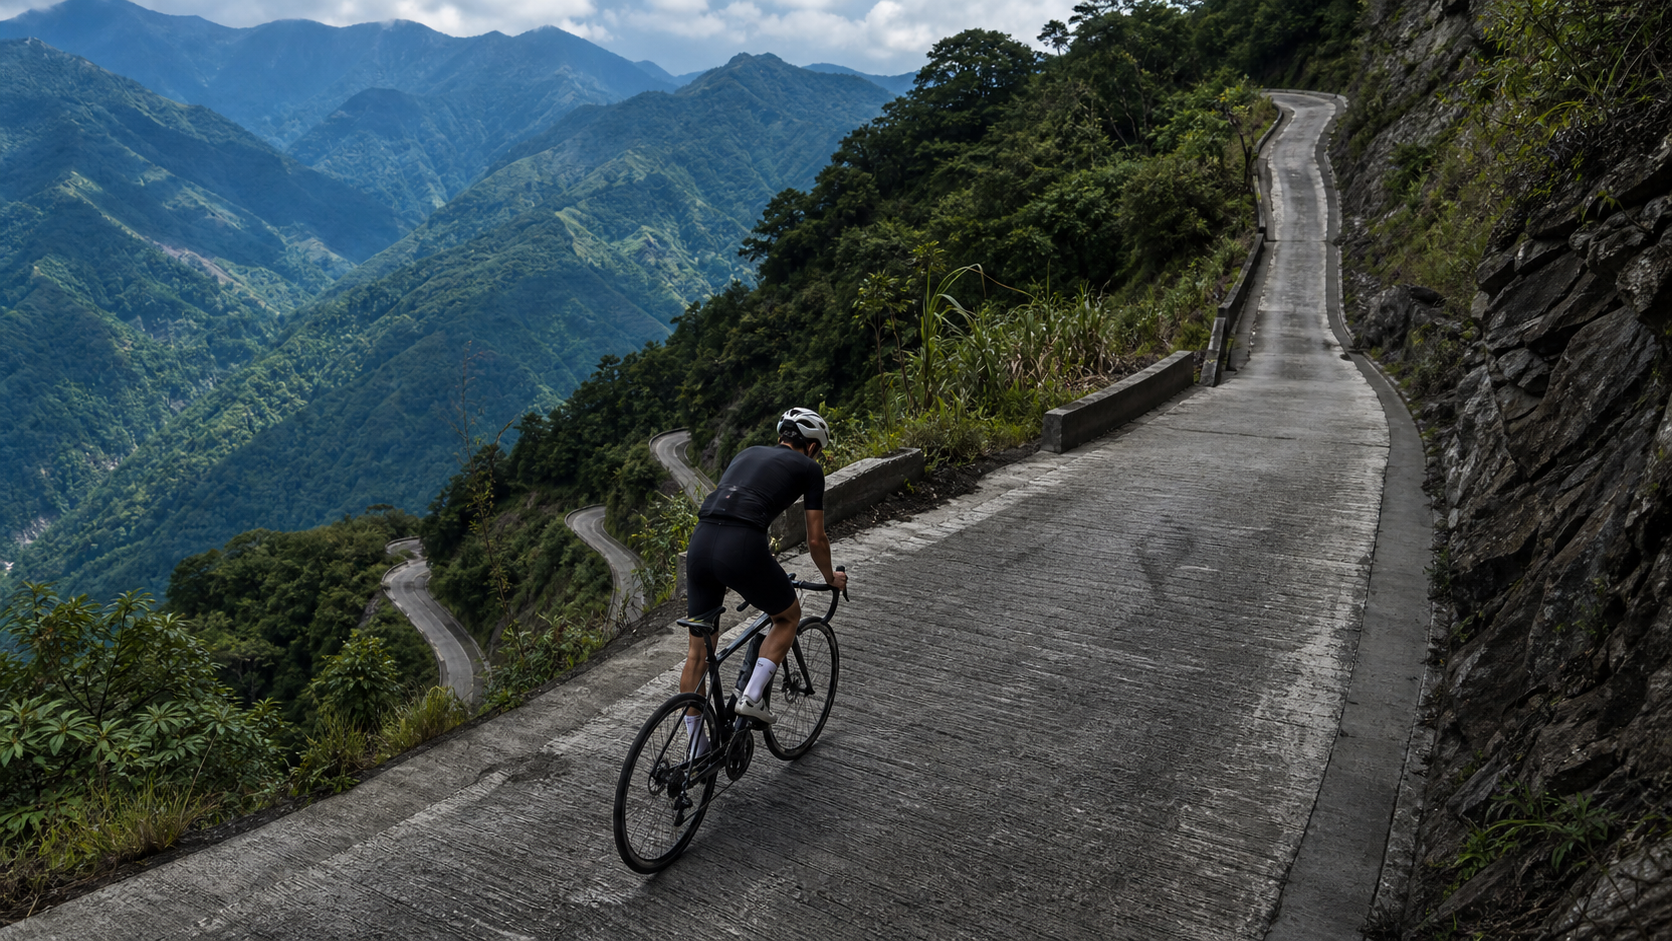
This is a route whose numbers look “manageable” on paper, but riding it will make you question your life choices. If you’re an engineer-minded rider, be sure to read the data tension section of this article in full before setting off.
Route Overview: Breaking Down the Key Data of the Wugong Mountain Climb
The Wugong Mountain Climb is located in Maolin District, Kaohsiung City, and is one of the few climbing segments within the Maolin National Scenic Area to be officially categorized and recorded by the Strava system. Let’s lay out the official data first:
| Item | Value |
|---|---|
| Route Name | Wugong Mountain Climb - Maolin |
| Region | Maolin District, Kaohsiung City |
| Total Distance | 6,741.9 meters (approx. 6.74 km) |
| Total Elevation Gain | 959.5 meters |
| Official Average Gradient | 9.7% |
| Strava Category | Category 4 |
Looking at just these two figures—“6.74 km, 9.7% average”—many experienced riders’ first reaction would be: “Not bad, a bit milder than some legendary hellish climbs.” After all, the general benchmark in a flatland rider’s mind is roughly this: anything below 5% counts as a gentle warm-up, 6-8% starts to get tough, and only above 10% does your thighs really feel the lactic acid building up. 9.7% sounds like it sits in the “hard but not hopeless” range.
But this is precisely the point that needs to be made crystal clear about this route: the official average gradient and the measured total elevation gain simply don’t add up.
Data Tension: 9.7% and 959.5 Meters Cannot Corroborate Each Other
Let’s run a cross-check using the most basic trigonometric reverse-engineering logic. If the entire 6.74 km route climbed at an average gradient of 9.7%, the theoretical total elevation gain would be:
6,741.9 meters × 9.7% ≈ 654 meters
But the actual recorded total elevation gain for this route is 959.5 meters—a full 305.5 meters more than the theoretical value, a discrepancy of 46.7%, nearly half the height of Taipei 101. Conversely, if we divide the measured total elevation gain of 959.5 meters by the total distance of 6.74 km, the “true average gradient” derived from this works out much closer to:
959.5 meters ÷ 6,741.9 meters ≈ 14.23%
In other words, describing this route with the figure “9.7% average gradient” is, to some extent, an understatement of its difficulty. An average gradient at the 14% level already places it among the most hardcore grades of publicly known routes in Taiwan—many riders are familiar with the Northern Cross-Island Highway or Fengguizui main line, whose average gradients mostly fall in the 4-6% range; even the famous long-distance climbs on the Central Cross-Island Highway or Alishan Highway rarely exceed 6-7% on average. Being able to push the average of an entire route to around 14% usually means the middle section conceals several short but brutally steep “walls” that forcibly drag the overall average upward.
As for why the officially listed 9.7% doesn’t match the 14% derived from reverse calculation, possible reasons include:
- Accumulated GPS elevation error: In steep, complex mountain terrain, satellite positioning elevation data is inherently more prone to noise than horizontal coordinates. Especially on sections with dramatic gradient changes and dense canopy cover, accumulated error may be partially “smoothed out” by the system’s segment-smoothing algorithms, causing the baseline used for calculating average gradient to not be fully consistent with the raw elevation-difference data from the total climb.
- Differences in gradient algorithms between Strava or route databases: The average gradient field is sometimes calculated by dividing the straight-line elevation difference between the segment’s start and end points by the distance, whereas total elevation gain is calculated by summing all positive elevation changes point by point. These two are fundamentally different calculation methods. If the route contains undulations (small descents followed by climbs), the point-by-point accumulated total gain will be greater than the start-to-end elevation difference—this is also why the “total elevation gain” on many climbing routes looks larger than the “elevation difference between finish and start.”
- The route contains downhill or flat sections that dilute the average gradient field: If the route isn’t a simple steady climb but rather a sawtooth profile of “steep up—short slight descent or flat—steep up again,” the total elevation gain faithfully records the sum of all climbing, but the single “average gradient” figure only reflects the overall slope from start to finish, flattening out the extremely steep middle sections together with the gentler/descending parts, making the displayed average far lower than the actual gradient experienced on the climbing sections themselves.
Here we must make an honest statement: we will not falsify any raw value just to make the numbers line up. The 6,741.9 meters, 959.5 meters, 9.7%, and Category 4—these four items are all raw fields recorded in the route database, and this article cites them all exactly as they are, without any adjustment. But as a rider, the lesson you should take from this discrepancy is very clear: set off with the mental preparation that “local gradients are far more intimidating than 9.7%,” rather than underestimating the difficulty based on the literal figure of 9.7%. During the actual ride, you’re likely to encounter short steep walls of 15% or even 20% or more, which on a route of just 6.74 km can cause your heart rate to spike instantly, your gearing to run out, and even force you to dismount and walk.
The Practical Meaning of a Category 4 Rating
Strava’s climb categorization system (Category, abbreviated as Cat) originates from the traditional classification logic of the Tour de France. The smaller the number, the higher the difficulty. Category 4 is generally regarded as an “entry-to-intermediate” level climb, milder than HC (Hors Catégorie, unclassified, the highest difficulty), Cat 1, Cat 2, and Cat 3. The classification formula is roughly a weighted value of distance (in meters) multiplied by average gradient (as a percentage); only when the value falls within a specific range is a segment assigned to a particular Category.
But this is another manifestation of the “average value trap”: Category 4 is the classification result calculated from the officially listed 9.7% average gradient and 6.74 km distance. If the reverse-derived 14% level were applied, the route’s weighted value would theoretically increase significantly, potentially pushing the classification toward Category 3 or even higher. In other words, don’t let the relatively approachable “Category 4” label lull you into complacency—this classification is calculated from the official fields, and those official fields themselves have a clear discrepancy with the total elevation gain. We recommend that all riders planning to tackle this route mentally prepare for it as a “Category 3 with discounted numbers,” which will more closely match the actual pain index of the ride.
Section-by-Section Strategy: Gradient Changes and Pacing Tactics
Although there is currently no kilometer-by-kilometer gradient profile available for precise citation (if you have the official GPX file or measured segment data on hand, please defer to on-site measurements and official data), based on the logic of the discrepancy between total elevation gain and average gradient, we can reasonably infer that this route’s gradient profile is highly uneven, and the riding strategy must adopt a conservative, almost defensive pacing approach.
Before the Attack: Treat Your Heart Rate Monitor as Your Most Honest Coach
6.74 km with 959.5 meters of climbing works out to an average of 142 meters of elevation gain per kilometer—a figure that is already quite hardcore in its own right (for comparison, most well-known climbing routes in Taiwan average between 60-100 meters of gain per kilometer). Given the uneven gradient, be sure to keep your heart rate ceiling low during the first 1-2 kilometers of the attack, riding within 75-80% of your maximum heart rate. Don’t let adrenaline carry you to 90% or above in the early stages—because you don’t know whether there are even steeper walls waiting further ahead. If you exhaust yourself in the early section, you’ll have absolutely nothing left to respond when you hit 15-20% short steep pitches later.
Middle Section: Expect “Hidden Walls”
Based on the data tension calculations, this route very likely conceals one or more short, extremely steep sections (possibly 100-300 meter walls where the gradient suddenly spikes above 15%). For the middle section, we recommend:
- Keep your eyes on the curvature changes of the road surface ahead rather than just staring at the computer numbers, because the real-time gradient display on phones/computers often lags; judging the gradient with your own eyes is actually more immediate.
- When you spot a section that’s visibly getting steeper, shift down 2-3 pedal strokes in advance, and don’t wait until your legs can barely turn over to shift. By then, the mechanical delay of shifting combined with the sudden change in chain tension makes chain drop or breakage much more likely.
- Standing out-of-saddle efforts should be reserved only for the steepest short walls, with each effort lasting no more than 20-30 seconds. The Maolin mountain area is hot and humid in summer, and prolonged out-of-saddle riding will drive your core heart rate up rapidly, which is detrimental to subsequent pacing.
Final Section: Keep “One Last Candle” in Reserve
A common mistake many riders make when tackling an unfamiliar steep climb is imagining the final kilometer as “the finish is in sight, so I can go all out.” But if the final section happens to be the steepest part of the gradient profile (some mountain climbs do indeed follow a “steepest at the end” pattern), an early all-out sprint will cause severe speed loss or even force you to dismount and walk. We recommend maintaining at least a 10% reserve of energy throughout the entire ride until you’ve confirmed the gradient of the final section, and only then—once you’re certain you’ve entered the last 500 meters of easier terrain (if any)—go all out for the finish.
Gearing and Equipment Recommendations
Facing an average gradient approaching the 14% level when reverse-calculated, with a high likelihood of 15-20% short steep walls, your gearing configuration is the key factor determining whether you “ride” the whole way or “walk” the whole way.
| Rider Level | Recommended Front Chainring | Recommended Rear Cassette | Easiest Gear Ratio | Notes |
|---|---|---|---|---|
| Advanced/Frequent Climber | Compact 50/34T | 11-30T or 11-32T | Approx. 1.06-1.13 | Still recommended to have a lighter gear as insurance |
| General Recreational Rider | Compact 50/34T | 11-32T or 11-34T | Below approx. 1.0 | More margin for short steep walls |
| Limited Climbing Experience | Small chainring 46/30T or gravel/mountain type | 11-36T and above | Below 0.83 | Strongly recommended to avoid being forced to walk |
Core recommendation: don’t challenge Wugong Mountain with the gearing you normally use on 6-8% climbing routes. Since the official 9.7% is only an “average,” local sections are highly likely to far exceed that figure. Your gearing should be configured based on “not losing speed on 18-20% short steep walls,” not on “cruising at 9.7%.” In recent years, the 1x systems (single front chainring + wide-range cassette, e.g., 40T paired with 10-36T or 10-42T) commonly seen on road and gravel bikes actually hold an advantage over traditional double-chainring setups on routes with such uneven gradients, because the rider doesn’t need to be distracted by front derailleur shifts mid-steep-section.
Other equipment recommendations:
- Wheelset: There’s no need to chase ultimate aerodynamics. On a six-kilometer climb, there’s almost no opportunity to accelerate and cruise. We recommend choosing a lighter training/climbing-oriented wheelset to reduce rotational inertia.
- Tires: The mountain road surface may have localized patches or potholes from years of post-Morakot reconstruction. We recommend using training tires with better puncture resistance and allowing for moderately reduced tire pressure, rather than ultra-narrow, high-pressure racing setups.
- Brakes: Hydraulic disc brakes offer significantly better heat dissipation and braking stability on the long descent back than rim brakes. If your bike is disc-brake spec, be sure to intermittently release the brake levers on the way down to avoid prolonged dragging that could lead to brake fade.
Nutrition and Hydration Strategy
At 6.74 km, the distance isn’t long. Most riders’ completion times will fall somewhere between 25 minutes and close to an hour (depending on individual ability and the actual gradient profile), so in theory there’s no need to carry full-meal-level provisions. However, because this is a “short but extreme” route, the rate of energy expenditure is far higher than riding a flat route for the same duration. Your nutrition strategy should focus on “pre-loading before the ride” and “real-time electrolytes during the ride,” rather than “solid food during the ride.”
- 1-2 hours before riding: Consume easily digestible carbohydrates (bananas, energy bars, white toast with jam, etc.), and avoid high-fat, high-fiber foods that could burden your stomach.
- During the ride: Since the total time is short but heart rate is high, we recommend carrying at least one 500-750ml bottle, which can be mixed with an electrolyte drink at a concentration not too high to avoid adding absorption burden on the stomach. The Maolin area is hot and humid in summer, with shaded mountain sections and sun-exposed stretches alternating, creating large swings in perceived temperature that make it easy to underestimate your sweat rate.
- After the ride: Immediately replenish fluids and electrolytes, and within 30 minutes consume a recovery meal with a carbohydrate-to-protein ratio of roughly 3:1. Mountain climbing places extremely high eccentric/concentric contraction loads on the quadriceps and glutes, and early recovery can reduce next-day soreness.
Weather and Seasonal Recommendations
Maolin is located in the low-mountain terrain of the southern Central Mountain Range. Summers are hot and humid with a high chance of afternoon convective showers, and mountain weather can change far more rapidly than in urban areas. The following recommendations are for reference only; be sure to check the Central Weather Administration’s real-time forecast and local road condition notices before setting out:
- Avoid the midday summer heat: We recommend departing in the early morning or near dusk, avoiding the 2-3 hours around noon when UV and surface temperatures are at their strongest.
- Watch for afternoon thunderstorms: Convective cloud systems develop quickly in mountain areas. If dark clouds are already piling up over distant peaks when you depart, consider adjusting your plans. Wet roads on steep gradients significantly increase the risk of slipping, and braking distances lengthen noticeably on steep sections.
- The winter butterfly-watching season (the overwintering period of Maolin’s Purple Butterfly Valley) is one of Maolin’s most famous tourist periods. During this time the climate is relatively cool and dry, with lower perceived exertion, making it a preferred challenge window for many riders. However, be mindful of the large day-night temperature differences and cold morning temperatures in the mountains.
- Typhoon damage and repaired sections: Some of Maolin’s connecting roads have undergone long-term reconstruction following Typhoon Morakot in 2009 (the 88 Flood). Road conditions, landslide warnings, and temporary closures may still vary with the seasons and typhoon impacts. Always defer to the latest official announcements and actual on-site conditions before departing.
Common Mistakes and DNF Risks
Based on the data tension analysis above, we’ve compiled the most common mistakes riders make when tackling the Wugong Mountain Climb:
- Being misled by the literal “9.7%” figure and setting off complacent: This is the biggest source of risk. As analyzed above, the measured reverse-derived average gradient is closer to 14%, and the route very likely conceals short steep walls of 15-20% or more. If both your mental preparation and gearing configuration are based on 9.7%, you can easily blow up right at the steep wall sections.
- Insufficient gearing forcing you to walk: This isn’t just a fitness issue; it’s also a mechanical one. If the lightest gear on your cassette can’t handle the short steep walls, forcing the pedals through can put excessive stress on your knees or even cause injury. Walking may be “embarrassing,” but it’s far wiser than pushing through and getting hurt.
- Imbalanced early pacing, blowing up at the steepest point: Because the gradient profile is uneven, the early section feeling “manageable” may well be an illusion. Pushing too hard too early makes it easy to run out of gas at the truly steep sections.
- Ignoring the risk of afternoon convective rain in the mountains: Short-distance climbs make it easy to underestimate the weather-change risk window. In reality, even if the entire ride takes only 30-60 minutes, mountain weather can still change dramatically within that time.
- Underestimating fluid and electrolyte loss: The rate of sweating and electrolyte loss during a short, high-intensity climb is no less than during long-distance flat riding. Don’t neglect your preparation just because the “distance is short.”
Target Time Table for Riders of Different Levels
The following time table is a reasonable estimated reference based on the route’s total distance, total elevation gain, and Category 4 classification. It is not an official segment timing benchmark. Actual times will vary significantly depending on individual fitness, weather on the day, road conditions, and gearing configuration. It is provided solely as a reference for pre-ride mental anchoring and training goal setting:
| Rider Level | Estimated Completion Time | Perceived Power Output (FTP%) | Recommended Heart Rate Zone |
|---|---|---|---|
| Pro/Competitive | Approx. 20-25 minutes | Near or above 100% FTP | Zone 4-5 |
| Experienced Amateur/Frequent Climber | Approx. 28-38 minutes | 85-95% FTP | Zone 3-4 |
| General Advanced Recreational Rider | Approx. 40-55 minutes | 70-80% FTP | Zone 3 |
| Limited Climbing Experience/Beginner | Approx. 55 minutes or more, including rest and walking | Adjusted as needed | Prioritize sustained riding over hitting specific zones |
A final reminder for riders of all levels: The core risk of this route lies not in the length of the distance, but in the unevenness of the gradient implied by the massive 46.7% discrepancy between the official average gradient and the measured total elevation gain. Regardless of your level, we recommend adjusting your mental setting before departure from “this is a 9.7% Category 4 route” to “this is a hardcore route with an average gradient approaching 14%, where local sections may far exceed that figure.” With sufficient gearing, conservative early pacing, and thorough preparation, you’ll be able to safely and completely ride this challenging Maolin mountain route.
Training Recommendations: How to Prepare for This Route
If you’ve already put the Wugong Mountain Climb on your upcoming challenge list, simply accumulating riding mileage isn’t the most efficient way to prepare. The core difficulty of this route lies in “short distance, high elevation-gain rate, uneven gradient.” In other words, more than long-distance endurance, it tests your power output near the anaerobic threshold and your ability to repeatedly recover from high-intensity loads in a short time. Below are several training directions you can arrange in the 4-6 weeks before the challenge.
Interval Training Over Long-Distance Riding
Since the entire ride may take only 25-55 minutes and is presumed to contain multiple short steep walls, your training menu should center on “lactate threshold intervals” and “short power intervals,” rather than traditional long-distance Zone 2 aerobic riding. For example, you can schedule 1-2 climbing interval sessions per week, such as on a training slope with a gradient of 8% or more, performing 4-6 sets of 3-5 minute high-intensity climbing efforts, with 3-4 minutes of easy spinning or flat recovery between sets. This training pattern effectively simulates the actual load profile of “steep wall—easier section—steep wall” alternation on Wugong Mountain.
Out-of-Saddle Strength and Core Stability Training
Given that the route’s potential short steep walls will require frequent use of out-of-saddle technique, we recommend incorporating strength training targeting the quadriceps, glutes, and core into your pre-race preparation—for example, squats, Bulgarian split squats, and plank exercises. Two 20-30 minute strength sessions per week can significantly improve stability and efficiency when climbing out of the saddle, reducing form breakdown and wasted energy caused by a weak core.
Real-Gear Simulation Practice
We recommend finding a training slope with a similar gradient (10% or more) and at least 500 meters in length before the challenge, and actually testing whether your planned gearing configuration can sustain output at a cadence of 60-70 rpm—rather than discovering on challenge day that your gearing isn’t sufficient. This practice will also help you more accurately assess your true perceived exertion on this type of short, steep climb, further calibrating the reasonable range for you within the target time table above.
On-Site Practical Reminders: Final Pre-Departure Checklist
Beyond data analysis and training planning, before actually departing to challenge the Wugong Mountain Climb, we recommend completing the following on-site checks to minimize risk:
- Confirm road conditions and closure notices: Due to post-typhoon reconstruction and flood season impacts, some sections of the Maolin mountain roads may have temporary closures, landslide warnings, or construction controls. Be sure to check the latest announcements from the Kaohsiung City Government or the Maolin National Scenic Area Administration before departing, and defer to actual on-site conditions.
- Inform riding companions or family of your itinerary: Mountain cell signal can be unreliable. We recommend informing riding partners or family of your planned departure and return times, and carrying a power bank to ensure your phone and bike computer have sufficient battery.
- Check the braking system: Whether for the climb out or the descent back, brake reliability is paramount. Before departing, check brake pad wear and whether hydraulic/rim brake cable tension is normal.
- Carry basic repair tools: Including spare tubes, a pump or CO2 inflator, and a multi-tool. The density of supply stations and bike shops in mountain areas is far lower than in urban areas, so self-rescue capability is critical in the event of a mechanical failure.
- Know your limits and always retain the flexibility to turn back: If you find your body isn’t responding well, the weather suddenly changes, or road conditions become unclear during the ride, don’t force yourself to complete the challenge. A safe turnaround always takes priority over a completion record.
This route of just 6.74 km condenses the steep essence of Maolin’s mountain terrain, and also condenses a classic case of a climbing route where “the numbers look gentle, but the actual riding is brutally honest.” We hope this engineer-perspective data analysis helps every rider preparing to challenge the Wugong Mountain Climb conquer this hardcore Maolin mountain route with more precise mental preparation and equipment configuration, safely and completely.
Related Reading
- Dona Route Practical Guide: Beneath the Gentle Category 0 Classification, the Truth of 508 Meters of Elevation Gain
- Wuzhi Mountain Practical Guide: 10 km, 839 Meters of Climbing—Don’t Be Fooled by the “5.7% Average”
- Between Breath and Purple Butterflies: A Land Story Taught to Me by a Maolin Wugong Mountain Climb
- Pinglin North 42 Practical Guide: A Hidden Hard Climb with a 12% Steep Section Concealed in 5.1 km—Full Breakdown of the Data Contradictions
西進武嶺 8000名單車友數據分析 PART1 | 從新手到高手數量/瓦數/推力比/FTP推力比/功率計使用率 大解析 | 公路車 | CTYeh
5 年前
台北闊瀨陡坡 騎旅 / 日本單車雜誌編輯車友臨時加入!/ 髮香才是最強的 / feat. 北迴歸線小隊 / 公路車 CT Yeh
6 個月前
半日 小台灣 極限單車路線挑戰實錄
7 年前
爬坡ITT實境)台中 魔王 松鼠坡 首航 6:12 大肚山 大三元 科福路
8 年前
新竹羅平 x 天湖部落 大禹嶺級變態陡坡! 4K超高畫質 空拍 | 公路車
5 年前
大武山後門26%歡樂陡坡!JJSC南台灣單車行Day2 / 被颱風追著跑 / 公路車 / CT Yeh
2 年前
2019 夏季KOM 5小 完賽心得 準備攻略 東進武嶺 夏季登山王之路 Taiwan KOM Challenge
7 年前
雨戰! 西進武嶺員工旅遊 加料 各路段大數據分析 | 同事端出5公斤的公路車來挑戰!? EP1
4 年前