Introduction
The feel of a hydraulic disc brake comes from the incompressible hydraulic fluid sealed within the brake line. When air bubbles (which are compressible) get into the line, the lever feel becomes “spongy,” requiring a longer lever throw to generate braking force. In Taiwan’s humid climate with large temperature swings, systems using DOT brake fluid are especially prone to absorbing moisture, which accelerates fluid degradation.
The purpose of bleeding is to purge air from the brake line and replenish it with fresh hydraulic fluid, restoring the lever feel to like-new condition. This procedure requires patience and care, but no special mechanical background is needed.
Shimano Mineral Oil vs. SRAM DOT Systems
| Characteristic | Shimano Mineral Oil | SRAM DOT 5.1 / DOT 4 |
|---|---|---|
| Fluid | Shimano mineral oil (yellow) | DOT 5.1 or DOT 4 |
| Water absorption | Low, stable over time | Higher (DOT fluid absorbs moisture) |
| Skin irritation | Low | High (corrosive, protection required) |
| Fluid mixing | Never mix with other fluids | DOT 5.1/4 can be mixed to a limited extent with each other, but never with mineral oil |
| Replacement interval | Every 2 years or when lever feel degrades | Annually in Taiwan’s humid climate |
Most important safety reminder: The two fluid types must never be mixed. If you’re unsure which system your bike uses, check the product manual or ask your bike shop.
Preparing Your Bleed Tools (Using Shimano as an Example)
| Tool | Description |
|---|---|
| Shimano bleed kit (TL-BT03S) | Includes syringes and fittings |
| Shimano mineral oil | Genuine SM-DB-OIL, yellow bottle |
| Nitrile gloves | Protect skin from fluid contact |
| Drip cloth or paper towels | Protect the rotor and frame |
| Flathead screwdriver | For removing the reservoir cover |
| Waste fluid container | For collecting old fluid |
Shimano Mineral Oil Bleeding Steps
Preparation
- Clamp the bike in a repair stand, or secure it against a wall.
- Lay down a drip cloth around the rotor, caliper, and frame. Although mineral oil is less damaging to paint or carbon than DOT fluid, protection is still needed.
- Remove the wheel and insert a brake pad spacer into the caliper (a piece of scrap cardboard folded to the right thickness works if you don’t have a spacer on hand).
- Remove the brake pads. If fluid gets on the pads during bleeding, they’ll be ruined.
Bleeding Steps
- Open the reservoir cover: At the top of the brake lever, rotate the lever so the reservoir sits horizontal, then use a flathead screwdriver to remove the reservoir cover.
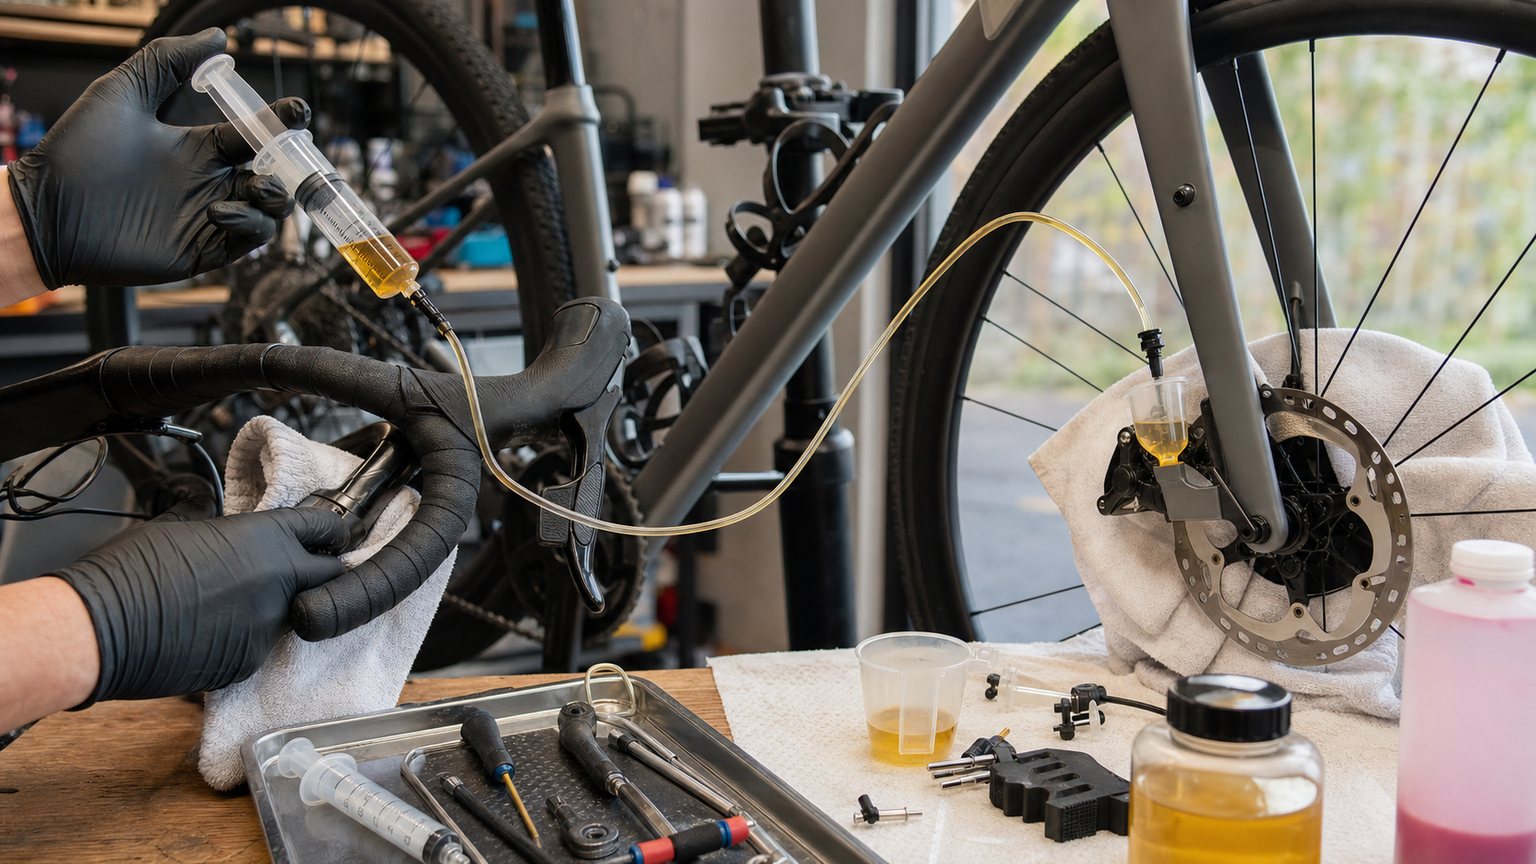
- Connect the syringes: At the caliper’s bleed port (the bleed screw beneath the small rubber plug at the bottom), connect an empty syringe to collect waste fluid. At the reservoir opening, connect a syringe filled with fresh mineral oil.
- Push in fresh fluid: Slowly push fresh fluid in from the reservoir side, while allowing the caliper-side syringe to naturally receive the waste fluid. Throughout the process, keep the fluid level in the reservoir syringe at least half full to avoid letting air into the system.
- Purge air: Gently tap the brake hose to help bubbles float upward. Continue pushing fresh fluid until no more bubbles appear at the caliper-side syringe.
- Reinstall the bleed screw: Before removing the caliper-side syringe, reinstall the bleed screw first (torque 6–8 Nm).
- Top off the reservoir: Slowly withdraw the reservoir syringe to bring the fluid level down to the standard mark. Don’t overfill (this will eliminate lever throw).
- Reinstall the reservoir cover, reinstall the brake pads, and remount the wheel.
Bedding-In and Testing
After bleeding, test the brakes with about 10 stops in a parking lot to confirm the lever feels firm with consistent throw. If it still feels spongy, there’s residual air in the system — repeat the bleeding process.
Differences with SRAM DOT Systems
SRAM systems bleed in the opposite direction from Shimano (from the caliper toward the lever), and DOT fluid is more corrosive, so gloves and eye protection are essential. SRAM provides free bleeding video tutorials — it’s recommended to watch the official video before attempting a bleed.
Practical Tips
- Most bike shops carrying Shimano in Taiwan can perform a bleed for you, typically costing NT$300–800 (including fluid). If you’re not confident doing it yourself, having a shop do it is the safer choice.
- Waste fluid from bleeding is chemical waste and should not be poured down a sink or toilet. Take it to a designated hazardous waste collection point run by your local environmental protection bureau, or ask your bike shop if they’ll collect it for you.
- If brake pads accidentally get contaminated with fluid, discard them and replace them immediately — pads that have absorbed fluid can never fully regain normal friction, no matter how they’re cleaned.
Conclusion
Bleeding hydraulic disc brakes is an advanced but absolutely worthwhile maintenance skill to learn. After a successful bleed, the improvement in lever feel often comes as a pleasant surprise — almost like installing a brand-new brake system. Mastering this skill will greatly boost your confidence and sense of control over your bike.
Related Reading
- Complete Guide to Bleeding Hydraulic Disc Brakes: Shimano and SRAM Dual-System Tutorial
- Road Bike Brake Fluid Replacement Tutorial: DOT vs. Mineral Oil Differences
- The Evolution of Road Bike Braking Systems: Mechanical Disc vs. Hydraulic Disc vs. Rim Brakes Compared
- MTB Braking Systems: Hydraulic Disc Brake Adjustment and Preventing Heat Fade
碟煞公路車 銑面器 !? 原來銑完差這麼多! 降低蹭碟機率! | TIME 公路車 保養小記錄 | CT Yeh
3 年前
SRAM FORCE E1 首發!/ 改成短腿了 / 煞車升級有感嗎? / TIME ADH 變速大升級 / 公路車 / CT Yeh
1 年前
碟煞公路車 優缺點?換車一年半實際經驗分享 / 公路車 / CT Yeh
2 年前
來都來了!改好改滿 / CS大導輪 + BB 可以省幾瓦? / 同場加映 TIME XPRO卡踏 / #公路車 #ceramicspeed / CT Yeh
1 年前
再一組! 全碳幅條 碟煞/無內胎輪組 開箱! 到底好騎嗎? UNAAS X40 | 公路車 | CT Yeh
4 年前
公路車 BB培林大升級! / 備戰海鷗繞圈賽 Canyon Aerod & TIME 一起改 / MIT大廠 CEMA對鎖式陶瓷培林BB & 導輪 / 公路車 / CT Yeh
2 年前
單車胎壓觀察到的有趣現象,SRAM Quarq TyreWiz 2.0 無內胎胎壓計 / 裝了有哪些幫助? / Tubeless / 公路車 / CT Yeh
1 年前
西進武嶺 自製新版AI配速表產生器 x 賽前攻略 抱佛腳! 沒有功率計也可以產生配速表嗎?有什麼其他眉角賽前要注意的呢? | 西進武嶺 / 東進武嶺 KOM 攻略 | 公路車 | CT Yeh
4 年前