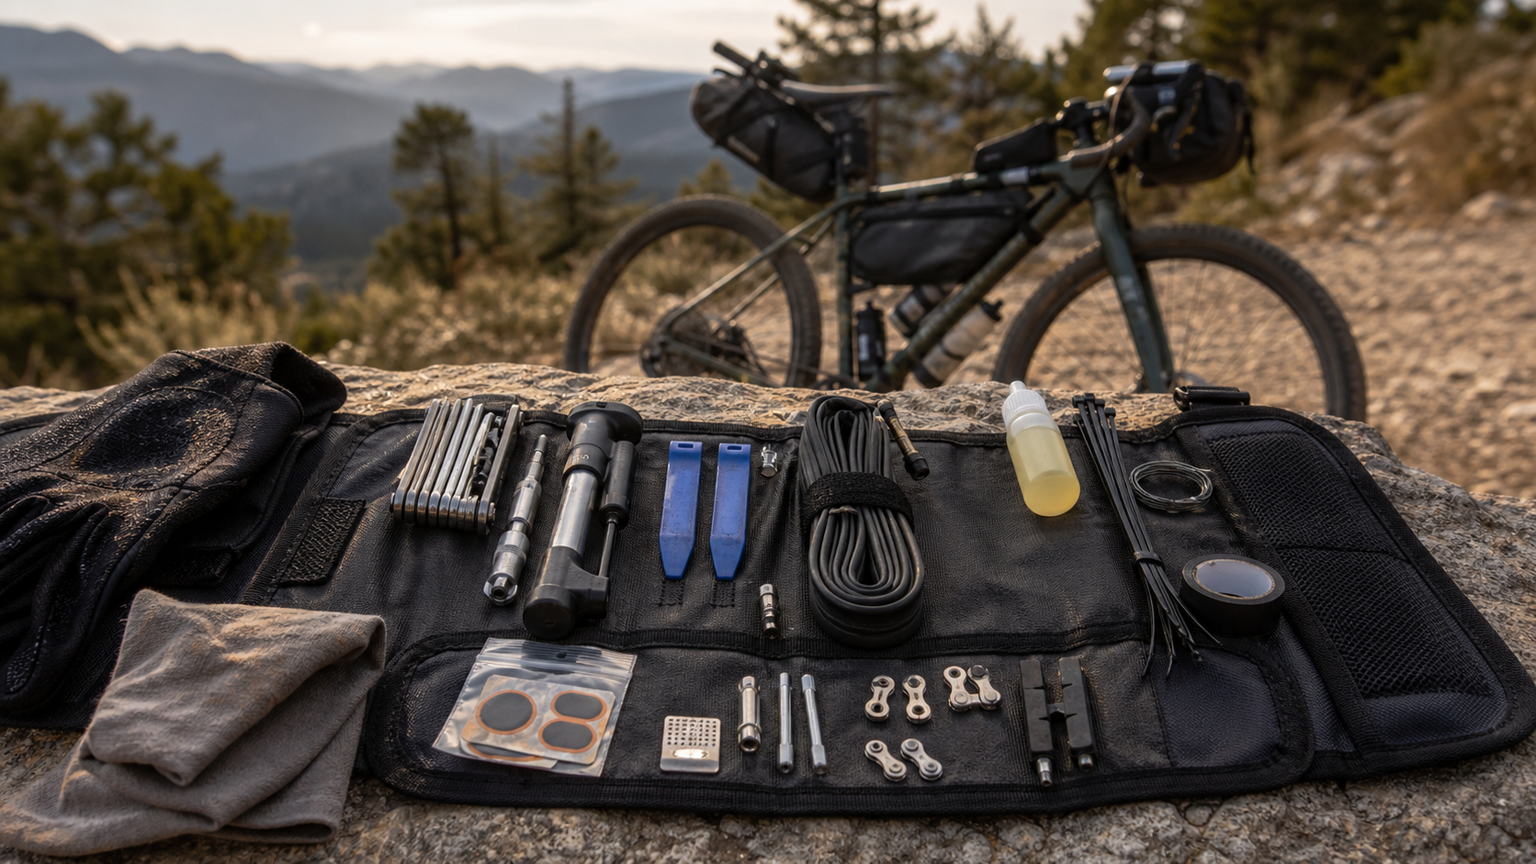
The Philosophy of Kit Selection
A bikepacking repair kit follows the principle of “solving the most problems with the least tools.” Every extra 100g is physical effort, but missing one critical tool can leave you stranded in the mountains. Rule of thumb: 80% of breakdowns are solved by 20% of tools.
Essential Tools Checklist (approx. 800g total)
| Tool/Consumable | Weight | Purpose |
|---|---|---|
| Multi-tool (with chain breaker) | 180g | Most adjustments and broken chains |
| Pump (mini or CO2) | 100g | Inflating after a flat repair |
| Patch kit + rasp | 30g | Patching inner tubes |
| Spare inner tube × 2 | 200g | Direct tube replacement |
| Tire levers × 2 | 30g | Removing tires |
| Duct tape (Tenacious Tape) | 20g | All-purpose repairs |
| Zip ties × 10 | 20g | Emergency fastening |
| Spoke + thin cord | 30g | Emergency lashing |
| Chain quick links × 2 | 5g | Broken chain repair |
| Spare bolts (M5/M6) | 20g | Loose bolts on bags/bottle cages |
| Spare brake pads | 30g | Wear on long descents |
| Chain lube (small bottle) | 50g | Multi-day lubrication |
| Rag | 30g | Cleaning |
| Total | approx. 745g |
Choosing a Multi-tool
Priority order for bikepacking multi-tools:
- Essential functions: Hex wrenches 2/2.5/3/4/5/6mm, Phillips screwdriver, Torx T25, chain breaker
- Common functions: Bottle opener (laughs), spoke wrench, Presta valve core tool
- Advanced functions: Disc brake adjuster, tubeless installation tool
Recommended tools:
- Topeak Mini PT30: 210g, 30 functions, most comprehensive
- Crank Brothers M19: 175g, 19 functions, balanced weight
- Lezyne SV PRO 17: 180g, 17 functions, includes chain tool
Tool Differences: Tubeless vs. Inner Tubes
Using Tubeless
Additional items to carry:
- Tire plugs (Bacon Strips) + tool: 30g
- Small bottle of tubeless sealant (30ml): 50g
- Still carry 1 inner tube (for when plugs fail)
Using Inner Tubes
Additional items to carry:
- Spare inner tube × 2: 100g each
- Patch kit: 30g
- No sealant needed
Recommendation: Tubeless systems have a lower flat probability, but failures are messier. It’s advisable to carry both.
Choosing a Pump
Mini Pump (recommended)
- Lezyne Pressure Drive: 85g, up to 120psi
- Topeak Race Rocket: 120g, features a foot-peg stabilizer design
- Pros: Reusable, no consumables
- Cons: 200+ strokes to reach 60psi
CO2 Cartridges
- Cartridge 16g + nozzle 30g
- Fills to 100psi in 5 seconds
- Cons: Consumable, gone once used, can freeze your hand in cold climates
Recommendation: Mini pump (primary) + 1 CO2 cartridge (emergency)
Repair Priority: Inner Tube / Tire Surface
Scenario 1: Small puncture in inner tube
→ Patch it (5 minutes)
Scenario 2: Large puncture or multiple holes in inner tube
→ Replace with a new inner tube directly (3 minutes)
Scenario 3: Tire surface punctured (cut)
→ Apply a Park Tool tire boot on the inside, or use a banknote/food wrapper as a temporary reinforcement
Scenario 4: Tire sidewall torn (severe)
→ Stitch + reinforce with a patch, ride to the nearest bike shop
Dealing with a Broken Chain
A broken chain is one of the most serious failures. Essential tools:
- Chain breaker (included in multi-tool)
- Chain quick links × 2 (different models for different speeds)
- Spare chain links (can be omitted for minimalist setups)
Repair steps:
- Locate the break
- Use the chain breaker to remove the damaged link
- Install a quick link to connect the two ends
- Confirm the quick link orientation is correct (arrow facing forward)
Advanced: If the chain is missing many links, you’ll need to shorten it (remove one corresponding inner + outer link).
Brake System Failures
Disc brake pad wear:
- Carry spare brake pads (30g per set)
- Monitor wear on multi-day descents
Hydraulic brake fluid leak:
- Nearly impossible to repair in the field
- Emergency workaround: wrap cord around the rotor to increase friction
- Plan an escape route in advance
Mechanical disc brake cable stretch:
- Adjust with a multi-tool
- Loosen the barrel adjuster to compensate
Drivetrain System Failures
Derailleur Misalignment (most common)
- Adjust cable tension with a tool
- Fine-tune with the barrel adjuster
Derailleur Dropped Chain
- Secure the derailleur to the middle gear position
- Use a quick link to run the chain on a single gear ratio
- “Lost shifting but can keep riding”
Broken Derailleur Hanger (severe)
- Nearly impossible to repair without a spare hanger
- Strongly recommended to carry a spare hanger (model-specific): 30g
- Emergency workaround: shorten the chain and convert to a singlespeed
Clever Uses for Emergency Consumables
Duct tape (Tenacious Tape):
- Tent holes, torn clothing
- Waterproofing food packaging
- Emergency repair of bag holes
Zip ties:
- Securing loose parts
- Emergency fix for broken bag racks
- Replacement for broken pannier straps
Spoke + thin cord:
- Emergency securing of loose bolts
- Reinforcing bent bag racks
- Emergency lashing
Storing the Tool Kit
Recommended:
- Small tool pouch (Apidura, Restrap): 50g
- Place at the bottom of a frame bag or in a top tube bag
- Wrap metal tools in a flannel cloth to prevent rattling
Important: Do not store metal tools in the same bag as electronic devices to avoid friction damage to screens.
Pre-Ride Tool Check
- Test every screwdriver bit on the multi-tool
- Confirm the chain breaker pin pushes out properly
- Pump up a wheel once to test the pump
- Unwrap a spare inner tube to confirm it holds air
- Check that patch glue hasn’t expired (within two years)
Related Reading
- Essential Repair Tools for Road Rides: Choosing a Lightweight Tool Kit
- Spare Tubes and Tool Kit Setup for Long Rides: Minimizing Weight and Maximizing Protection
- Spare Parts Checklist for Long-Distance Riding: Must-Carry Repair Tools
- 12 Essential Road Bike Tools: Self-Rescue on the Road and Home Maintenance
單車 一日北高 ( 雙城 ) 肥宅雙人瘋狂行 紀錄片 REACTO
10 年前
摔車後補裝備: 好市多新款單車安全帽& Specialized Romin 北高整路屁股都不痛的坐墊 | 一千元居然有MIPS | CT Yeh | 公路車
4 年前
#公路車 #Fitting 靠人工智慧APP 幫你調整單車
6 年前
多到選擇障礙... 換個單車把帶想一個小時 / BTP / 編織&軟木特有材質超吸睛! / 公路車 / CT Yeh
1 年前
碟煞公路車 銑面器 !? 原來銑完差這麼多! 降低蹭碟機率! | TIME 公路車 保養小記錄 | CT Yeh
3 年前
洗單車神器 吹水機! 實際洗車用用看 暴力洗鍊條大法 | 公路車 | CT Yeh
4 年前
靠單車減肥35公斤 心得分享與整理
7 年前
一日北高前的高裝檢 | 北高 360 | 挑戰11小時的裝備 | 一日雙塔 | 補給
6 年前