The Complete Guide to Frame Sizing: How Stack and Reach Determine Your Riding Position
文章導覽
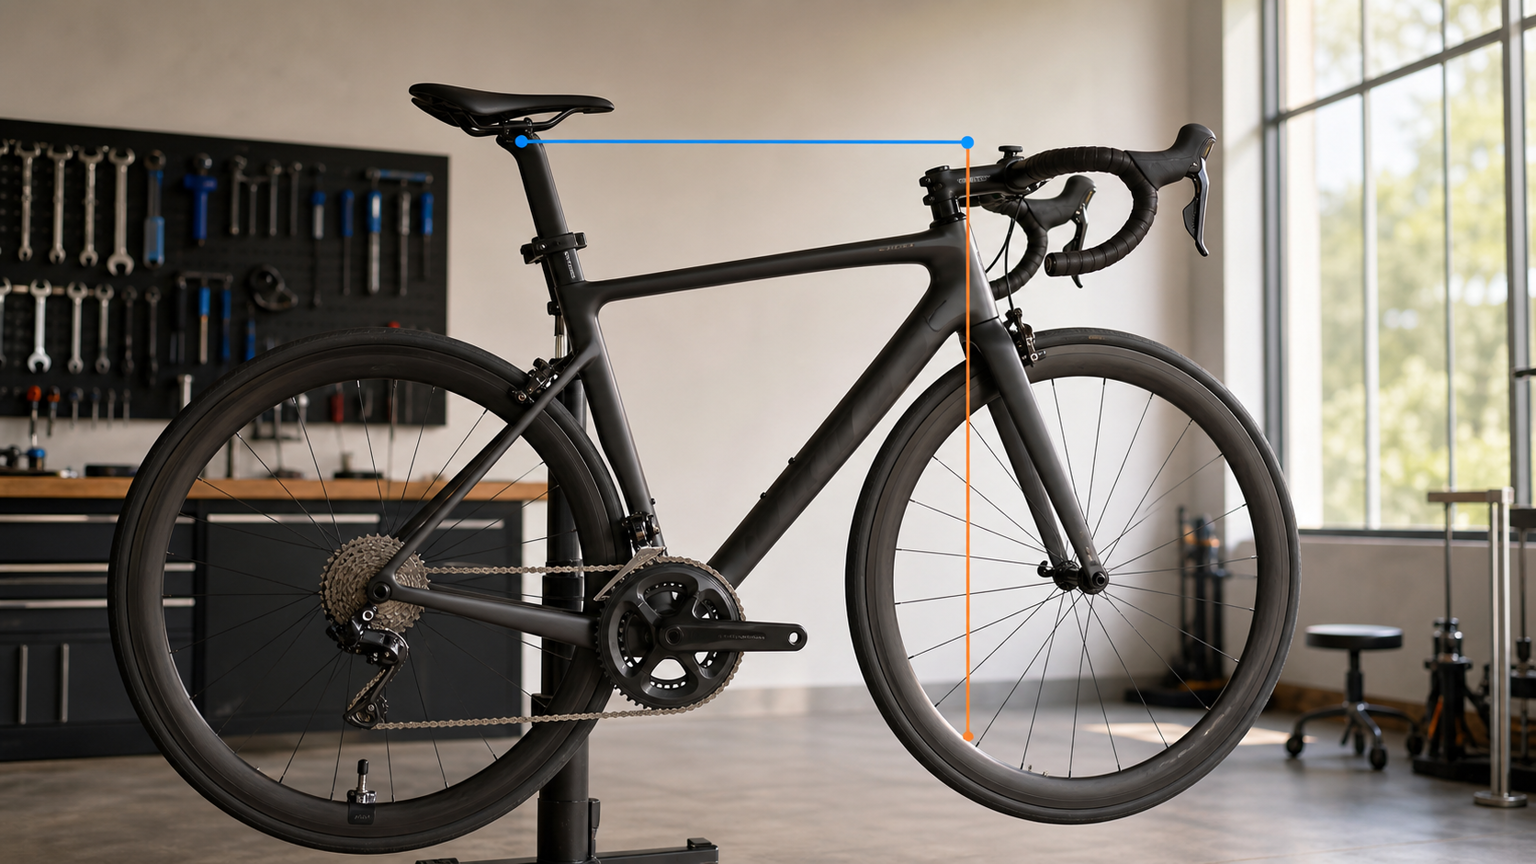
The Complete Guide to Frame Sizing: How Stack and Reach Determine Your Riding Position
The scariest thing about buying a road bike isn’t ending up with poor performance — it’s ending up with the wrong size frame. No amount of stem, spacer, or seatpost adjustment can fully compensate for an ill-fitting frame. But frame sizing labels are confusing: some brands use S/M/L, others use 50/52/54/56, and two bikes both labeled “54” can have very different geometry. The only reliably comparable numbers are Stack and Reach.
What Are Stack and Reach?
Stack
Definition: The vertical distance from the center of the bottom bracket to the center of the top of the head tube.
Stack determines the starting height of your handlebars. The larger the Stack, the higher the handlebar position, and the more upright your riding posture.
Reach
Definition: The horizontal distance from the center of the bottom bracket to the center of the top of the head tube.
Reach determines how far you need to extend to reach the handlebars. The larger the Reach, the more your upper body needs to stretch forward.
Why Are These Two Parameters So Important?
Traditional frame size labels (like “54cm”) usually refer to seat tube length (C-T or C-C), but seat tube length only reflects one dimension of the frame’s vertical orientation — it tells you nothing about the frame’s horizontal size. More importantly, seat tube length can be compensated for by adjusting saddle height, but Stack and Reach are inherent, unchangeable dimensions of the frame itself.
You can swap stems of different lengths, add or remove spacers, and adjust the saddle’s fore-aft position, but these are all fine-tuning on top of the Stack and Reach foundation. If the foundation is wrong, there isn’t enough room in fine-tuning to fix it.
How Stack and Reach Affect Your Ride
The Effect of Stack
| Stack Trait | Larger Stack | Smaller Stack |
|---|---|---|
| Handlebar Position | Higher | Lower |
| Back Angle | More upright | More forward-leaning |
| Lower Back Pressure | Less | More |
| Frontal Area | Larger | Smaller |
| Suited For | Average flexibility, casual riding | Good flexibility, race-oriented |
It’s worth noting that Stack can be “raised” by adding headset spacers (usually up to 30-40mm max), but it cannot be lowered (unless you cut the steerer tube, which is irreversible). So when choosing a bike, it’s better to pick one with a slightly lower Stack and add spacers than to pick one that’s too tall.
The Effect of Reach
| Reach Trait | Larger Reach | Smaller Reach |
|---|---|---|
| Upper Body Extension | More stretched forward | More compact |
| Weight Distribution | Toward front wheel | Toward rear wheel |
| Handling Feel | More stable | More agile |
| Adjustment Method | Compensate with shorter stem | Compensate with longer stem |
Reach can be compensated for with stem length; a stem length between 80-120mm is generally recommended. If you need a stem shorter than 70mm or longer than 130mm to ride comfortably, that’s likely a sign you chose the wrong frame size.
How to Find the Stack and Reach That Fit You
Method 1: Reverse-Engineer From an Existing Bike
If you currently have a bike that feels comfortable to ride, the simplest method is:
- Look up that frame’s Stack and Reach values
- Calculate your current spacer height and stem length
- Derive your “effective Stack” and “effective Reach”
Effective Stack = Frame Stack + Spacer Height + (Stem Length × sin(Stem Angle))
Effective Reach = Frame Reach + Stem Length × cos(Stem Angle)
Method 2: Body Measurement Estimation
Below is a starting reference estimated from body measurements:
| Height (cm) | Suggested Stack Range (mm) | Suggested Reach Range (mm) |
|---|---|---|
| 160-165 | 500-530 | 360-375 |
| 165-170 | 520-550 | 370-385 |
| 170-175 | 540-570 | 375-395 |
| 175-180 | 560-590 | 385-400 |
| 180-185 | 580-610 | 390-405 |
| 185-190 | 600-630 | 400-415 |
| 190+ | 620-650 | 410-425 |
Note: The above are reference ranges only; actual values are heavily influenced by body proportions (torso length, arm length, leg length). Two people both 175cm tall — one with long arms and short legs, the other with short arms and long legs — can have optimal setups that differ by as much as 20mm.
Method 3: Professional Bike Fitting
The most accurate approach is a professional bike fitting:
- The fitter measures the dimensions of various parts of your body
- Different positions are simulated on the fitting rig
- Based on your flexibility, strength, and riding goals
- Specific Stack and Reach values are recommended
- Stem length, spacer height, saddle position, and more are also determined
The cost is roughly NT$2,000-5,000, but for a high-value frame purchase, this investment is well worth it.
What the Stack/Reach Ratio Tells You
The ratio Stack ÷ Reach lets you quickly judge a bike’s geometric character:
- > 1.55: Very upright and comfortable (endurance, touring bikes)
- 1.45-1.55: Moderately sporty (most mid-range road bikes)
- 1.35-1.45: Race-oriented (race-geometry road bikes)
- < 1.35: Extremely aggressive (time trial bikes, track bikes)
This ratio is especially useful when comparing different brands. For example, if Brand A’s size M has a Stack/Reach ratio of 1.50 and Brand B’s size M has a ratio of 1.42, then Brand B’s riding position will clearly be more aggressive.
Common Sizing Mistakes
Mistake 1: Looking Only at Seat Tube Length
Two bikes with the same seat tube length can have Stack and Reach values that differ by 10-20mm. Always rely on Stack/Reach as your reference.
Mistake 2: Sizing Up “For Comfort”
A frame that’s too large means Reach is too long, causing you to overreach and leading to wrist and shoulder pain. Compensating with a short stem will make handling twitchy and nervous.
Mistake 3: Sizing Down “For Agility”
A frame that’s too small means Stack is too low, potentially forcing you to stack a large number of spacers (which looks unsightly and affects steerer tube load), and insufficient Reach will bring your knees too close to the handlebars.
Mistake 4: Copying Someone Else’s Size
“My friend is about the same height as me, he rides a 54 so I’ll ride a 54 too” — this is the most common mistake. Height is just one reference point; body proportions are what really matter.
Mistake 5: Ignoring the Impact of Your Riding Goals
For the same rider, a lower-Stack setup might be needed for criterium racing, while a higher Stack might be needed for a 300km long-distance ride. Your geometry choice should reflect your riding goals.
Practical Bike-Buying Process
- Determine your fitting data (through a professional fitting or by reverse-engineering from an existing bike)
- List the Stack and Reach of candidate bikes (from official geometry charts)
- Calculate the stem length and spacer height each bike would require
- Eliminate options requiring extreme components (stem < 80mm or > 120mm)
- Test ride the candidate bikes (at least 30 minutes to feel the difference)
- Test ride again after fine-tuning (don’t rush the decision — a good bike shop will let you test ride multiple times)
Remember, Stack and Reach are a frame’s DNA. Get the DNA right, and subsequent fitting adjustments are just fine-tuning; get the DNA wrong, and no amount of adjustment will make it more than a compromise. Time spent studying these two numbers is time well spent.