Introduction to Sports Biomechanics: Force, Torque, and Motion Analysis — Understanding How Your Body Generates Power
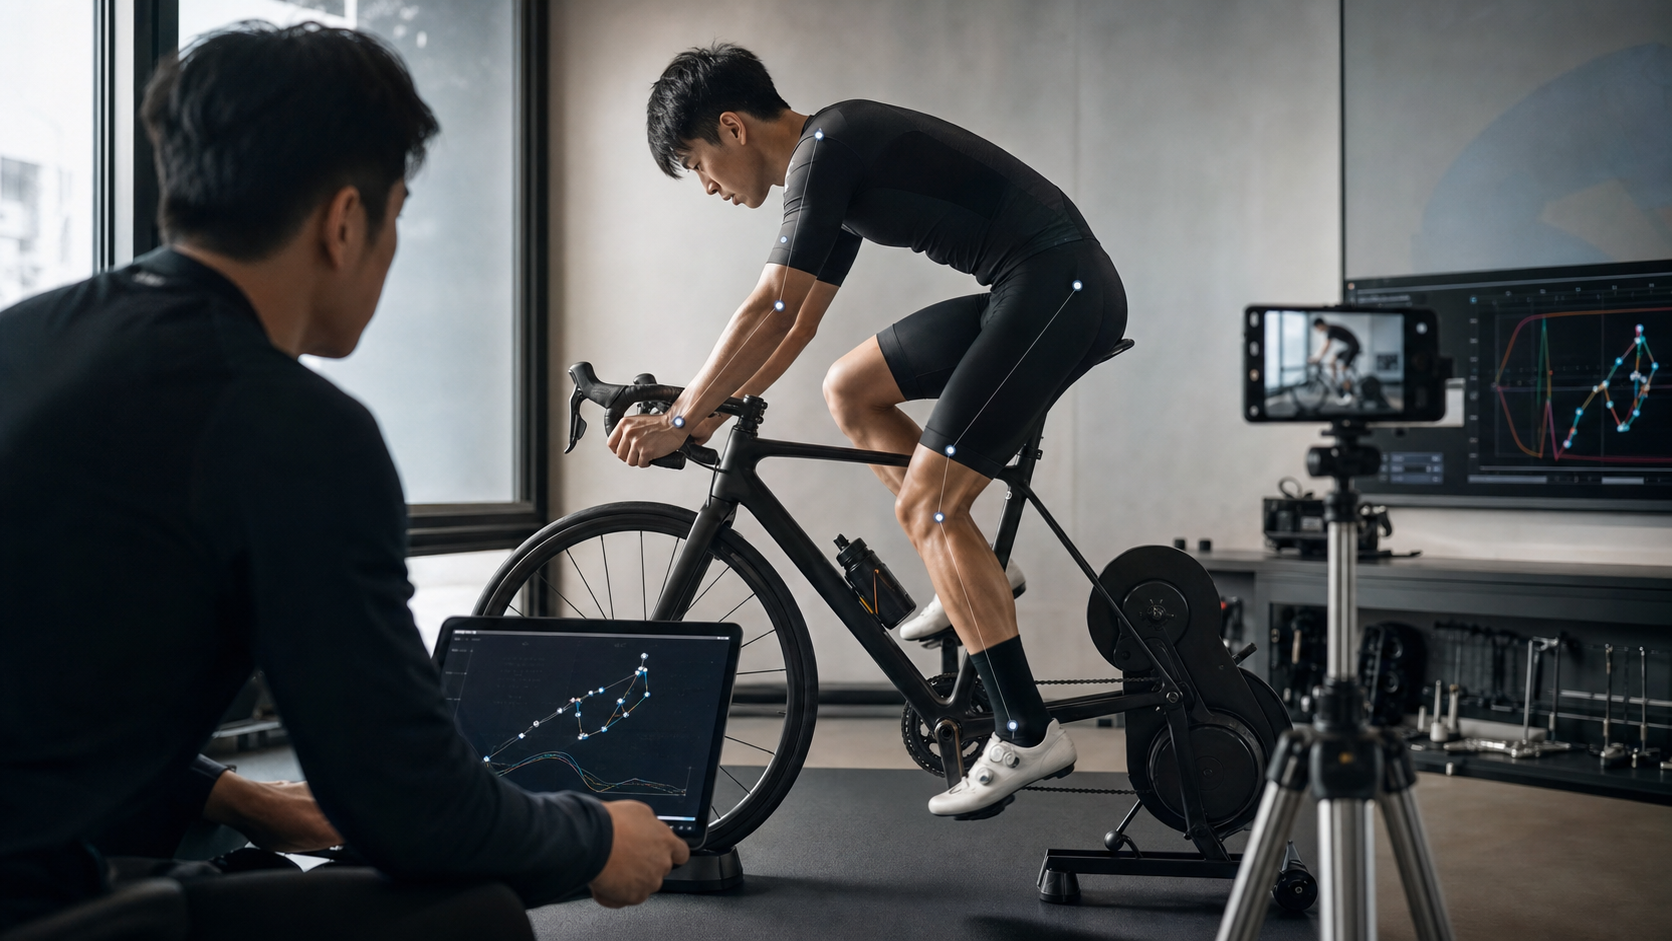
First, a Case I’ve Worked With for Three Years
There was an engineer training with me who worked in the Hsinchu Science Park—let’s call him A-Hong. When he first came to me, his Functional Threshold Power (FTP) had been stuck at 210 watts for a full year, and he was training so hard he started doubting himself. His fitness test data wasn’t actually bad—his VO2 max and lactate threshold were both above average for his age—but he just couldn’t ride fast, and he often got pain on the outside of his knee when climbing.
I didn’t hand him a training plan right away. Instead, I put him on the trainer, recorded three minutes of his pedaling with my phone, and played it back frame by frame in slow motion. After watching it, I roughly knew what the problem was: his saddle was too low, and his knee flexion angle at the bottom of the pedal stroke was close to 45 degrees. Essentially, he was pushing through every revolution in a “half-squat” position. Moreover, almost all his force was being dumped straight down at the 12 o’clock position, with no “pedaling in circles” through the 2 to 5 o’clock range. His torque curve was bunched up in one spot, leaking away in every other direction.
This wasn’t a fitness problem—it was a biomechanics problem. I raised his saddle, fine-tuned the fore-aft position so his knee angle at the bottom of the stroke fell within 30 degrees, and then spent six weeks rebuilding his pedaling rhythm. Three months later, his FTP reached 248 watts, and his knee pain was gone. His fitness hadn’t skyrocketed; what changed was “how the force was transmitted.”
This is why I always tell my athletes: Before you push harder, first understand how your body generates force. This article will introduce you to the three most core concepts in sports biomechanics—force, torque, and motion analysis. Once you understand them, you’ll see your own training with completely different eyes.
What Biomechanics Actually Studies
Biomechanics, in simple terms, uses physics (especially mechanics) to look at how living organisms move and how they experience force. Applied to sports, it answers very practical questions:
- When you push the pedal, how does force transmit from your glutes, thighs, and calves all the way to the pedal?
- At the moment of foot strike while running, how large is the ground reaction force, and in which direction does it act?
- Why is it that with the same squat weight, some people’s knees are fine while others end up with meniscus damage requiring medical treatment?
Sports biomechanics isn’t formulas locked in an ivory tower; it’s a language for understanding movement quality. You don’t need to solve differential equations, but you do need to grasp a few basic concepts to judge whether your movement is “efficient” or “chronically self-destructive.”
Three Terms You Must Distinguish First
Many people lump “force,” “torque,” and “power” together, and as a result, their training direction gets completely muddled. Let me break it down for you in the most plain-spoken way.
| Term | Physics Definition | Plain-Language Understanding | Example in Sports |
|---|---|---|---|
| Force | The effect that changes an object’s state of motion, unit: Newton (N) | The size of your “push” or “pull” | The force of pressing down on the pedal |
| Torque | Force × moment arm, the rotational effect around an axis, unit: Newton-meter (N·m) | Your ability to “rotate” a joint or crank | The twisting force that turns the crank |
| Power | Work done per unit time, unit: Watt (W) | Your ability to “sustain output” | The wattage shown on the trainer |
The relationship among these three has an elegant formula in cycling:
Power (W) = Torque (N·m) × Angular Velocity (radians per second)
In terms a rider can understand: Watts = how hard you push (torque) × how fast you spin (cadence).
This equation hides a key insight: to output 250 watts, you can either “push very hard and spin slowly” (high torque, low cadence) or “push with less force and spin quickly” (low torque, high cadence). These two choices have vastly different effects on your muscles, joints, and fatigue accumulation. This is also a key point we’ll discuss in detail later.
I often use an analogy with my athletes: force is like the money in your hand, torque is “how you spend that money,” and power is “how much value you produce over a period of time.” With the same amount of money, someone who knows how to spend it buys exactly what they need, while someone who doesn’t wastes half of it. Your body’s force production is the same—it’s not just about having strength; it’s about directing that strength in the right direction, at the right time. This is exactly where biomechanics can help you: it lets you see “where your money is going.”
Force: The Starting Point of All Movement
Ground Reaction Force: You Bear It with Every Step
Let’s start with running. You might think running is “pushing backward with your feet,” but biomechanics will tell you that what actually propels you forward is the Ground Reaction Force (GRF). The harder you push into the ground, the harder the ground pushes back—this is Newton’s Third Law of Motion.
Here’s the catch: for a typical jogger, the vertical ground reaction force at foot strike is about 2 to 3 times body weight. That means a 70 kg runner’s knees and ankles have to absorb impacts on the order of 140 to 210 kg with every step. At faster paces or on downhills, this number gets even higher.
This is why foot strike pattern matters so much. With the same force, if you land with a stiff, straight leg, the impact transmits straight up to the knee, hip, and even the lower back; if you land with a slightly bent knee, letting the muscles absorb like a spring, the same force gets distributed and cushioned. This isn’t mysticism—it’s straightforward mechanics.
The Three Elements of Force: Magnitude, Direction, and Point of Application
Force isn’t just about “how big.” It also has “which direction” and “where it’s applied.” If any of these three elements is off, efficiency suffers.
I often use a relatable example to explain this to athletes: when you push a door, if you push right next to the hinge (wrong point of application), it’s hard to open no matter how hard you push; if you push at an angle (wrong direction), a large portion of your force is wasted. Your body makes these kinds of mistakes every day—you just can’t see it.
Back to A-Hong’s example. When he pedaled, almost all his force went straight down (12 o’clock direction), but when the crank is at the 3 o’clock position, a downward force contributes almost nothing to “rotating the crank” (because the force direction is perpendicular to the crank’s rotation). What he was wasting was precisely the “direction” element.
Torque: The Rotational Effect of Joints and Cranks
If force is “linear push and pull,” then torque is “rotational effect.” Almost all human movement is essentially joints rotating around an axis—knee extension, elbow flexion, hip opening and closing—all of these are torque in action.
Moment Arm: Why Posture Matters More Than Strength
Torque = Force × Moment Arm. The moment arm is “the perpendicular distance from the line of action of the force to the axis of rotation.” Once you understand this concept, you’ll find that many “whys” in training suddenly make sense.
Here’s a common gym example: during a biceps curl, when your elbow is bent at 90 degrees and your forearm is horizontal, the weight creates the maximum torque on the elbow joint (longest moment arm), which is why this angle feels “heaviest and most burning.” When your arm is fully extended or fully curled, the moment arm shortens, and the same dumbbell feels easier. The weight hasn’t changed; the torque has.
This principle directly affects your safety. In a squat, if your center of mass shifts too far forward and the barbell is too far from your hip joint, the moment arm lengthens and the torque on your lower back skyrockets—this is why many people develop lower back pain from squatting. Adjusting your posture to shorten the moment arm often protects you more than just grinding through core work.
Torque in Cycling: Pedaling in Circles, Not Stomping
Back to cycling. As the crank rotates one full revolution, ideally you want to apply effective “rotational torque” to the crank throughout the entire circle. But most amateur riders’ torque is concentrated in the “pushing down” phase from 1 to 5 o’clock, with the rest of the circle nearly freewheeling—or even creating resistance.
Advanced pedaling involves a slight “scraping backward” motion from 6 to 8 o’clock (bottom to back) and reducing the burden of “mashing down on the other foot” during the 8 to 12 o’clock (upstroke) phase. Across the full revolution, the torque curve becomes more even—this is what’s commonly called “pedaling in circles.” An even torque distribution isn’t just more efficient; it also spreads the load across more muscle groups, delaying fatigue in any single area.
The Trade-off Between Cadence and Torque: A Practical Table
Earlier I mentioned that “at the same wattage, you can use high torque with low cadence, or low torque with high cadence.” This isn’t just theory—it determines whether you get injured and how durable you are.
Laboratory research has found that trained cyclists freely choose a cadence of around 90 to 100 rpm, which is significantly higher than the mechanically optimal cadence for minimizing oxygen consumption alone (around 60 to 70 rpm). Why would the body choose a cadence that “uses more oxygen”? Because at higher cadences, the muscular force required per pedal stroke is smaller, which reduces localized muscle fatigue, protects fast-twitch muscle fibers, and allows you to sustain power over long rides (source listed in the references at the end).
Here’s a trade-off table I’ve put together to help you decide which strategy to use in which situation:
| Situation | Recommended Cadence | Torque Characteristics | Why |
|---|---|---|---|
| Long-distance cruising, endurance rides | 85–95 rpm | Low-to-moderate torque | Spreads muscle load, protects knees, delays fatigue |
| Steep climbs | 70–85 rpm | Moderate-to-high torque | The grade limits cadence, but try not to drop too low to avoid overloading the knees |
| Short sprints | 100+ rpm | Low torque, explosive | Relies on fast-twitch fibers and neural recruitment; torque demand is relatively low |
| Returning from injury, sensitive knees | 90–100 rpm | Low torque | Less force per revolution, lower stress on the knee joint |
The most important takeaway from this table: if your knees are prone to pain, prioritize raising your cadence and lowering your torque. I’ve worked with countless athletes with old knee injuries—just raising their cruising cadence from 70 to 90 rpm noticeably improved their pain, because the torque each knee had to bear per revolution became smaller.
But a word of caution: higher cadence isn’t always better. Excessively high cadence (e.g., sustaining over 110 rpm for long periods) greatly increases cardiovascular demand and the need for pelvic stability, which can actually hurt efficiency and cause your upper body to start swaying. So the right mindset isn’t “spin as fast as you can,” but “find the sweet spot where your knees feel easy and your cardiovascular system isn’t blown out.” Most people land between 85 and 95 rpm, but you need to test and feel it with your own body. This is also why I never give my athletes a rigid number—I teach them how to observe and how to judge.
Motion Analysis Tools: From Free to Professional
Now that we’ve covered the concepts, let’s talk about how you can actually “see” your own mechanical problems. Motion analysis spans a whole spectrum, from the most basic to the most professional.
Level One: Phone Slow-Motion—Anyone Can Do It
I’ll be honest: in fifteen years of coaching, the tool I use most often and with the best cost-performance ratio is a smartphone.
Almost every phone these days can shoot slow-motion at 120 or 240 fps. All you need to do:
- Mount your phone securely (tripod or against a wall) and film yourself from the direct side view while riding the trainer or running on a treadmill.
- Record for 30 seconds to a minute, then go through it frame by frame with the built-in player afterward.
- Focus on a few key moments: knee angle at the bottom of the pedal stroke, whether your knee lands in front of or behind your foot at the moment of foot strike, and whether your upper body sways side to side.
Just doing this will let you catch about 80% of obvious problems. Many paid apps (like motion analysis software that lets you draw lines and measure angles frame by frame) make it even easier to draw lines and measure angles directly on the screen, but the principle is the same.
Level Two: Power Meters and Pedaling Analysis
If you’re serious about cycling, a power meter is a worthwhile investment. Beyond displaying watts, mid-to-high-end power meters can give you data like left/right leg balance, Torque Effectiveness, and Pedal Smoothness—essentially quantifying the torque curve you can’t see.
When I review this data with athletes, the two most common issues I catch are: a left/right leg difference of more than 5% (indicating compensation or an old injury on one side), and low torque effectiveness (indicating torque concentrated in the downstroke with leakage in other directions). These are hard to judge precisely with the naked eye, but the data makes them crystal clear.
Level Three: Professional Labs and Bike Fitting
The highest tier is three-dimensional motion capture systems in sports science labs (reflective markers placed on the body, with multiple infrared cameras reconstructing a 3D skeleton), paired with force plates to measure ground reaction forces. This level is typically found in university sports science departments, national training centers, or high-end bike fitting services.
In Taiwan, more and more professional bike fitting studios offer dynamic measurement services, using sensors to see your joint angles in real time while you ride. If you have chronic pain with no identifiable cause, or you’ve invested heavily in training and want to break through, spending money on a professional fitting is usually well worth it.
Tool Comparison Table
| Tool Level | Cost | What You Can See | Who It’s For |
|---|---|---|---|
| Phone slow-motion | Nearly free | Joint angles, postural symmetry, obvious compensation | Everyone; a must-do for beginners |
| Power meter + pedaling analysis | Moderate | Torque curve, left/right balance, pedaling efficiency | Riders training seriously |
| Professional bike fit | Moderate-to-high | Dynamic joint angles, personalized adjustments | Those with chronic pain or looking to break through |
| 3D motion capture | High (mostly institutional) | Complete 3D mechanics, ground reaction forces | Competitive athletes, research, post-surgical assessment |
A Real Adjustment Example: Saddle Height and Knee Angle
I mentioned A-Hong’s knee angle problem earlier—let’s expand on it here, because it’s the most common trap riders fall into, and it has clear research backing.
Research indicates that when setting saddle height, a knee flexion angle of approximately 25 to 30 degrees at the bottom of the pedal stroke significantly reduces the risk of overuse injuries and is associated with better pedaling efficiency. Conversely, when the knee flexion angle exceeds 40 degrees, the stress on the knee joint (especially the patellofemoral joint) increases noticeably, raising the risk of pain (source listed in the references at the end).
Note that “knee flexion angle” here means how much the knee is bent from fully straight (0 degrees). So 25 to 30 degrees is a state of “nearly straight, but not fully locked out.” If the saddle is too low, the knee bends too much (large angle), like A-Hong half-squatting and mashing. If the saddle is too high, the knee is almost fully extended and the pelvis rocks side to side, which instead strains the hamstring tendons.
A Preliminary Self-Check You Can Do
- Have someone film you from the direct side view, or set up your phone on a selfie stand, and pedal a few revolutions on the trainer.
- Pause at the frame where the pedal is at the bottom of the stroke (pedal at 6 o’clock, foot roughly horizontal).
- Roughly assess whether your knee is “nearly straight with a slight bend” or “bent a lot, like a half-squat.”
- If it’s clearly a half-squat, the saddle may be too low; if your pelvis rocks side to side and you’re straining to reach the pedal, it may be too high.
Reminder: this is only a preliminary self-check and cannot replace a professional fitting. When adjusting saddle height, it’s recommended to change no more than 3 to 5 mm at a time, then ride a few times to feel it out. Don’t raise it all at once and give your body no time to adapt.
Common Mistakes and Corrections
In all my years of coaching, the same biomechanical errors keep recurring. I’ve listed the most common ones below, along with correction directions.
Mistake One: Only Training “Force,” Ignoring “Direction” and “Efficiency”
Many people think getting stronger means “pushing harder.” But if your force direction is wrong and half your torque is leaking away, no amount of force will help. Correction: First use your phone or power meter to look at your movement and pedaling efficiency, and recover the “leaked force.” This often leads to faster progress than simply adding more training volume.
Mistake Two: Cadence Too Low, Making the Knees Bear the Torque
This is especially common among new riders coming from a motorcycle or car mindset—they’re used to “grinding slowly in a big gear,” and their cadence often drops below 60 rpm. This riding style produces extremely high torque per revolution, and the knees take the brunt. Correction: Practice bringing your cruising cadence up to 85–95 rpm, shift to an easier gear, and let your cardiovascular system do a bit more work while your knees carry less.
Mistake Three: Landing in Front of Your Body When Running (Overstriding)
Many people try to “run faster by taking bigger strides,” landing well in front of their center of mass. This creates a braking force pointing backward and sends the impact straight into the knees. Correction: Increase your cadence and shorten your stride so your landing point is closer to directly beneath your body, keeping your knees slightly bent at landing to act as shock absorbers.
Mistake Four: Looking Only at a Single Data Point, Ignoring the Whole Kinetic Chain
The human body is a Kinetic Chain, with force linking from the foot, ankle, knee, hip, and core all the way up. The root cause of knee pain may well be insufficient hip mobility or weak core strength. Correction: Don’t just stare at the painful spot—look upstream and downstream. This is also why professional assessments look at the whole movement rather than treating the symptom in isolation.
Common Mistakes Quick-Reference Table
| Mistake | Cost to Your Body | Correction Direction |
|---|---|---|
| Only adding training volume without checking movement | Low efficiency, fast fatigue, prone to injury | Do a movement analysis first to find the force leaks |
| Cadence too low | Excessive torque on the knees | Raise cadence, shift to an easier gear |
| Overstriding when running | Braking force, knee impact | Increase cadence, land closer to your center of mass |
| Only treating the painful spot | Recurring issues | Trace the kinetic chain upstream and downstream for the root cause |
Actionable Advice for Readers at Different Levels
Biomechanics isn’t just for elite athletes—people at every stage can use it. Here are concrete starting points based on your level.
Beginners New to Sport
The single most important thing you should do right now: record yourself riding or running once with your phone and watch it in slow motion. You don’t need to measure angles or understand formulas—just “seeing yourself move” will reveal a bunch of problems you never felt. Combined with the self-check points in this article (knee angle, landing position, upper-body sway), you’re already ahead of most people.
Also, don’t rush to chase watts and pace. Put “is my movement correct” ahead of “how fast am I going” and “how hard am I pushing.” Once the foundation is solid, adding training volume later won’t lead to injury.
Intermediate Athletes with Some Foundation
You can start incorporating data. If you ride, consider a power meter and learn to read pedaling efficiency and left/right balance; if you run, pay attention to cadence (for most people, increasing cadence and shortening stride is kinder to the knees). At the same time, schedule a professional bike fit or running form assessment to address any lingering minor aches and pains.
This stage is also a great time to start targeted strength and mobility training—hip mobility, core stability, single-leg balance. These are the foundations that make the kinetic chain smoother.
Competitive Athletes Chasing Results
What you need is more refined quantification and periodization. Regularly use power meters and motion analysis to track changes in mechanical metrics, and pay special attention to movement compensation when fatigue accumulates (many injuries happen at the moment form breaks down). If you have access to 3D motion capture or sports science lab resources, make good use of them.
More importantly, treat biomechanics as a tool for injury prevention, not just performance enhancement. The thing competitive athletes fear most isn’t training too little—it’s being sidelined by injury. Regularly reviewing your mechanics and catching compensation early is the most cost-effective investment.
Integrating into Taiwan’s Everyday Context
Finally, some practical reminders specific to Taiwan. The cycling and running environment here has several characteristics that all relate to biomechanics.
Hot, humid climate and fatigue compensation. Taiwan’s summers are hot and humid. During prolonged exercise, body temperature and fatigue rise, and movement quality declines—what starts as textbook pedaling or running form tends to break down and show compensation in the latter half. This is when injury risk is highest. My advice: on long rides or runs in hot weather, deliberately “protect your form” in the later stages rather than forcing the pace, and keep up with hydration and electrolytes (for most people, about 400 to 800 ml of fluid per hour when sweating heavily, adjusted based on individual sweat rates).
Mechanical challenges of common venues. Classic climbs like Wuling and Fengguizui subject the knees to severe prolonged high-torque pedaling, so having your fitting and cadence strategy prepared in advance is important. Riverside bike paths are relatively flat, making them ideal for practicing smooth pedaling and stable running form.
Nutrition reminders for those who eat out. Eating out is convenient in Taiwan, but if you only consume refined carbohydrates and insufficient protein after long training sessions, muscle repair suffers, and over time both strength and movement stability are affected. After training, try to get enough protein and carbohydrates. This isn’t biomechanics per se, but it’s the foundation that supports good movement.
Make good use of Taiwan’s healthcare resources. If you have pain that persists for more than two to three weeks, doesn’t improve with rest, or is severe enough to affect walking or climbing stairs, don’t just search your symptoms online and tough it out. Medical care is easily accessible in Taiwan—rehabilitation, orthopedics, and sports medicine clinics can all provide professional assessment, and physical therapists can do movement analysis and corrective work. Seeking care early and identifying structural problems is always more cost-effective than letting it drag into a chronic injury.
A Second Case: A Runner’s Knee, the Problem Was Actually in the Hip
Let me share another athlete: a woman in her early forties with three years of running experience, let’s call her Xiao-Min. Her issue was that the outside of her right knee would start to feel tight and sting after about 5 km of running. It would improve with rest, but flare up again every time she ran—this went on for nearly six months. She initially thought it was her shoes and switched three pairs without any effect.
I had her run on the treadmill and filmed her from both directly behind and directly from the side with my phone. Watching the slow motion, the problem emerged: when her right foot landed, her knee visibly collapsed inward and her pelvis dropped toward the landing side (professionally called “pelvic drop” and “knee valgus”). This was actually weakness in the gluteus medius on the outside of the hip, which couldn’t support the single-leg stance phase, forcing the knee to compensate inward and chronically irritating the lateral structures until they became inflamed.
The pain was in the knee, but the root cause was in the hip. This perfectly echoes the kinetic chain concept from earlier. I didn’t have her do endless knee stretches. Instead, I prescribed gluteus medius strength training (side-lying leg raises, single-leg bridges, clamshells, etc.), combined with increasing her cadence so her landing was more centered under her center of mass. Eight weeks later, her knee pain had almost completely disappeared—and she was surprised to find her pace had naturally gotten faster too, because the kinetic chain was smoother and force was no longer leaking into “compensation.”
I often use this case to remind athletes: when you see pain, don’t jump to conclusions. Use motion analysis to trace up and down the kinetic chain—the answer is often not where you expect it to be.
Going Deeper: Three Key Mechanical Metrics for Runners
If you’re a runner, beyond the landing position discussed earlier, there are three mechanical metrics worth knowing. All of them can be initially observed with a phone or wearable device—no lab required.
| Metric | What It Is | Common Problem | General Direction |
|---|---|---|---|
| Cadence | Steps per minute | Too low (long stride, landing in front) | Most people benefit from moving toward 170–180 steps per minute (varies by individual) |
| Vertical oscillation | The amount your body bounces up and down | Too large means force is wasted jumping upward | Think “forward” rather than “upward,” reduce the bouncing feel |
| Ground contact time | How long your foot is in contact with the ground | Too long often accompanies braking and poor efficiency | Increasing cadence and improving elasticity usually helps |
Reminder: these numbers are “general directions,” not ironclad rules. Everyone’s height, leg length, and running history differ, so the appropriate range will vary. Don’t force yourself into a “standard value” that makes you uncomfortable. The point of movement analysis is to identify “clear deviations that come with pain or poor efficiency,” not to chase some pretty number.
This is also the attitude I always emphasize: biomechanics is a tool for understanding and judgment, not a scale for anxiety. Data serves you—you don’t serve the data.
Mechanical Concepts Can Also Protect Your Weight Training
Many people think biomechanics only relates to cycling and running, but weight training needs it even more—because the forces and torques in lifting are much larger, and when form goes wrong, injuries come fast and hard.
Using the moment arm concept from earlier, you can understand several safety principles in weight training:
- Keep the barbell close to your body in the deadlift. The farther the bar is from your body, the longer the moment arm on your lower back, the greater the torque, and the higher the injury risk. Pulling it against your legs is shortening the moment arm.
- In the squat, keep your knees, hips, and center of mass in a reasonable alignment. Excessive forward lean lengthens the moment arm on the knees or lower back; find a squat pattern that suits your body proportions so the torque is distributed across joints that can handle it.
- In the overhead press, keep the bar stable directly above your shoulders. Once it drifts off the vertical line, the moment arm on the shoulder joint lengthens, making impingement or compensation more likely.
You don’t need to memorize any formulas. Just remember one sentence: keep the line of action of the weight as close to your joint axis as possible—the moment arm shortens, the torque decreases, and the joint stays safe. This single sentence can help you avoid most posture-related injuries in the gym.
Frequently Asked Questions (FAQ)
Over the years, these are the biomechanics questions I’ve been asked to death. Here they are, all answered in one place.
Q: I just want to exercise for health, not compete. Do I still need to understand biomechanics?
A: The more you’re “just exercising for health,” the more you need it. Because you don’t have a team doctor or athletic trainer watching your form. If you develop a chronic injury, you lose the very thing exercise was supposed to give you. Understanding a bit of basic mechanics and doing phone self-checks is the cheapest self-protection there is.
Q: Can I handle all the saddle, handlebar, and other adjustments myself at home?
A: Preliminary self-checks of saddle height and knee angle you can do yourself, and I recommend everyone do them at least once. But adjustments involving fore-aft position, handlebar drop, and cleat angle are interconnected—for those, I recommend a professional fitting to avoid making things worse by yourself. Remember to make small adjustments and give your body time to adapt.
Q: I don’t have a power meter. Does that mean I can’t do movement analysis?
A: Not at all. Phone slow-motion can solve 80% of beginner-level problems, and it’s free. A power meter is a tool for “advanced quantification,” not a “beginner necessity.” Use the free tools well first, then consider whether to invest in equipment.
Q: After changing my form, I feel more tired and awkward at first. Did I change it wrong?
A: Not necessarily. When you change a long-established movement habit, your body initially uses muscle groups it’s not used to, so a brief period of discomfort is normal. But you need to distinguish between “unfamiliar discomfort” and “clear pain”—the former can be progressed gradually, while the latter means you should stop, reassess, or seek professional help. Give yourself a few weeks of adaptation, and don’t change too much at once.
Q: At what level of pain should I see a doctor, and what level can I handle with self-adjustment?
A: A simple principle: if the pain persists for more than two to three weeks, doesn’t improve with rest, or is severe enough to affect daily walking, climbing stairs, or sleep, it’s time to see a doctor. In Taiwan, rehabilitation, orthopedics, and sports medicine clinics are all easily accessible—don’t let a minor injury turn into a major one. Form adjustments can address “efficiency” and “minor discomfort,” but structural problems require professional diagnosis.
A Four-Week Introductory Plan for You
Reading concepts alone isn’t enough—let me turn it into a four-week plan you can start right away. This isn’t a training schedule; it’s practice in “learning to see yourself with mechanical eyes.”
| Week | What to Do This Week | Goal |
|---|---|---|
| Week 1 | Record yourself riding or running once with your phone, watch in slow motion three times | Get used to “observing your own movement” |
| Week 2 | Do the saddle/knee angle self-check, or the running landing position self-check | Identify the single most obvious mechanical problem |
| Week 3 | Make a small adjustment targeting that problem (cadence, stride rate, or saddle) | Experience the difference a “small change” makes |
| Week 4 | Record yourself again, compare with Week 1, and consider whether professional assessment is needed | Build the “observe → adjust → re-observe” loop |
The point of these four weeks isn’t to “get stronger”—it’s to build a habit: turning training from “grinding away blindly” into “something you can see and adjust.” Once you have this loop, every training session will teach you more than it would otherwise.
Conclusion: See Yourself Anew Through the Eyes of Biomechanics
Back to A-Hong from the beginning. He later told me that his biggest takeaway wasn’t the tens of watts of FTP improvement—it was that he finally “understood what his body was doing.” Before, he only knew “push hard.” Now he knows where the force goes, whether the torque is even enough, and whether his knee angle is correct. This understanding will stay with him for life.
An introduction to sports biomechanics, at its core, comes down to three things: understanding force (how hard you push and pull), understanding torque (how you rotate joints and equipment), and learning to see them through movement analysis. You don’t need to become a scientist—you just need an extra pair of “mechanical eyes.”
Next time you train, don’t rush to add volume. Set up your phone first and watch yourself in slow motion once. You’ll be surprised to find that those leaked watts and those seeds of injury have been in the frame all along—you just never learned how to see them. Once you see them, you’ve mastered the most solid, and least injury-prone, path to progress.
This article is educational content and cannot replace individual diagnosis and treatment advice from a physician, physical therapist, or nutritionist. If you have persistent pain or existing joint, cardiovascular, or other health conditions, please consult a qualified medical professional before starting or adjusting your training, and rely on individualized assessment.
References
- Simple Endurance Coaching — Optimal Cadence for Cyclists: What the Research Says About Power, Efficiency, and Fatigue: https://simpleendurancecoaching.com/optimal-cadence-for-cyclists-what-the-research-says-about-power-efficiency-and-fatigue/
- Determining optimal cadence for an individual road cyclist from field data (PMC): https://pmc.ncbi.nlm.nih.gov/articles/PMC4989856/
- Effects of bicycle saddle height on knee injury risk and cycling performance (PubMed): https://pubmed.ncbi.nlm.nih.gov/21615188/
- Effects of saddle height on economy in cycling (PubMed): https://pubmed.ncbi.nlm.nih.gov/18545167/
Related Reading
- The Physiology of Cycling Power Training: The Scientific Relationship Between Muscle Energy Systems and Power Output
- Athlete Mobility Assessment and Improvement: A Coach’s Complete Practical Guide from Screening to Correction
- Cycling Pedaling Biomechanics: Coordination of the Knee, Ankle, and Hip Joints
- The Biomechanics of Running Form: Foot Strike, Cadence, and Efficiency—Explaining Whether You Should Change Your Running Form
西進武嶺 免費訓練分析服務 Intervals | 練不夠還是練過頭?你哪一種類型選手?AI模型告訴你! | 備戰神器 | 公路車 訓練 | CT Yeh
4 年前
西進武嶺 8000名單車友數據分析 PART1 | 從新手到高手數量/瓦數/推力比/FTP推力比/功率計使用率 大解析 | 公路車 | CTYeh
5 年前
西進武嶺 自製新版AI配速表產生器 x 賽前攻略 抱佛腳! 沒有功率計也可以產生配速表嗎?有什麼其他眉角賽前要注意的呢? | 西進武嶺 / 東進武嶺 KOM 攻略 | 公路車 | CT Yeh
4 年前
FTL 與 SYB 車隊專訪 西進武嶺 實用攻略分享! 2小時 如何練?!你不知道的眉角!新手準備武嶺必看 EP1 | 實力派女車友 | 精華版 | 公路車 | CTYeh
4 年前
單車AI教練!全新 ChatGPT4o 幫你分析訓練成果!排武嶺課表,分析騎車姿勢! 太神了! / 公路車 / CT Yeh / feat. 緯緯
2 年前
#公路車 #Fitting 靠人工智慧APP 幫你調整單車
6 年前
CT 喇低賽) 武嶺牽車 才是王道 西進牽車四小時內秘訣 攝手位置 如何判斷 防抽筋小秘訣
7 年前
Never Stop 西進武嶺 前後雙機 完整全程錄影 訓練台 實境
8 年前