Tour de Kusatsu-Shirane Practical Guide: Breakdown of the 12.1 km / 957 m Climb / 6.2% Average Gradient Snow-Season Climb Data
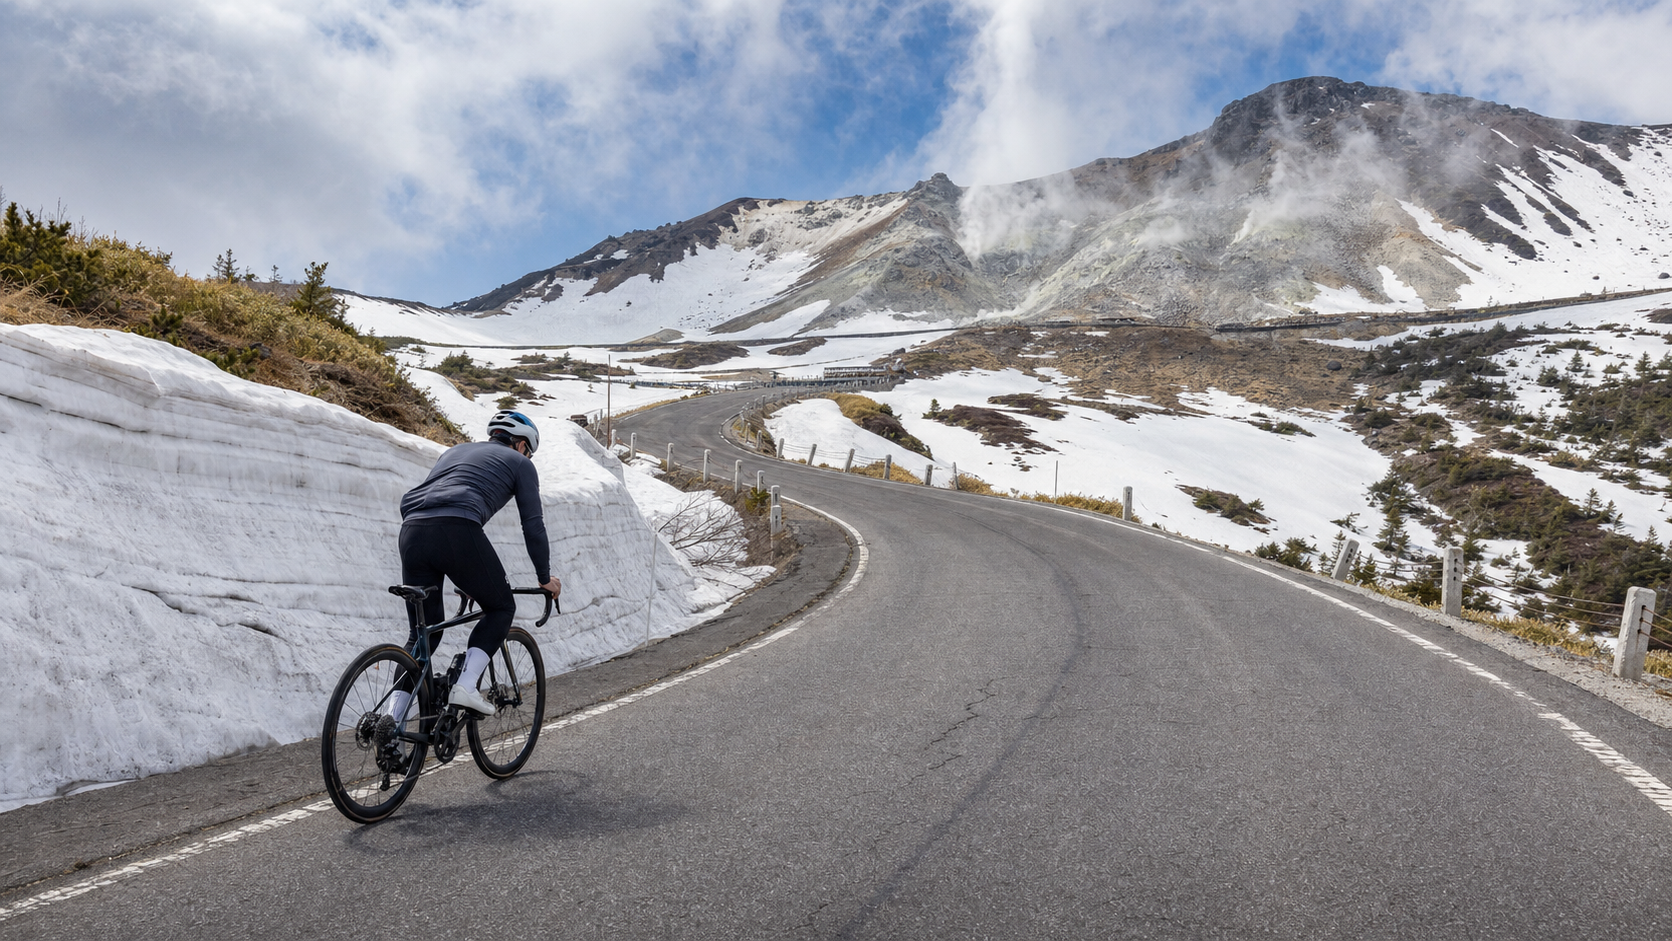
The Tour de Kusatsu is one of Japan’s longest-running hill climb races. The course starts at Kusatsu International Ski Resort in Kusatsu Town, Gunma Prefecture, and climbs along the “Shiga-Kusatsu Kogen Route (National Route 292)” all the way to Shirane Volcano Parking Lot, with the finish at an elevation of approximately 2,000 meters. The Shirane course covered in this article has the following Strava-measured data: distance 12,085 meters (approx. 12.1 km), cumulative elevation gain of approximately 957.4 meters, and an average grade of 6.2%.
Let’s look at these three numbers together first. 12.1 km paired with 957 m of climbing means you need to lift yourself nearly the height of three Taipei 101 towers stacked on top of each other in less than a half-marathon distance. An average grade of 6.2% doesn’t sound extreme, but this is an “average”—the actual road has gentle warm-up sections as well as hard ramps approaching double digits. If your pacing strategy only focuses on the average grade, you’ll almost certainly blow up in the later sections.
For climbing, the average grade is a number for spectators; what riders actually face is the “distribution” and “rhythm” of the grades. The same 6.2% average grade—whether it’s gentle first then steep, or steep first then gentle—represents two completely different races.
In this guide, I’ll take an engineer’s approach, breaking the route into functional segments and walking through grade changes, pacing, cadence, gear selection, and fueling/hydration strategy for each. Finally, I’ll discuss common mistakes and DNF risks under late-snow low temperatures, and provide quantifiable target time references for riders of different levels.
1. Overall Data First: What Kind of Climb Is This?
Before breaking it into segments, let’s establish an overall feel for the numbers. Let’s convert the 12.1 km, 957 m, and 6.2% figures into several useful reference values:
| Item | Value | Notes |
|---|---|---|
| Measured Distance | Approx. 12.1 km | Strava segment 12,085 m |
| Cumulative Elevation Gain | Approx. 957 m | Finish at Shirane Volcano Parking Lot |
| Average Grade | 6.2% | Full-course average, not the steepest section |
| Finish Elevation | Approx. 2,000 m | High altitude, reduced oxygen |
| Average Elevation Gain per km | Approx. 79 m/km | Equivalent to sustained 7.9% perceived load |
| Work Done per km for a 100 kg System | Approx. 77,000 joules | Anti-gravity work of rider + bike + gear |
Here are the key points an engineer should note:
- Average grade 6.2% but 79 m of climbing per km: Because the segment start includes a relatively gentle approach section, the actual core climbing section has a higher grade than 6.2%. You can’t back-calculate power requirements using 6.2%; you need to use the “grade of the current section.”
- Finish elevation approx. 2,000 m: This is the most underestimated killer on this route. At 2,000 m, the reduced air pressure drops aerobic output by roughly 8–12% compared to sea level (depending on individual acclimatization). The watts you can sustain at the base will feel “inexplicably hard to push” above 1,700 m—it’s not that you’re getting weaker; the air is thinner.
- Held during the late-snow season: This event takes place in early spring during the residual snow period, meaning low temperatures, strong winds, and possible snow walls on both sides of the road. The cold changes your fueling rhythm and gear requirements, which we’ll discuss in detail later.
Remember this first: The difficulty of this route lies not in any single steep point, but in the stacking of “sustained moderate-to-high grade” plus “high altitude at the finish.” You’re not fighting a wall; you’re fighting a long, steady incline that becomes increasingly oxygen-deprived the further you go.
Why the “Average Grade” Can Deceive You
Here’s a simple example. Suppose a 10 km climb has the first 3 km at 2% and the remaining 7 km at 8%. The calculated average grade is approximately 6.2%, the same as this route. But if you use 6.2% to estimate your pacing for the entire climb, you’ll be too conservative in the early section and get crushed by the real 8% grade in the later section. That’s the trap of the average grade—it averages out the “easy parts” and the “painful parts,” but your legs only truly suffer during the painful parts.
So the correct way to read it is: Treat 6.2% as a signal that “this is a climb that demands serious respect,” then use the actual grade of the current section to decide gearing and power, rather than forcing the average onto every moment. This is also why I’ll break the route into four segments below, each with different pacing instructions—because each segment has its own character.
Another easily overlooked point is “sustained effort.” Some routes have very steep sections, but they’re short, followed by flatter terrain or even descents that let you recover. The killer feature of this Shirane course is that it “gives you almost nowhere to rest.” From the main climbing section onward, the grade holds steadily in the moderate-to-high range, forcing your cardiovascular system and legs to operate under high load for extended periods without respite. This is particularly unforgiving for riders who are “explosive” but lack “sustained endurance.”
2. Segment-by-Segment Strategy: Breaking 12.1 km into Four Battles
I’ll divide the route into four functional segments. Actual GPS mileage may vary slightly depending on the starting point, so I’ll describe them in relative proportions, focusing on each segment’s “character” and corresponding strategy.
Segment 1 (approx. 0–2.5 km): Warm-up Approach—Control Your Excited Legs
The first two-plus kilometers after the start are a relatively gentle approach, with grades mostly between 3–5%. This is the only section of the entire course where you can “settle your breathing and find your rhythm,” but it’s also where most people make their biggest mistake—because your legs feel fresh and the race atmosphere is electric, it’s easy to surge out at 10–20% above your target power.
- Pacing: Hold your power at 90–95% of your “sustainable full-course power” (roughly 60-minute FTP level, adjusted to your estimated finish time). Better to be conservative early.
- Cadence: Maintain 80–90 rpm, using a lighter gear to gradually bring your heart rate up. Don’t let your heart rate spike to threshold within the first 5 minutes.
- Common mistake: Chasing the riders around you. Every extra watt you spend here will be repaid with interest in Segments 3 and 4.
Segment 2 (approx. 2.5–6.5 km): The Main Climb—Core of the Elevation Gain
Entering the middle section, the grade begins to hold in the 6–8% sustained range. This is where the bulk of the course’s elevation gain is concentrated, and it’s where you need to settle into “cruise mode.”
- Pacing: Switch to target power (100% of sustainable full-course power) and hold steady. The goal here is “boringly consistent”—the flatter your power curve, the better.
- Cadence: You can drop slightly to 72–82 rpm. When the grade steepens, downshift to maintain cadence rather than muscling a big gear, which strains your knees and builds lactate.
- Fueling timing: Complete your first fueling (energy gel or food) during this relatively “non-extreme” section, because after Segment 3 you’ll be too busy to eat.
Segment 3 (approx. 6.5–10 km): Steepness and Altitude Rise Together—The True Decisive Point
This segment decides the race. The grade stays moderate-to-high, and by now you’re above 1,500 m, where oxygen availability drops noticeably. You’ll feel like “the same grade, but much harder to breathe.”
- Pacing: Here you must proactively accept that “power will drift downward.” The reduction in aerobic output at altitude is a physiological reality; trying to hold sea-level power will only blow you up early. Use heart rate plus perceived exertion (RPE) as your primary metrics, keeping RPE at the edge of “can still speak short sentences.”
- Cadence: Holding cadence above 70 rpm is critical. Once your cadence drops below 60 and you start “grinding dead spots,” it means you’ve entered anaerobic depletion and cramps aren’t far behind.
- Mental approach: Shrink your goal from “the finish line” to “the next corner.” This segment is the most mentally draining; breaking the goal into pieces is the only solution.
Segment 4 (approx. 10–12.1 km): High-Altitude Sprint to the Shirane Volcano Parking Lot Finish
The final two kilometers approach 2,000 m of elevation, with thin air, possible crosswinds, and cold. The grade here isn’t necessarily the steepest of the course, but due to oxygen debt and accumulated fatigue, it will feel the most painful.
- Pacing: If you’ve banked energy earlier, you can push your heart rate up 3–5 bpm here, using the psychological dividend of “just one last stretch” to squeeze out remaining power.
- Cadence: Some drop in cadence is acceptable, but avoid prolonged standing sprints—standing at altitude consumes oxygen extremely quickly. Short bursts are fine; long stretches of standing will bottom you out instantly.
- Finish: The finish is at Shirane Volcano Parking Lot, approximately 2,000 m. Immediately put on your warm layers upon arrival (see the weather section).
Segment Pacing Summary Table
Here’s a condensed table of the four-segment strategy, convenient for taping to your bike computer or printing out:
| Segment | Relative Mileage | Grade Character | Power Instruction | Cadence | Key Focus |
|---|---|---|---|---|---|
| Segment 1 | 0–2.5 km | Gentle approach | 90–95% of target | 80–90 rpm | Control excitement, don’t surge |
| Segment 2 | 2.5–6.5 km | Main climb cruise | 100% of target | 72–82 rpm | Stay boringly steady, fuel early |
| Segment 3 | 6.5–10 km | Steep + oxygen debt | Drift downward naturally | Hold 70+ rpm | Heart rate takes over, break goals into pieces |
| Segment 4 | 10–12.1 km | High-altitude finish | Squeeze out what’s left | Allow to drop | Minimize standing, warm up at finish |
The core logic of this table is an effort curve that goes from restraint in the early segment, to locked-in during the middle, to release in the later segments—low early, high late. But note: the “high late” refers to “subjective effort (RPE) and heart rate going up,” not “power numbers going up,” because high altitude suppresses your power ceiling.
3. Gearing and Equipment: Configuration Recommendations for 6.2% Average Grade + High Altitude
Given the grade distribution of this route (sustained 6–8%, with some sections steeper) and the power reduction caused by the high-altitude finish, the gearing philosophy should be “lighter rather than heavier.”
Gearing recommendations (three tiers based on fitness):
- Competitive racers: 50/34 compact crankset up front, with at least an 11–30T or 11–32T cassette in the rear. You have the strength to hold cadence on slightly heavier gears.
- General advanced riders: Compact 50/34 up front, 11–34T in the rear. The extra 34T is your lifesaver when oxygen debt hits in Segment 3.
- Finish-oriented / heavier riders: Seriously consider going gravel-style or a 1x wide-range cassette, or even a 46/30 crankset with an 11–36T cassette. For heavy mashers, a 6.2% average grade is actually sustained high load; a wide gear range isn’t weakness—it’s strategy.
Key equipment checklist:
- Wheels: Standard climbing rims (30–40 mm) are sufficient. Don’t go deep-section for aero—the high-altitude sections of Shirane can have crosswinds, and deep rims become a liability in strong late-snow crosswinds.
- Tire pressure: Cold temperatures slightly reduce tire pressure. Adjust before departure based on the temperature to avoid excessive rolling resistance from under-inflated tires at the start.
- Bike computer / power meter: A power meter is strongly recommended. Given this route’s “high-altitude power reduction” characteristic, relying on heart rate alone can easily mislead you; running both power and heart rate in parallel is the only way to pace precisely.
- Warm layers: This is a late-snow climb; the descent and finish are extremely cold. A windbreaker/thermal vest is mandatory, not optional (see next section).
4. Fueling and Hydration: The Hidden Trap of Cold-Weather Climbing
Many people assume “if it’s cold, you don’t need to drink much water.” This is the most dangerous misconception on a late-snow climb.
- Hydration: In cold conditions, you won’t feel thirsty, but respiratory water loss and sweating from climbing continue. Take small sips every 15–20 minutes, using “time” as your reminder rather than waiting for “thirst.” For the full 12.1 km, with a finish time of roughly 40–70 minutes, carry at least one large bottle.
- Calories/electrolytes: Complete your primary fueling during the gentler grades of Segments 1 and 2. Energy gels harden and become difficult to squeeze in cold weather; keep them in a jersey pocket close to your body before departure to warm them. Electrolyte drinks help prevent cramping under the combination of cold and high intensity.
- Caffeine: If you regularly use it, caffeine 30–45 minutes before the start can help with a 40–70 minute effort, but never try something new on race day.
The golden rule of fueling: Eat while you “still can,” don’t wait until you “need” to. After Segment 3, you’ll be too busy to fuel, so all energy must be banked in the first half of the ride.
5. Weather and Season: Late-Snow Cold Is the Second Opponent on This Route
The Tour de Kusatsu is held during the early spring residual snow season, and the weather conditions at this time of year must be treated seriously as a “second opponent.”
- Extreme temperature swings: The base at Kusatsu Onsen may be relatively mild, but the finish at Shirane Volcano Parking Lot sits at approximately 2,000 m, where temperatures can be 10°C or more lower than the base, with strong winds. Snow walls may line both sides of the road during the residual snow period.
- Hot on the climb, cold on the descent: You’ll heat up and sweat while climbing, but the moment you stop at the finish—and as you prepare for the descent—your body temperature drops rapidly. A sweat-soaked base layer plus cold high-altitude wind equals hypothermia risk.
- Equipment strategy:
- Choose a moisture-wicking, quick-drying base layer; avoid cotton (once wet, you’re done).
- Carry a packable windbreaker/thermal vest and put it on immediately at the finish.
- Add gloves, a neck warmer, and toe covers based on the day’s forecast. Losing feeling in your fingers from cold high-altitude wind affects braking—this is a safety issue, not a comfort issue.
- Visibility and road surface: Fog or slippery sections can occur during the residual snow season. Control your speed on descents, especially in the finish area.
6. Common Mistakes and DNF Risk Checklist
Here’s a list of the most common errors that cause people to “fail to finish or see their results collapse.” Go through each item before race day:
- Going out too hard in the early section: The most common cause of blowing up. Every extra watt in the first 2.5 km is repaid double.
- Gearing too heavy: Going uphill with the mindset “I use the big ring on flats” will make you regret not bringing a 34T when oxygen debt hits in Segment 3.
- Ignoring high-altitude power reduction: Trying to hold sea-level power above 1,700 m is the standard script for blowing up early.
- Delaying fueling until the later sections: After Segment 3, there’s simply no time to eat; energy must be front-loaded.
- Underestimating the cold: Not bringing warm layers leads to hypothermia at the finish and stiff fingers that can’t brake on the descent—this is the error most likely to become a safety incident.
- Not adjusting tire pressure for temperature: Cold-induced low pressure increases rolling resistance and degrades handling.
- Using new equipment/fueling for the first time on race day: Anything new should be tested in training before race day.
DNF risk ranking: For most amateur riders, the real threats to finishing this route aren’t the steepness, but (1) cramping in the middle sections from uncontrolled early pacing, (2) being forced off the bike by altitude-induced oxygen debt, and (3) hypothermia from the cold. All three can be significantly mitigated through “conservative pacing + wide gearing + warm clothing.”
7. Target Time References for Riders of Different Levels
The following target times are rough estimates for the “Shirane course of approximately 12.1 km with 957 m of climbing.” Actual results are heavily influenced by weather, residual snow, wind direction, and altitude acclimatization on the day. These are for pacing planning only, not guarantees.
| Rider Level | Reference Finish Time | Speed Concept | Pacing Strategy |
|---|---|---|---|
| Elite racer | Around 40 minutes | High watts-per-kg, can sustain high-altitude output | Stay near threshold throughout, still hold power at altitude |
| Advanced club rider | Around 50–58 minutes | Stable sub-threshold output | Restrained early, cruise mid, empty the tank at the end |
| General fitness rider | Around 60–75 minutes | Aerobically steady, aided by wide gearing | Conservative throughout, finish-oriented |
| Finish-oriented beginner | Around 75–90+ minutes | Cadence first, not chasing power | Break into segments, rest in pieces, split the finish into small chunks |
Remember: in a hill climb, “consistency” is always worth more than “explosiveness.” A smooth 55-minute ride with a steady power curve beats a 53-minute ride that starts fast and collapses (and if you collapse badly enough, you might not finish at all).
8. Practical Power Pacing: Converting 957 Meters into Executable Numbers
We’ve talked a lot about “conservative” and “steady”—now let’s ground it in an executable power model you can rehearse on the trainer before race day.
First, establish a rough physical intuition. When climbing, your power primarily works against gravity, approximated by:
Climbing power (watts) ≈ System total weight (kg) × 9.8 × vertical ascent rate (m/s) ÷ drivetrain efficiency
Using an example of “rider 65 kg + bike and gear 10 kg = system 75 kg”: if you want to complete the 957 m of climbing in about 50 minutes, the vertical ascent rate is approximately 957 ÷ 3000 seconds ≈ 0.319 m/s. Just fighting gravity requires about 75 × 9.8 × 0.319 ≈ 234 watts. Adding rolling resistance and aerodynamic drag (which is minimal when climbing), your actual output lands in the 250–260 watt range. This also explains why “body weight” is such a critical variable in climbing—for the same target time, every additional 5 kg of system weight costs you over ten extra watts.
Extending this logic into a pacing table for riders of different output capabilities:
| System Total Weight | Target Finish Time | Required Average Output (estimate) | Watts-per-kg Concept |
|---|---|---|---|
| 70 kg | Approx. 45 minutes | Approx. 285 W | High, race-oriented |
| 75 kg | Approx. 50 minutes | Approx. 255 W | Advanced club |
| 80 kg | Approx. 60 minutes | Approx. 225 W | Aerobically steady |
| 88 kg | Approx. 75 minutes | Approx. 200 W | Finish-oriented |
Note that this table does not account for high-altitude power decay. In practice, if you can hold 260 W steadily at the base, you may only manage around 235 W above 1,700 m while feeling just as taxed. So the real pacing strategy should be: bank a little in the early/mid sections (lower altitude), keeping perceived effort one notch below threshold; then let power drift downward naturally at high altitude, with heart rate and RPE taking over. Don’t panic and force it when you see power drop—that’s a normal response to oxygen debt.
The Specific Method for Dual-Track Pacing with Heart Rate + Power
- Lower-altitude section (0–6.5 km): Use power as the primary metric, locking it at 95–100% of target, with heart rate as monitoring.
- High-altitude section (after 6.5 km): Switch to heart rate as the primary metric, holding it at “threshold heart rate minus 3–5 bpm,” allowing power to decline naturally.
- Final 2 km: Remove the limits; decide based on remaining perceived exertion whether to push heart rate up.
This dual-track switching of “power at low altitude, heart rate at high altitude” is the most practical pacing philosophy for this route with its significant elevation gradient.
9. Pre-Race Training and Final Reminders
To prepare specifically for this route, focus your training on three areas:
- Threshold endurance: This is a sustained 40–90 minute effort. SST (Sweet Spot, approximately 88–94% of FTP) and long FTP-range intervals are the most targeted training. Aim for single efforts of 20–40 minutes to simulate the “boredom” of middle-section cruising.
- Climbing-specific cadence work: Find a long climb at 6–8% and practice “holding power at a fixed cadence” to simulate middle-section cruising. Deliberately downshift to protect cadence when the grade steepens, building the muscle memory of not muscling big gears.
- High-altitude/cold adaptation: If possible, ride a high-altitude route before the race to give your body a memory of oxygen debt; also test your cold-weather gear combination. Practice where your warm layers go in which pocket and whether you can put them on one-handed while riding.
Race Week and Race Day Checklist
- One week before: Taper progressively, keeping intensity but cutting volume so you arrive with fresh legs.
- Night before: Confirm fueling, warm layers, tires, brakes, and shifting are all in place; portion out your fueling.
- Race morning: Eat early to allow digestion time; make final tire pressure and clothing adjustments based on the temperature.
- Warm-up: In late-snow cold, muscles need more warming. If the venue allows, spin lightly in an easy gear before the start to bring your heart rate up slightly, avoiding starting with cold, stiff muscles.
Finally, part of the beauty of this route comes precisely from its harshness—the volcanic highlands in residual snow, the increasingly barren landscape as you climb, the sense of achievement at the 2,000 m finish. All of it is earned through pacing discipline. It won’t give you extra oxygen just because your willpower is strong, and it won’t cancel the cold because you’re having a good day. The only things you control are “preparation” and “pacing.” Read the numbers, hold your rhythm, bring your gear—leave the rest to your legs and this mountain, Shirane.
Treat every section of the climb as a quantifiable engineering problem: know how many watts to push, which gear to use, where to fuel, and where to rein in power. When you eliminate uncertainty item by item, what remains is the pure enjoyment of the climb itself.
10. Descent and Cool-Down: Don’t Let the Most Dangerous Part Ruin a Great Climb
Most riders preparing for a hill climb put all their focus on “how to get up” and forget “how to get down safely.” On a late-snow high-altitude route, the descent is actually the higher-risk phase.
- Body temperature management first: Descending from the finish at approximately 2,000 m, the wind chill drops rapidly as speed increases. Put on your warm layers and gloves before starting the descent. A sweat-soaked base layer plus high-speed cold wind is the standard recipe for hypothermia.
- Reading the road: During the residual snow season, the road may have meltwater, wet patches in shaded areas, or even localized ice. Brake early before corners and avoid braking mid-corner; treat any darker or reflective road surface as slippery.
- Braking rhythm: Avoid prolonged dragging on long descents (especially the risk of overheating disc brakes or blowing tires on rim brakes). Control speed with “intermittent pulsing” to give the braking system time to cool.
- Body position: Keep your center of gravity low and back, relax your upper body, and let the bike hold its line. Fingers stiffen easily in cold wind; if you feel them going numb, find a safe spot to stop and shake them out before continuing. That’s not wasting time—that’s staying alive.
Cool-down matters just as much. After reaching the base, spin gently in an easy gear for a few minutes to flush lactate and let your heart rate settle, then take in carbohydrates and protein. This effort is a significant load on your body; finishing properly means tomorrow won’t be ruined.
11. FAQ
Q: My FTP on flat ground is decent, but I’ve never climbed at altitude. Will I have problems?
A: Yes. Flat-ground power doesn’t equal high-altitude performance. Above 1,700 m, aerobic output drops noticeably. Without mental preparation, you’re likely to panic in Segment 3 when you “can’t push the same watts for no apparent reason,” over-force, and blow up early. Be sure to let heart rate and RPE take over and accept that power reduction is normal.
Q: How light should my gearing actually be?
A: Lighter rather than heavier. For general advanced riders, at least an 11–34T cassette is recommended; finish-oriented or heavier riders should consider even wider cassettes or a smaller front chainring. Those extra teeth won’t slow you down, but they can save you in the oxygen-deprived Segment 3.
Q: Is the late-snow season really that cold?
A: The finish sits at approximately 2,000 m, potentially 10°C or more colder than the base, with strong winds and possible snow walls on both sides. You’ll heat up while climbing, but your temperature drops rapidly the moment you stop. Warm layers are mandatory, not optional.
Q: How long does it take to finish?
A: Elite riders finish in around 40 minutes, advanced riders around 50–58 minutes, general riders around 60–75 minutes, and finish-oriented beginners may take 75–90+ minutes. Actual times are heavily influenced by weather, residual snow, and altitude acclimatization, so don’t treat these numbers as guarantees.
Q: Is one bottle enough?
A: For a 40–70 minute climb, at least one large bottle; in cold conditions you won’t feel thirsty, but you’re still losing fluid. Use time-based reminders to take small sips.
12. Pre-Ride Checklist (Ready to Copy)
The night before, go through this list item by item:
- [ ] Gearing confirmed (rear cassette wide enough, ≥34T recommended)
- [ ] Power meter/bike computer battery and data fields configured (displaying both power and heart rate)
- [ ] Warm layers (packable windbreaker/vest), gloves, neck warmer
- [ ] Moisture-wicking quick-dry base layer (avoid cotton)
- [ ] Fueling portioned out, kept warm in a jersey pocket
- [ ] At least one large bottle (with electrolytes)
- [ ] Tire pressure with room to adjust for next day’s temperature
- [ ] Brakes, shifting, and chain checked (descent safety)
- [ ] Race and road/volcano access information confirmed one more time
Eliminate uncertainty item by item, and you’ve already won half the battle at the starting line. The rest is up to your legs and this mountain, Shirane.
May every corner bring you closer to the sky above Yugama.
Related Reading
- Riding Above the Three Great Hot Springs of Japan: Tour de Kusatsu-Shiranesan, a Hot Spring Journey from Yubatake Steam to the Snowy Highlands
- Utsukushigahara Highland Climb Guide: Opening Ramp of 20%+, Straight Up Nagano’s 2,000-Meter Lava Plateau
- Akagi-san East Face · Rihei Chaya Hill Climb Guide: 9.1 km at 7.7% Average Grade, a Quiet Steep Climb in Kiryu Kurohone-cho
- Hakone Pass (National Route 1) Practical Guide: Segment Pacing and Gear Breakdown for 15.6 km with 846 m of Climbing
台北闊瀨陡坡 騎旅 / 日本單車雜誌編輯車友臨時加入!/ 髮香才是最強的 / feat. 北迴歸線小隊 / 公路車 CT Yeh
6 個月前
半日 小台灣 極限單車路線挑戰實錄
7 年前
2025 乘鞍岳登山賽 比賽全紀錄篇 / 完整路線攻略介紹 / 日本版武嶺 公路最高點 / 高山空拍絕景 / 明年會開團! / 公路車 / CT Yeh
10 個月前
西進武嶺 8000名單車友數據分析 PART1 | 從新手到高手數量/瓦數/推力比/FTP推力比/功率計使用率 大解析 | 公路車 | CTYeh
5 年前
小野田真的存在!日本赤城山爬坡公路賽 台灣首發團完全實錄 | 頭文字D真實賽道! | 看完東奧自行車賽後好想再去騎一次啊! | 公路車 | CT Yeh
4 年前
爬坡ITT實境)台中 魔王 松鼠坡 首航 6:12 大肚山 大三元 科福路
8 年前
FTL 與 SYB 車隊專訪 西進武嶺 實用攻略分享! 2小時 如何練?!你不知道的眉角!新手準備武嶺必看 EP1 | 實力派女車友 | 精華版 | 公路車 | CTYeh
4 年前
2025 乘鞍 KOM 登山賽挑戰實錄 / 日本公路最高 ! 賽前探路篇 / 比富士山厲害,無敵絕景!/ 40週年 / 中文YT首發 / 公路車 / CT Yeh #乘鞍ヒルクライム
11 個月前