Maebashi Akagi Mountain Hill Climb Official Course Guide: 18.6 km, 60+ Consecutive Corners, 1,238 m Elevation Gain — A True Climbing Challenge
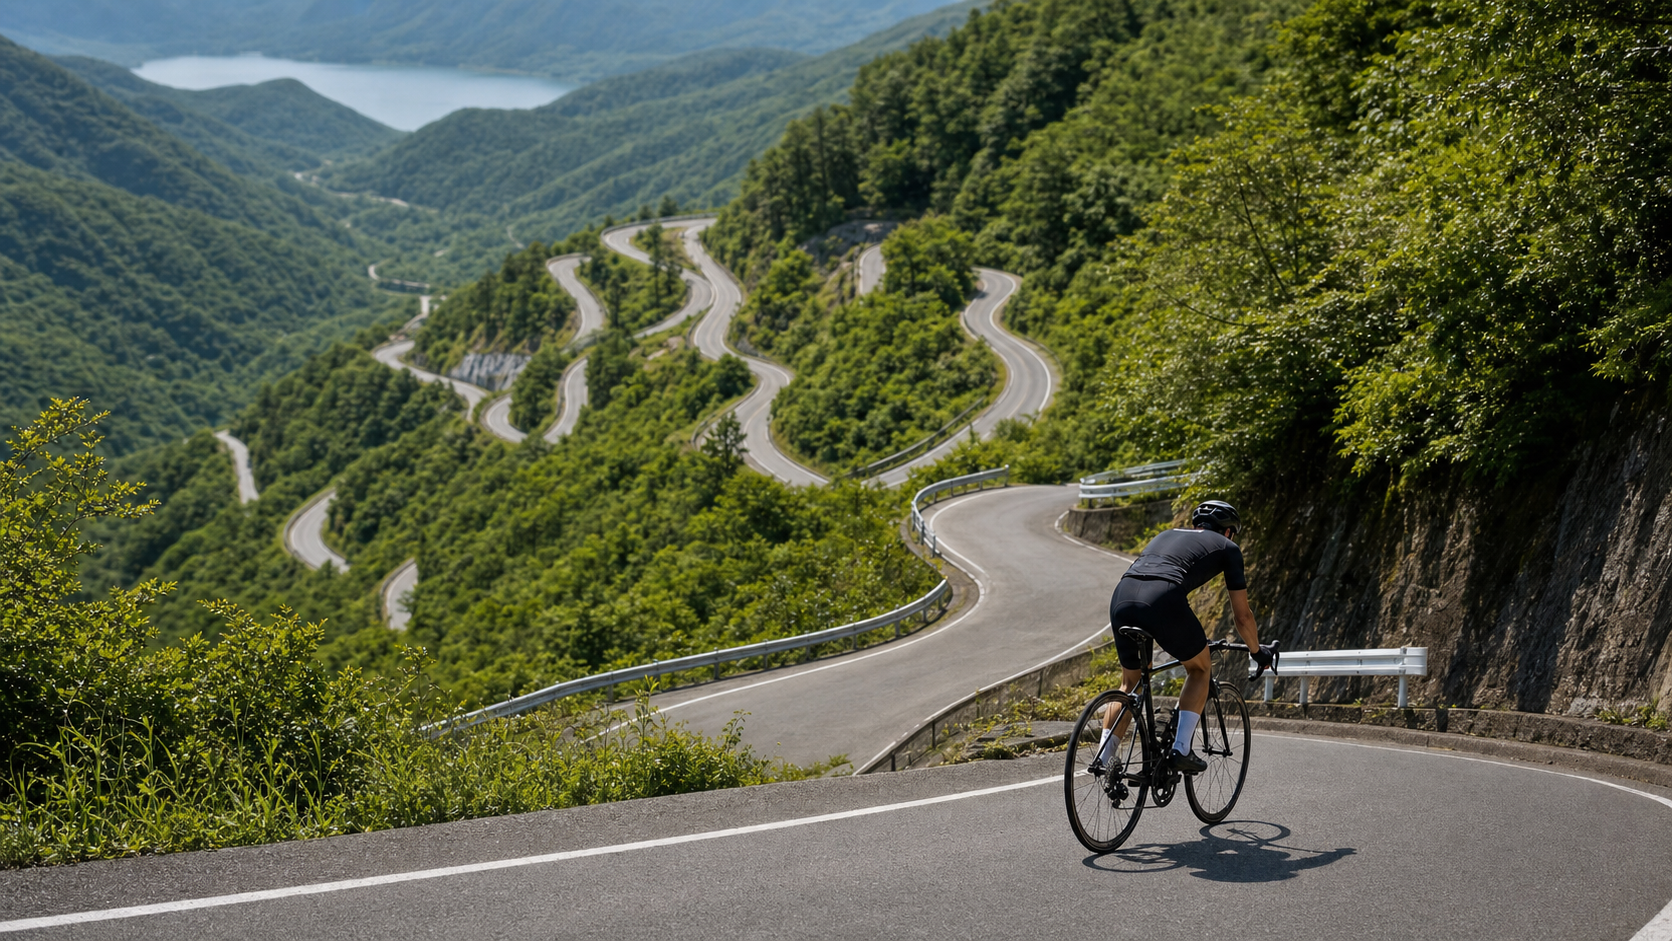
60 corners are not road decorations — they are 60 rhythm tests this course throws at you.
If the eastern side of Mount Akagi via Rihei Chaya is a quiet monologue, then the “Maebashi Akagi Mountain Hill Climb” official course on the Maebashi city side is a full-fledged examination. It is one of Japan’s few officially sanctioned hill climb courses, hosting a race every autumn (around September). This guide uses data as its backbone, breaking down this 18.6 km long climb — along with its signature 60+ consecutive corners — piece by piece for you.
Course Specifications: Quantifying a True Climb
Lay out the core data of this official course, and you will immediately feel how different its character is from short, steep climbs.
| Item | Value | Notes |
|---|---|---|
| Measured Distance | 18.6 km | Maebashi city side, Gunma Prefectural Route 4 |
| Total Elevation Gain | 1,238 m | Long-distance cumulative climbing |
| Average Gradient | 6.6% | True mid-distance climb grade |
| Maximum Gradient | 9.7% | Interspersed within the consecutive corners |
| Consecutive Corners | 60+ | Cornering rhythm is the key challenge |
| Start | Michi-no-Eki “Maebashi Akagi” | Up Route 4 to the summit of Mount Akagi |
| Finish | Akagi Mountain General Tourist Information Center | Summit tourist hub |
18.6 km at an average gradient of 6.6% — this is a textbook “endurance-type” climb. Compared to the “short but steep” high-intensity punch of the eastern Rihei Chaya route, the Maebashi official course demands stability, endurance, and rhythm management. You will not be knocked out by a single steep wall here, but you will be slowly worn down by the cumulative toll of 18.6 km and the constant rhythm disruption from 60+ corners. These are two completely different kinds of pain.
Converted to climbing density: 18.6 km gaining 1,238 meters equals roughly 67 meters of climbing per kilometer — a lower density than the eastern route’s 78 m/km, but the distance is twice as long and the total elevation gain is over 500 meters more. This is a race that demands “pacing intelligence” rather than “explosive bursts.”
Understanding the 60+ Consecutive Corners: Corners Are Your Breathing Points
The most distinctive feature of this course is the 60+ consecutive corners once Route 4 cuts from the gentle foothills into the mountain zone. Many riders treat corners merely as obstacles to “negotiate carefully,” but smart climbers turn them into weapons.
Straights make you suffer; corners give you respite. Learn to steal a breath in every corner, and you have already won half the battle.
There are three key points to cornering logic on a climb:
- Inside line vs. outside line trade-off: The inside line is shorter but usually steeper; the outside line is gentler but longer. When energy is plentiful, take the inside line to save distance; when energy is running low, favor the outside line’s gentler gradient to protect your cadence.
- Use corners to reset your rhythm: Consecutive corners mean subtle gradient fluctuations. At relatively easier sections within corners, you can ease off slightly, bring your heart rate down a notch, then tackle the next straight steep section.
- Look far ahead: Consecutive corners are mentally draining. Don’t stare at your front wheel — lift your gaze to the exit of the next corner, and your body will naturally find the smoothest line, reducing unnecessary braking and accelerating.
Segment Strategy: Cutting 18.6 km into Five Parts
The biggest mistake on a long climb is “riding purely by feel” — you must manage it in segments. Here is a rough five-part breakdown of the 18.6 km.
Segment 1 (approx. 0–4 km): Gentle Foothills — Restrain! Restrain!
Starting from Michi-no-Eki “Maebashi Akagi,” the first stretch runs along the gentle foothills of Mount Akagi, with relatively friendly gradients. This is the most dangerous psychological trap on the entire course: freshest legs, easiest slopes, highest excitement — nine out of ten riders burn their energy prematurely right here.
- Power: Strictly hold at 80–85% of FTP; it is better to feel “too easy.”
- Cadence: 80–90 rpm, keep it smooth.
- Mindset: Tell yourself “the mountain is ahead, not here.”
Segment 2 (approx. 4–9 km): Entering the Consecutive Corners — Rhythm Takes Shape
The gradient rises and the consecutive corners start coming thick and fast. The task in this segment is to “lock in” your pacing rhythm — find a power and cadence combination you can sustain steadily for over an hour.
- Power: Closer to 85–90% of FTP.
- Cornering: Start practicing “breathing in corners” — actively relax through the gentler corner sections.
- Fueling: You have been riding for 20–30 minutes by now; begin regular water and energy intake.
Segment 3 (approx. 9–13 km): Mid-Course Grind — The Battle of Willpower
The middle section of a long climb is the most punishing — the novelty is gone, the finish is still far away, and your body starts protesting. There are no shortcuts here; it is simply “hold the line.” Hold your power, hold your cadence, hold your breathing rhythm. The consecutive corners are your friends here — every gentler corner is a micro-rest.
Segment 4 (approx. 13–16 km): Approaching the Steepest Section — Gearing Gets Tested
The course’s maximum gradient of about 9.7% is mostly hidden in the latter half. By this point, you have expended most of your energy, and when you hit a steep section approaching 10%, cadence management is your only lifeline. Downshift early as it steepens, trade torque for cadence, and do not let your cadence drop below 55 rpm.
Segment 5 (approx. 16–18.6 km): Sprinting to the Summit Tourist Information Center
In the final 2-plus kilometers, if you paced the earlier sections well, you can gradually apply pressure here and pour out whatever energy remains. The finish is the Akagi Mountain General Tourist Information Center, with the summit in sight. Spend that last 5% of reserved energy beautifully right here.
Gearing and Equipment: Endurance Setup for a Long Climb
For an 18.6 km climb with an average gradient of 6.6% and a maximum of 9.7%, your gearing must balance “cruising efficiency” with “steep-section rescue.”
| Rider Level | Recommended Chainring | Recommended Cassette | Notes |
|---|---|---|---|
| Competitive | 34T (compact) | 11-30T | High-cadence cruising, sufficient strength |
| Advanced Enthusiast | 34T | 11-32T | Balances long-climb endurance and steep sections |
| General Enthusiast | 34T | 11-34T | Safe choice for the maximum gradient |
| Beginner/Conservative | 34T or smaller | 11-34T or wider | Endurance first; just keep turning over |
The core principle for long-climb gearing is “smooth cruising gears and sufficient rescue gears.” You will spend most of your time cruising steadily in mid-range gears, but make sure your easiest gear can handle the 9.7% maximum gradient. As for wheels, there is no need to obsess over ultra-deep rims on a long climb — mid-to-low profile, lightweight climbing wheels can accumulate a noticeable advantage over 18.6 km, but leg strength is always the top priority.
Fueling and Hydration: The Endurance Project of a Long Climb
On an 18.6 km climb, ride times easily exceed one hour, so fueling is no longer optional — it is a necessary part of finishing.
- Before the race: Eat a solid carbohydrate-rich meal 3–4 hours prior, and take an easily digestible energy source right before starting.
- Carbohydrates on the road: Refuel every 20–30 minutes (energy gels, bananas, energy bars) to keep blood sugar stable. Do not wait until you are hungry — by then it is too late.
- Hydration: Carry at least two bottles (mandatory in summer), sipping regularly in small amounts based on sweat rate; with prolonged sweating, watch your electrolytes — consider electrolyte drinks to prevent cramping.
- Summit refueling: The finish area around the tourist information center is the summit hub — be sure to refuel and add layers before descending.
Seasonally, the summit of Mount Akagi sits at high altitude with temperatures significantly lower than at the base. In the autumn race season, the temperature gap between morning and evening is large, and you must add a windbreaker before reaching the summit and descending — hypothermia on a long descent is a real risk.
Common Mistakes and DNF Traps
The pitfalls on a long, official course are different from those on short, steep climbs.
- Surging on the Susono section: Burning all your energy on the gentlest first 4 km, then blowing up mid-climb—this is the #1 cause of DNFs.
- No pacing rhythm: Alternating fast and slow, standing and sitting erratically, results in terrible energy efficiency and premature exhaustion over 18.6 km.
- Braking hard in corners: If you slam the brakes and then hammer the pedals at every one of the 60+ corners, you’re wasting energy you need for the climb. Learn to flow through them smoothly.
- Refueling too late: Treating a long climb like a short one and only eating when hungry or drinking when thirsty leads to a blood-sugar crash (bonking) that’s nearly impossible to recover from on the climb.
- Underestimating the cold at the summit: You think only about how hot the climb is, forgetting that the top is cool and the descent is cold. Hypothermia impairs bike handling and wrecks your sense of well-being.
Target Times for Riders of Different Levels
The following is a reference framework for self-assessment. Actual results are heavily influenced by body weight, W/kg, daily form, and weather.
| Rider Level | Approx. Power-to-Weight Ratio | Reference Finish Time | Key Strategy |
|---|---|---|---|
| Racer / Strong | 4.0 W/kg and above | Approx. 60–70 min | High tempo throughout, save energy in corners |
| Advanced Enthusiast | 3.0–4.0 W/kg | Approx. 70–85 min | Steady pace, proper fueling |
| General Enthusiast | 2.5–3.0 W/kg | Approx. 85–100 min | Manage in segments, rest in corners |
| Entry Challenge | Below 2.5 W/kg | Over 100 min | Finish first, don’t chase time |
The Fueling Rhythm Project for Long Climbs
On an 18.6 km climb that takes an hour or more, fueling isn’t just about “bringing something”—it’s an endurance project that requires precise calculation. The body’s glycogen stores are limited under high intensity. Once they hit empty (commonly called “bonking”), power drops off a cliff, and it’s nearly impossible to recover on the climb.
Treat fueling as a “scheduled task” rather than “eat when hungry”:
| Time Point | Fueling Action | Purpose |
|---|---|---|
| 15 min before starting | One energy gel / half a banana | Elevate starting blood sugar |
| Every 20–30 min | One serving of carbs (gel/bar/banana) | Maintain stable blood sugar, avoid bonking |
| Throughout, regularly | Small sips of water | Prevent dehydration, adjust based on sweat rate |
| Prolonged sweating | Electrolyte drink | Replenish sodium, prevent cramps |
| After reaching the summit | Refuel + add clothing | Store energy for the descent, prevent hypothermia |
Key principle: carbs must be taken “ahead of time.” There’s a time lag between eating and when the energy is actually available to your body, so you can’t wait until you’re hungry or out of gas to refuel—by then it’s too late. Set fueling as an alarm and execute it regularly—that’s your lifeline for surviving a long climb without bonking.
Mileage Mindset: Breaking 18.6 km into Mental Segments
The most torturous part of a long climb is the psychological pressure of “the finish is still so far away.” Instead of constantly thinking about how much is left, break the course into several mental anchor points and conquer them one by one:
- 0–4 km (Susono): Tell yourself, “This is a warm-up; the mountain hasn’t started yet,” and strictly keep the intensity low.
- 4–9 km (entering the corners): Your mission is to “lock in the rhythm” and find a power output you can sustain for an hour.
- 9–13 km (middle section): The toughest stretch. The mindset is “just hold on,” using each corner as a counter.
- 13–16 km (approaching the steepest part): Tell yourself, “Here comes the hardest part—shift gears and protect your cadence.”
- 16–18.6 km (summit push): “Pour out everything you have left.” The lake at the top is waiting for you.
When you break one big mountain into five small goals, that overwhelming sense of “unreachable” gets dismantled into five small victories of “I can do this.” That’s the psychological survival skill for long climbs.
A Quantitative Framework for Power Pacing on Long Climbs
An 18.6 km climb is the distance that best demonstrates the value of “pacing engineering.” Short climbs can be powered through on willpower alone; long climbs cannot—you must manage yourself with numbers.
If you have a power meter, set a “target average power,” typically at 83%–88% of FTP (slightly more conservative than short climbs because the duration is longer). Then use the following two metrics to evaluate execution quality:
| Metric | Ideal Value | Meaning |
|---|---|---|
| VI (Variability Index) | The closer to 1.0, the better | Whether output is steady; surging and backing off will push it higher |
| IF (Intensity Factor) | Around 0.85 for long climbs | NP ÷ FTP, reflects overall intensity |
| Power difference between first and second half | The smaller, the better | Higher first half = a sign of pacing failure |
The classic failure mode on long climbs is “power in the first half significantly higher than the second half.” You feel great on the Susono section and unknowingly push too hard; by the middle and later stages, your energy is depleted, power keeps dropping, and you may even bonk. The ideal power curve for a long climb should be “nearly flat throughout, with a slight uptick at the very end.” This 18.6 km course is the perfect training ground for practicing this kind of “evened-out output.”
If you don’t have a power meter, keep your heart rate below threshold and self-calibrate using a breathing intensity where “you can speak short sentences but can’t hold a conversation.” And strictly remind yourself: on the most comfortable Susono section, you should feel like it’s “still too easy”—that’s exactly right.
Pre-Ride Checklist
Preparation for a long climbing race is more involved than for a short climb. A checklist helps you avoid silly mistakes.
- [ ] Bike: Brakes, shifting, chain lube, tire pressure (set according to weight and tire width), quick-release/thru-axle tightened.
- [ ] Gear ratio check: Confirm your easiest gear can handle the 9.7% maximum grade—don’t get to the mountain only to find you have no gear left.
- [ ] Fueling: At least 2 bottles of water (summer), one serving of energy every 20–30 min, electrolytes.
- [ ] Clothing: It’s cold at the summit—bring a packable windbreaker and put it on before descending.
- [ ] Weather: Check mountain weather before departure. Be cautious about slippery roads after rain and poor visibility in fog.
- [ ] Computer/Battery: Power meter, bike computer, and lights fully charged.
- [ ] Emergency: Spare tube/tubeless repair kit, pump, phone, ID, and a little cash.
Advanced Cornering: Riding the 60 Corners Smoothly
This course’s signature is 60+ consecutive corners, and cornering technique directly affects your energy efficiency and safety. Although cornering speeds on an uphill are not high, there’s still a clear difference between good and bad technique.
- Line choice matters more than braking: On uphill corners, speed is already low, so the focus isn’t on braking but on “choosing a line with the most favorable gradient that doesn’t interrupt your pedaling rhythm.” The inside line is steepest and shortest; the outside line is more gradual and longer. Choose flexibly based on your energy at the moment.
- Maintain cadence continuity: The biggest mistake in corners is letting your cadence drop due to distraction. Look at the exit, keep your body relaxed, and keep the cadence turning through the corner so you don’t carry the extra burden of “restarting” on the way out.
- The 60 corners on the descent are the real deal: Uphill cornering is slow and low-risk; but when you descend after the climb, those same 60 corners come at high speed. Be sure to use the principles of “outside-inside-outside, feather the brakes, and look far ahead” to get through safely.
Descending Technique: Managing Body Temperature and Equipment on the 18.6 km Descent
The climb hurts, but the descent is where this course truly tests your skill and judgment. An 18.6 km descent with 60+ corners brings two unique challenges: body temperature management and equipment overheating.
- Body temperature management: On the climb, you’re hot and drenched in sweat. The moment you stop at the summit and start descending, the high-speed airflow rapidly strips away body heat. Put on your windbreaker before descending. On a long descent, hypothermia stiffens your fingers and slows your reactions, directly threatening cornering safety.
- Brake overheating: On a continuous descent, holding the brakes will cause serious heat buildup in the rotors or rims. Use “feathering”—brake decisively when you need to slow down, release through the corner, and handle the next one on the exit. Give your equipment time to cool and give yourself more stable control.
- Cornering rhythm: The 60 corners reappear at high speed on the descent. Use an “outside-inside-outside” line, get your speed sorted before entering the corner, and don’t brake mid-corner. Always look toward the exit of the next corner.
- Watch for road hazards: On blind corners, stay on your side of the road. Watch for oncoming traffic, leaves, wet pavement, and gravel.
Remember: climbing 18.6 km proves your legs are strong enough, but descending safely proves you’re truly mature. Don’t let a beautiful summit be ruined by a careless descent.
Official Race vs. Self-Practice: The Differences Between the Two Riding Styles
This course hosts an official hill climb every autumn, but for most of the year, it’s simply an open county road that you can ride up to practice on whenever you like. The riding approach differs slightly between the two scenarios:
| Aspect | Official Race | Self-Practice |
|---|---|---|
| Road | Race-controlled, safer | Open road, must obey traffic rules and watch for oncoming vehicles |
| Support | Aid stations usually provided | Entirely self-supplied, bring enough supplies |
| Pace | Riding with others, easy to get pulled into a faster pace | Self-controlled, better for practicing pacing |
| Atmosphere | Strong sense of ceremony, spectators present | Quiet, purely facing yourself |
| Mindset | Chasing results, going for a PB | Building a foundation, honing technique |
If the official race is your goal, be sure to do several self-practice runs beforehand. Familiarizing yourself with the rhythm of the 60 corners, confirming your gear ratios, and finding your sustainable power over 18.6 km—these are all things you grind out during regular practice. On race day, the worst thing you can do is let fellow riders pull you beyond your own pace, surging in the early section and blowing up in the latter half. Your opponent isn’t the rider next to you; it’s that 18.6 km climb and your own pacing discipline.
Race Atmosphere and Mental Preparation
The appeal of an official hill climb isn’t just in the results—it’s in that sense of ceremony of “a group of people taking on a mountain together.” The starting line at dawn, the rows of assembled bikes, the air thick with nervous anticipation—that alone is an unforgettable experience.
But precisely because of this, mental preparation is especially important. The mental demon of a long-distance hill climb usually erupts in the middle section (roughly 9–13 km): the novelty fades, the finish still seems far away, your body starts to protest, and the thought “why am I putting myself through this” creeps into your head. This is completely normal—push through this stretch, and the summit is within reach.
A few mental tips:
- Break the long climb into small goals: Don’t keep thinking “10 km to go”; instead think “ride to the next corner, the next kilometer marker.” Breaking a big ordeal into small segments makes it much more bearable.
- Use the 60 corners as a metronome: Treat each corner as turning a page, letting the continuous bends become your mental counter.
- Visualize the reward at the summit: When you’re struggling, imagine rounding the final corner and seeing Lake Onuma and the red Akagi Shrine appear before you—that’s the finish-line image for your journey.
Q&A Quick Fire
Q: I’ve never ridden a climb longer than 15 km. Would it be too much to take on 18.6 km directly?
A: As long as your gearing is light enough, your pacing is conservative enough, and your nutrition is on point, a general enthusiast can complete it with a “finish first, don’t chase time” mindset. The key is to hold back in the early section and not burn all your energy on the Susono stretch. If you can ride a climb of similar distance once or twice in training beforehand, both your confidence and your body will be better prepared.
Q: Should I use a mountain bike or a road bike?
A: This is a paved county road, so a road bike is the best fit. The key isn’t the bike type but the gear ratio—make sure your easiest gear can handle the 9.7% maximum gradient.
Q: Is it okay to practice alone? Or do I have to enter the official race?
A: You can absolutely go up and practice on your own anytime (just note it’s an open road—obey traffic rules and watch for oncoming vehicles). The value of the official race lies in the closed-road atmosphere, aid stations, and the sense of ceremony of taking on the challenge with many fellow riders, but practice and challenge are something you can do on your own anytime.
Q: Where do most people blow up?
A: Statistically, most people crack in the “middle section (roughly 9–13 km)”—the novelty is gone, the finish is still far, and the body starts to protest. Get through the middle, and the summit is in sight.
Q: Is it really that cold at the summit?
A: The summit of Akagi is at high elevation, considerably cooler than the base, and the temperature swings are especially noticeable during the autumn race season. Be sure to put on a windbreaker before descending—hypothermia on a long descent is a real risk, not an overreaction.
Q: How do I find my “sustainable power”?
A: The simplest method is to do an FTP test first (a 20-minute all-out effort, take 90%), and once you have your threshold power, set your target average power for the long climb at 83–88% of FTP. If you don’t have a power meter, self-calibrate using a breathing intensity where “you can speak short sentences but can’t hold a conversation,” and remember that on the Susono stretch you should feel like “this is still too easy.”
Q: Are the 60 corners dangerous?
A: On the way up, speeds are slow, so it’s mostly mentally draining rather than dangerous; what really requires skill is the high-speed consecutive corners on the descent. As long as you follow the principles of “outside-inside-outside line, feather the brakes, look far ahead, and add a layer at the summit to prevent numb hands,” safety is very manageable. Just remember not to show off your speed on the descent.
Summary: A Long Question About Self-Management
When you break this 18.6 km official course down to its essence, you’ll find it never tests pure leg strength—it tests comprehensive self-management ability: pacing discipline, anticipating your nutrition needs, cornering rhythm, mental endurance, and respect for the cold at the summit. Leg strength is just the entry ticket; whether you can manage yourself is what determines if you reach the summit in style.
Lock in your pace with power or breathing, break the 18.6 km into five mental segments, set your nutrition as an alarm and execute it on schedule, treat the 60 corners as a metronome and a chance to catch your breath, and save your windbreaker for the descent—when you nail each of these details one by one, this authentic Japanese hill climb course will transform from “a daunting long climb” into “an endurance project completely under your control.” This is the most captivating part of authentic hill climbing: it rewards those who know how to manage themselves.
Conclusion: The Wisdom of Authentic Hill Climbing
The Maebashi Akagi Mountain Hill Climb official course doesn’t test who has the strongest legs—it tests who best knows how to manage themselves. 18.6 km, 1,238 meters of elevation gain, over 60 consecutive corners—this is a comprehensive question about “pacing, rhythm, endurance, and mental fortitude.”
Hold back in the early section, hold the line in the middle, shift gears on the steep pitches, and give everything in the final stretch; steal breaths in the corners, keep your nutrition on point, and add a layer at the summit. Treat this official course as a precision endurance project to execute, rather than a reckless sprint, and you’ll complete this classic test of authentic Japanese hill climbing in the finest form in front of the tourist information center at the Akagi summit. And when you stand at the top, gazing at that touch of red by Lake Onuma, you’ll understand: the true reward of this climb was never the time on your bike computer, but the composure of having managed yourself well all the way up, unhurried and steady.
Related Reading
- From the Poet’s City to the Crater Lake: The Authentic Pilgrimage of Maebashi Akagi’s 18.6 km, 60-Corner Climb
- 136 Chikanding Guide: How Taichung Riders Crack the Gentle-Then-Steep Test Course
- Akagi East Face · Rihei Chaya Hill Climb Guide: The Quiet Steep Climb of Kiryu Kurohone Town, 9.1 km at 7.7% Average Gradient
- Kirishima Ebino Highland Climb Practical Guide: Full Data Analysis of the 12 km, 861 m Volcanic Highland Long Climb
小野田真的存在!日本赤城山爬坡公路賽 台灣首發團完全實錄 | 頭文字D真實賽道! | 看完東奧自行車賽後好想再去騎一次啊! | 公路車 | CT Yeh
4 年前
台北闊瀨陡坡 騎旅 / 日本單車雜誌編輯車友臨時加入!/ 髮香才是最強的 / feat. 北迴歸線小隊 / 公路車 CT Yeh
6 個月前
台灣旅行團參加 第7回まえばし赤城山ヒルクライム大会 雙視點
8 年前
大禹嶺 到 武嶺牌樓 全程前後實況錄影 | 北進武嶺 | 東進武嶺 | KOM | 訓練台 | 坡度分析 | Taiwan KOM Last 10 km HARD | 公路車
6 年前
半日 小台灣 極限單車路線挑戰實錄
7 年前
嘉義大埔、阿婆灣挑戰賽,美到以為在日本!ft. 環騎5 Cool 西拉雅188 / 公路車 / CT Yeh
7 個月前
2025 乘鞍岳登山賽 比賽全紀錄篇 / 完整路線攻略介紹 / 日本版武嶺 公路最高點 / 高山空拍絕景 / 明年會開團! / 公路車 / CT Yeh
10 個月前
2025 乘鞍 KOM 登山賽挑戰實錄 / 日本公路最高 ! 賽前探路篇 / 比富士山厲害,無敵絕景!/ 40週年 / 中文YT首發 / 公路車 / CT Yeh #乘鞍ヒルクライム
10 個月前