Mount Fuji Skyline Guide: 26 km Climb to the Highest Rideable Point on Fuji — Gotemba Fifth Station at 2,400 Meters
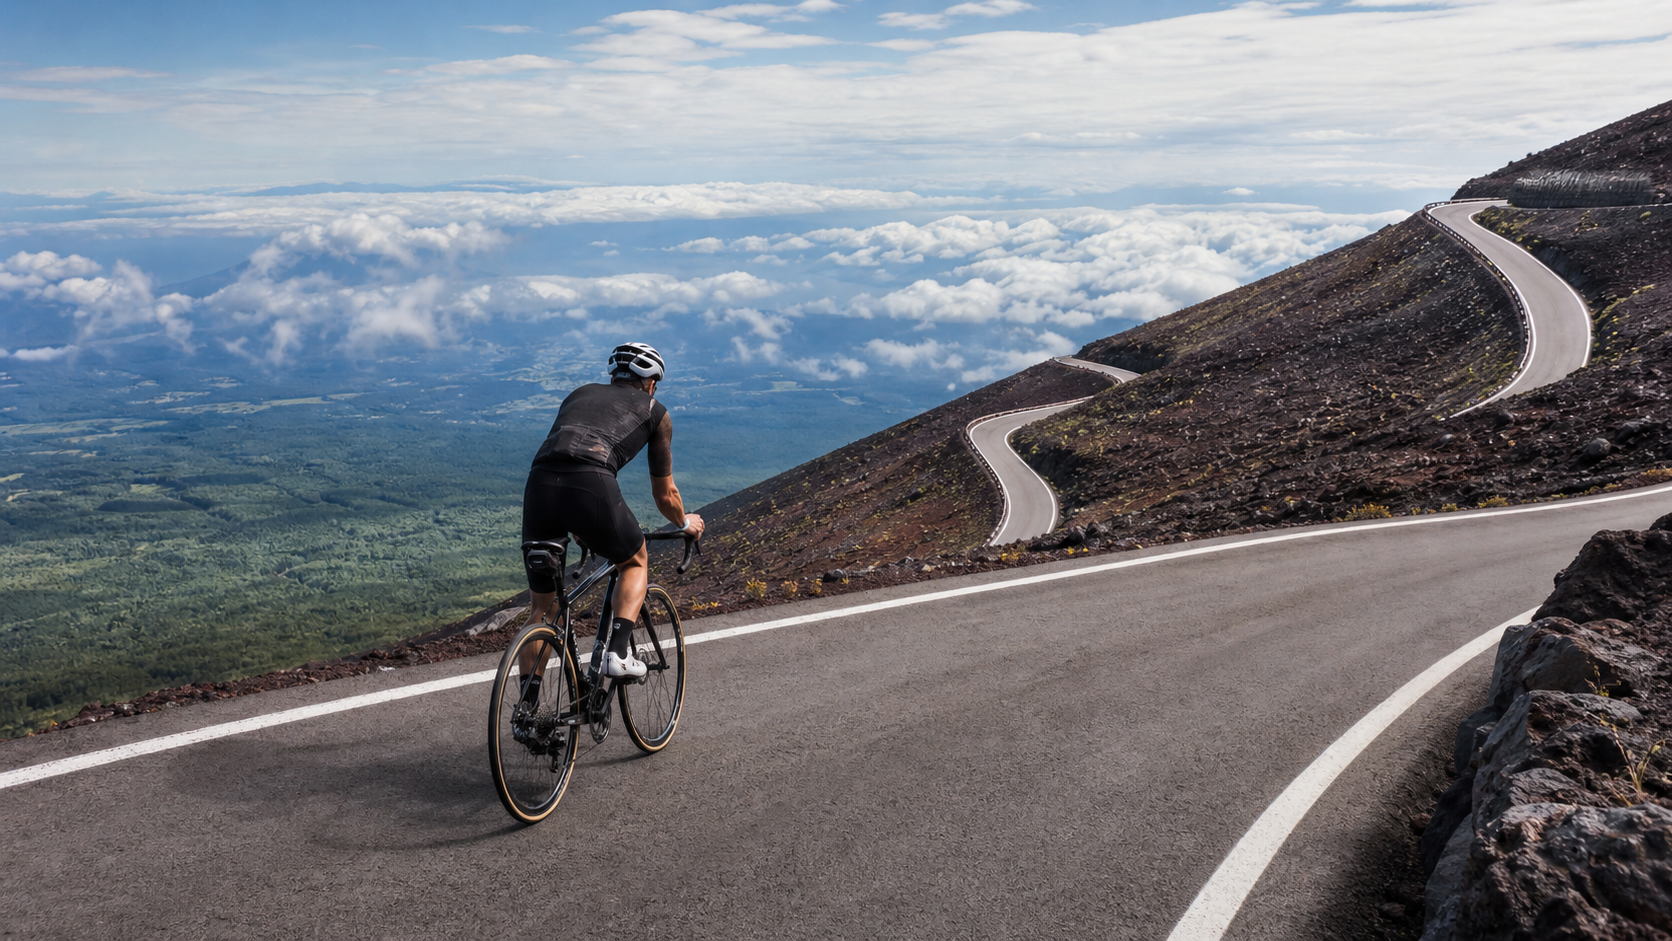
If Fuji Azami Line is the “short and brutal” steep climb, then Fuji Skyline is its polar opposite—a “long and lofty” endurance ascent. This road leads to the Fujinomiya Route 5th Station at 2400 meters, the highest of all Fuji’s climbing trailheads and the highest point on the mountain accessible by car or bicycle.
Let’s look at the numbers first. The climb featured here measures approximately 26.67 km in distance, 1765.8 meters of elevation gain, with an average gradient of 6.6% (as measured on the Strava climb segment). This is a textbook “long-distance, high-gain, high-altitude” mega-climb. It should be noted that depending on the starting point, different sources report slightly different figures (ranging from roughly 27–30 km and 1770–1870 meters of gain); the numbers used here fall within a reasonable range and match the same road as recorded on the climb’s dedicated page, with only minor differences in the measurement starting point.
1. Route Overview and Actual Data
| Item | Data |
|---|---|
| Distance | Approx. 26.67 km |
| Elevation Gain | Approx. 1765.8 m |
| Average Gradient | 6.6% |
| Summit Elevation | Approx. 2400 m (Fujinomiya Route 5th Station) |
| Location | Fujinomiya City ↔ Gotemba City, Shizuoka Prefecture |
| Official Name | Omote Fuji Circuit Road |
| Difficulty Rating | Long-distance endurance mega-climb (high altitude) |
The Fujinomiya Route 5th Station sits at 2400 meters—a figure worth emphasizing again: it is the highest of all Fuji’s climbing trailheads, and the highest point you can reach on Fuji by bicycle. This status as the “highest point” makes this road the ultimate pilgrimage goal for many cyclists on Mount Fuji.
The Dual Challenge of “Long” and “High”
To understand this road, you first need to understand that its difficulty comes from a completely different source than Fuji Azami Line. Azami Line is “short and brutal”—it knocks you down with instantaneous steepness; Fuji Skyline is “long and lofty”—it grinds you down with endless mileage and progressively thinning air.
Nearly 27 kilometers of distance means sustaining output for close to two to three hours, a severe test of endurance. And the 2400-meter summit elevation means working in a noticeably oxygen-deprived environment in the latter half—reduced oxygen availability lowers your VO2 max, so the same pedal output yields a higher heart rate and faster fatigue. When “long distance” meets “high altitude,” the two difficulties compound to create this road’s unique challenge. It won’t intimidate you in a single moment; instead, it slowly erodes your strength and willpower over the long ascent. Therefore, pacing wisdom and logistical preparation matter more than brute force on this road.
2. Route Structure: Two Distinct Personalities
Fuji Skyline’s official name is “Omote Fuji Circuit Road,” stretching approximately 34.5 km in total, and it can be divided into two sections, each with a completely distinct character. Understanding this “forest first, sky later” two-part structure is the foundation of your pacing plan and the key knowledge that determines whether you finish successfully:
- Circuit Section (first half): The lateral forest-road stretch between Fujinomiya and Gotemba. Wide road surface, riding through the trees, limited views, few sharp corners. This is the “forest belt” world, and the critical section where you establish rhythm and bank energy.
- Climb Section (second half, approx. 13 km): Ascending from the 2nd Station junction toward the Fujinomiya Route 5th Station. The trees grow shorter, the views open up dramatically, earning it the name “the core of the Skyline.” This is the “sky road” world, and the steepest, highest, and most demanding part of the entire route—all your earlier energy reserves are meant to be spent here.
Understanding this “forest first, sky later” structure is the foundation of your pacing strategy.
3. Section-by-Section Guide
Section 1: Forest Belt Start (First Half, Steady Accumulation)
In the first half’s circuit/forest-belt section, the gradient is relatively even as you ride through coniferous forest. The keyword for this section is “patience.” It’s not steep, but it’s long—your job is to establish a steady rhythm you can sustain for a long time, keeping your heart rate in the aerobic zone (75–80% of max HR), like a machine moving at a constant speed. The views here are enclosed, which can feel monotonous, but it’s precisely this monotony that tests your discipline to “stay calm and steadily bank elevation.”
On a long climb like this, the best strategy for the early section is “pace by power or heart rate, not by feel.” At the start, your body feels its best and adrenaline is highest, making it easy to overestimate the intensity you can sustain and unconsciously ride too hard. If you have a power meter or heart rate monitor, set a ceiling and stick to it strictly; if not, use “can I still talk easily” as a simple gauge—if you’re already too breathless to speak in the forest belt, the intensity is definitely too high. Remember, this is a nearly three-hour expedition; every bit of restraint in the early section is what allows you to last longer later.
Along the way you’ll pass Mizugatsuka Park (on the Gotemba side, just before the 2nd Station junction), which has parking, a cafeteria, and shops. The park’s observation deck offers close-up views of Mount Fuji, Mount Hoei, and the Hoei Crater—an ideal spot for refueling and resting. Just before that, there’s also the Nishiusuzuka Parking Area, a forest-side parking lot.
The psychological challenge of this forest-belt section is actually greater than the physical one. Because it’s not steep and the views are enclosed, it’s easy to feel monotonous, even bored, and lose focus. Some riders, feeling “not tired enough yet,” unconsciously increase their effort, wanting to get through this “easy” part faster—and that’s the trap. Every bit of extra energy you burn in the forest belt will be collected from you at double the cost in the core of the climb section later. The right approach is to treat this section like a machine moving at constant speed, steadily accumulating elevation in the most efficient way possible, banking your precious energy for the latter half that truly needs it. Learning to “hold back from pushing” here is the first lesson in completing this road.
Section 2: Climb Section Core (Second Half, Approx. 13 km, The Real Test)
After passing the 2nd Station junction and entering the climb section, the road’s character changes completely. The forest gradually recedes, the views open wide, and you begin to see the clouds below your feet, the Southern Alps in the distance, and Suruga Bay. But the price of the beautiful scenery is a steeper gradient and rapidly rising altitude.
This section, called “the core of the Skyline,” is characterized by getting steeper the closer you get to the 5th Station, with almost no flat sections and no traffic lights—a “climb it all in one go” type. By now you’re above 2000 meters, and the oxygen deficit makes every pedal stroke more laborious. Pacing strategy: shift to a lower gear, raise your cadence to above 80 rpm, trade speed for muscle recovery; and use rhythmic breathing (deep inhales and exhales) to manage the breathlessness from altitude.
The “no flats, no traffic lights” characteristic is a double-edged sword. On the plus side, it lets you maintain a continuous rhythm without interruption; on the downside, it offers no “legitimate excuse to rest”—you can’t rely on red lights or flat sections to sneak a breather; you can only manage intensity through your own pacing wisdom. So in this section, you need to control your output even more strictly: if you feel your heart rate nearing its limit, actively downshift and slow down, using “can I still maintain my cadence” as the gauge for whether you’re overdoing it. Better to climb steadily at a slower pace than expected than to push hard in an oxygen-deprived state and completely blow up halfway. The wisdom of this section boils down to four words: hold steady, don’t crack.
Section 3: Charging to the 2400-Meter 5th Station (Final Stretch, Repeated Steep Pitches)
In the final stretch approaching the 5th Station, steep pitches appear repeatedly. By now your body has been working in an oxygen-deprived state for over two hours, and the subjective suffering is intense. The mental trick is “chunking”—don’t look at how far remains, only focus on the small segment right in front of you, eating it one piece at a time. When you finally ride onto the Fujinomiya Route 5th Station (2400 meters), on a clear day you can gaze out at Mount Hoei, the Southern Alps, the Izu Peninsula, and Suruga Bay. You’ve stood on the highest point of Fuji reachable by bicycle.
The suffering in this section is very real: over two hours of sustained output, compounded by high-altitude oxygen deficit, leaves your legs heavy, your breathing rapid, and your willpower wavering. But it’s precisely by persevering through this state that “reaching the 5th Station” becomes so meaningful. When you round the final corner and see the 5th Station parking lot appear before you, that emotion—a mix of exhaustion, relief, and overwhelming accomplishment—washes over you in an instant. You can’t help but look back down the long road you’ve just climbed and say to yourself: I did it. I rode myself to the highest point of Mount Fuji.
10. Descent and Final Reminders
Reaching the summit is only half the journey—the descent of this long climb demands equal seriousness:
- Layer up before setting off: On a long descent from 2,400 meters, wind chill can strip your body heat within minutes. Make sure to put on your windbreaker and full-finger gloves before you start.
- Brake in stages to protect your brakes: Over nearly 27 kilometers of descending, continuous heavy braking can overheat rims or rotors. Instead, use an intermittent rhythm: “brake to slow down—release to cool—brake again.”
- Beware of impaired judgment from fatigue: After a long climb, both body and mind are exhausted, and your reactions and decision-making on the descent will be slower. Control your speed, leave ample reaction margin, and don’t risk it just to chase a faster descent time.
- Keep your hands warm: Frozen fingers directly compromise brake feel, which is extremely dangerous on a long descent.
Only when you can safely climb to 2,400 meters and safely return to the base is this Fuji-san expedition truly complete.
4. Gearing and Equipment
This route is a triple combination of “long distance + high altitude + steep final ramps,” so your gearing must be prepared for both the steep finale and the oxygen-thin altitude:
- Chainrings: A compact 50/34 is the bare minimum. Cruising-oriented riders should consider an even lighter setup to leave more margin for the later stages.
- Cassette: An 11–34T is recommended, giving you reserve capacity against the double assault of repeated steep ramps and altitude hypoxia in the final section.
- Cadence: Maintain 75–85 rpm throughout. At altitude, grinding a big gear at low cadence is especially taboo—it accelerates muscle fatigue and will burn you out earlier in the core climbing zone.
For gear, high-altitude warmth is non-negotiable. The finish sits at 2,400 meters; even if it’s midsummer at the base, the Fifth Station may be only in the teens (Celsius) or colder, and with the wind chill of the long descent, hypothermia is a real risk. You must bring: a lightweight windbreaker, full-finger gloves, and a neck gaiter or ear warmers. Riders have suffered hypothermia here due to insufficient supplies and inadequate warmth—this is not an exaggeration.
An important concept to establish here: the weather at the base and the weather at the Fifth Station are two different worlds. When you start at the bottom under bright sunshine and warmth, it’s easy to underestimate the cold up top and think, “Why carry all that warm clothing?” But by the time you’ve climbed nearly 1,800 meters and reached the Fifth Station at 2,400 meters, temperatures may have dropped by more than ten degrees, and with the strong winds at elevation, it feels even colder. Then comes the long descent, where wind chill can drain the body heat you accumulated on the climb in just minutes. This is why “summer at the base, autumn/winter at the Fifth Station” is no exaggeration—it’s a reality every rider must take seriously. Better to carry a jacket you never use than to regret not bringing one at 2,400 meters.
5. Nutrition and Hydration
With nearly 27 kilometers, almost 1,800 meters of climbing, and two to three hours of effort, fueling is the lifeline of completing this ride—no less important than your legs:
- Before departure: Eat plenty of carbohydrates to top off your glycogen stores.
- On the bike: Carry at least two bottles (water + electrolytes) and multiple energy gels or solid snacks.
- The Mizugatsuka Park area is the ideal formal refueling stop—replenish blood sugar and fluids before entering the most oxygen-deprived core of the climbing zone.
- Fueling rhythm: Eat every 30–40 minutes; don’t wait until you’re hungry. High altitude dulls hunger cues, and by the time you feel hungry, your blood sugar is often already low.
The fueling philosophy of this route can be summed up as “early and low.” Early—eat regularly while the forest zone is still easy, don’t put it off until you’re deep in the climbing core. Low—fill your stomach while the altitude is still manageable and your body can digest normally, because above 2,000 meters, hypoxia impairs blood flow to the gut and digestion efficiency, making eating less comfortable. Mizugatsuka Park is one of the few formal refueling points on this long climb—make full use of it: fill your bottles, top up your energy, use the restroom, and rest briefly to prepare thoroughly for the climbing core ahead. Beyond this point, it’s a high-altitude stretch with virtually no resupply, where you’ll have to rely solely on what you’ve brought.
6. Seasons, Weather, and Traffic Restrictions
- Winter closure: The climbing section is closed in winter, reopening around late April each year, with slight variations by annual announcement.
- My-car restrictions during climbing season—bicycles are exempt! Like the Fuji Azami Line, during Fuji-san’s opening season (roughly early July to September 10), the Fujinomiya route of this road enforces vehicle restrictions, requiring cars to park at the perimeter and transfer to shuttle buses. However, bicycles are not subject to these restrictions and can still ride up to the Fifth Station during the restricted period. For 2026, the Fujinomiya route restriction period is announced as July 10, 09:00 to September 10, 18:00. During peak season, cars are turned away and the road is clear—making it an ideal time for cyclists. This is a “secret trick” worth exploiting when planning this route: during the busiest climbing season of the year, cars are all stopped at the base while you can enjoy a nearly car-free, quiet, and clear sky road. For riders who value ride quality and safety, these conditions are rare.
- Low temperatures at altitude: The Fifth Station at 2,400 meters is cold—summer at the base, but autumn/winter at the Fifth Station. Dress warmly.
7. Common Mistakes and DNF Risks
- Overexerting in the early forest zone: This section isn’t steep but is very long. If you burn too much here, the climbing core later will exact double the toll.
- Gearing too heavy: Ignoring the repeated steep ramps and altitude hypoxia in the final section, preparing gearing based on an “average 6.6% grade” only to be shocked by the steep pitches at the end.
- Insufficient warmth: Hypothermia at 2,400 meters is a real risk, especially under the wind chill of the long descent.
- Miscalculating fuel: Without regular fueling on a long climb, the combination of hypoxia and low blood sugar in the final section often leads to a complete collapse—and by then, there are no aid stations to save you.
- Starting too late in the day: Afternoon weather in the mountains is prone to change. Always start in the morning and leave ample buffer. With nearly three hours of climbing plus a long descent, this route carries a high time cost, and squeezing it into the end of a day’s itinerary is a dangerous arrangement.
- Going out too fast in the early section: The forest zone isn’t steep but is long. Being fooled by “this feels easy” and burning too much early on is one of the most insidious and fatal mistakes on this route.
8. Target Times by Rider Level
The following are reference times for the full route (approximately 26.67 km, ~1,766 m of climbing), which vary significantly due to altitude:
| Rider Level | Reference Completion Time |
|---|---|
| Advanced competitive | Within approximately 1 hr 30 min |
| Steady cruiser | Approximately 1 hr 50 min – 2 hr 20 min |
| Sightseeing challenger | Approximately 2 hr 30 min – 3 hr |
Treat these times as references, not targets. The altitude on this route will make your actual pace noticeably slower than your sea-level expectations—this is completely normal. Rather than staring anxiously at your bike computer, focus on steady pacing and regular fueling—manage the process well, and the time will naturally be what it should be. For the vast majority of riders, reaching the Fifth Station at 2,400 meters steadily and safely is the finest result.
9. The Science of Pacing on High-Altitude Climbs
Riding above 2,000 meters, reduced oxygen availability lowers your VO₂ max, meaning the same output yields a higher heart rate. The iron rule for high-altitude climbs is therefore “dial the intensity down one to two notches”—the power you can sustain for an hour at sea level may only be sustainable at 80% of that at 2,400 meters. Rather than pushing through with sea-level expectations and blowing up in the final section, start with a more conservative output from the very beginning and distribute your effort evenly across the entire climb.
Combine this with “rhythmic breathing”—deliberately inhaling and exhaling deeply, filling and emptying each breath fully, and syncing your breathing with your cadence—which can markedly ease the breathlessness of hypoxia. This is the hidden technique seasoned riders use to maintain efficiency on high-altitude climbs. The forest zone in the early part of the Fujisan Skyline is ideal for establishing this steady rhythm, allowing your body to settle into its most economical cruising state before entering the high-altitude core.
The Psychological Trap of the Final Stretch
The final stretch of the Fujisan Skyline hides a psychological trap that can easily break you. When you finally emerge from the treeline and see the open sky and the sea of clouds in the distance, your brain mistakenly thinks, “The finish line is right ahead,” and you unconsciously relax. But in reality, the closer you get to the Fifth Station, the steeper the gradient becomes, while your body is still struggling under oxygen deprivation—this gap between “thinking you’re almost there” and “still having a tough battle ahead” is a common cause of slowing down or even cramping in the final stretch.
The way to counter this is to “set the finish line a bit further back.” Tell yourself, “The real finish line is still farther away,” and use this psychological cue to force yourself to maintain your output until you actually ride past the Fifth Station parking lot. At the same time, continue using the method of breaking the goal into segments—don’t look at how far you have left, just focus on the next corner, the next section of road right in front of you, and eat it up bit by bit. When you hold on with this discipline to the very end and stand at 2,400 meters at that moment, all the previous pain will transform into an unparalleled sense of accomplishment.
A Comparison with Wuling
For Taiwanese riders, the best reference point for the Fujisan Skyline is actually Wuling. Both are “long-distance, high-climbing, high-altitude” super climbs that require endurance and pacing wisdom to complete, rather than relying on instantaneous explosive power. The difference is that Wuling is longer, higher (Taiwan’s highest road point at 3,275 meters), and has a greater elevation gain, making it a tougher challenge. The Fujisan Skyline’s 2,400 meters is lower, but it carries the added blessing of the sacred mountain symbol of “Fuji,” as well as the special condition of enjoying a quiet, traffic-free road surface during the climbing season when cars are banned.
If you’ve ridden Wuling, then the difficulty of the Fujisan Skyline will be within a range your body understands—prepare for it as a “Wuling-grade, but with completely different scenery and atmosphere” high-altitude long climb, and you’ll be about right. Conversely, if you haven’t yet challenged a long climb of this level, it’s recommended to first accumulate enough long-distance climbing experience in Taiwan before taking on this sky road of Fuji.
Conclusion
The Fujisan Skyline is a super climb that tests both “length and altitude.” 26.67 kilometers, nearly 1,800 meters of elevation gain, and a 2,400-meter summit—it doesn’t intimidate you with instant steepness like a brutal ramp does, but instead slowly grinds down your patience and willpower with its long mileage and progressively thinning air. Its threshold isn’t in the steepness of any single section, but in the overall length and height. Equip yourself with a low gear ratio, bring plenty of warm clothing and supplies, and manage the high altitude with conservative pacing, and you can deliver yourself to the highest point on Fuji that is rideable. When you stand at Fujinomiya Fifth Station, looking down at the sea of clouds beneath your feet and Suruga Bay in the distance, you’ll understand: this 26-kilometer journey is worth it.
Finally, let me summarize the essence of conquering the Fujisan Skyline in one sentence: In the early forest section, hold back and don’t charge; fuel up regularly, early and at low altitude; in the later section, keep your core steady and don’t fall apart; and stay warm and control your speed on both climbs and descents. Get these four things right, and you’ll ride this long, high, and distant road to completion steadily. This is not a road that can be conquered by brute force alone; it rewards riders who are patient, understand pacing, and come fully prepared. And when you use wisdom and perseverance to deliver yourself to that highest point on Fuji that a rider can reach, that sense of accomplishment will become the most precious medal in your cycling career.
Related Reading
- Riding to the Highest Reachable Point on Fuji: The Fujisan Skyline, Hoei Crater, and a Cloud-Level Journey Through the Forest Belt
- Fuji Subaru Line Practical Guide: 24 Kilometers, 1,210 Meters of Climbing, a Pure Test of Your Aerobic Threshold
- Fuji Azami Line Steep Ramp Guide: The Survival Guide for the Lightest Gear Ratio on Japan’s Steepest Ramp
- A Pilgrimage Beneath the Towering Wall: The Fuji Azami Line, Subashiri Entrance, and a Test of Will on a Brutal Ramp
富士山KOM 賽事篇 VLOG!/ 小野田出沒!/ 完整路段分析 / 武嶺要騎多快才能拿環?/ 台灣選手 第20回Mt.富士ヒルクライム 参加!/ 公路車 / CT Yeh
2 年前
2025 乘鞍岳登山賽 比賽全紀錄篇 / 完整路線攻略介紹 / 日本版武嶺 公路最高點 / 高山空拍絕景 / 明年會開團! / 公路車 / CT Yeh
10 個月前
半日 小台灣 極限單車路線挑戰實錄
7 年前
2025富士山登山賽團,預約報名中! #cycling #公路車
2 年前
2025 乘鞍 KOM 登山賽挑戰實錄 / 日本公路最高 ! 賽前探路篇 / 比富士山厲害,無敵絕景!/ 40週年 / 中文YT首發 / 公路車 / CT Yeh #乘鞍ヒルクライム
10 個月前
全段數據 2024富士山登山賽 ((銅環)) 請開字幕! /全程解說版 4K高畫質/ feat. 樂華演城旭 / 公路車 / CT Yeh / 第20回Mt.富士ヒルクライム
2 年前
台北闊瀨陡坡 騎旅 / 日本單車雜誌編輯車友臨時加入!/ 髮香才是最強的 / feat. 北迴歸線小隊 / 公路車 CT Yeh
6 個月前
2024富士山KOM!兩萬人規模參賽!報到篇 / 台灣車友擠爆機場/超震撼會場!/ 公路車 / CT Yeh
2 年前