MTB Jumping Technique: Takeoff Timing and Landing Absorption for Small Tabletops
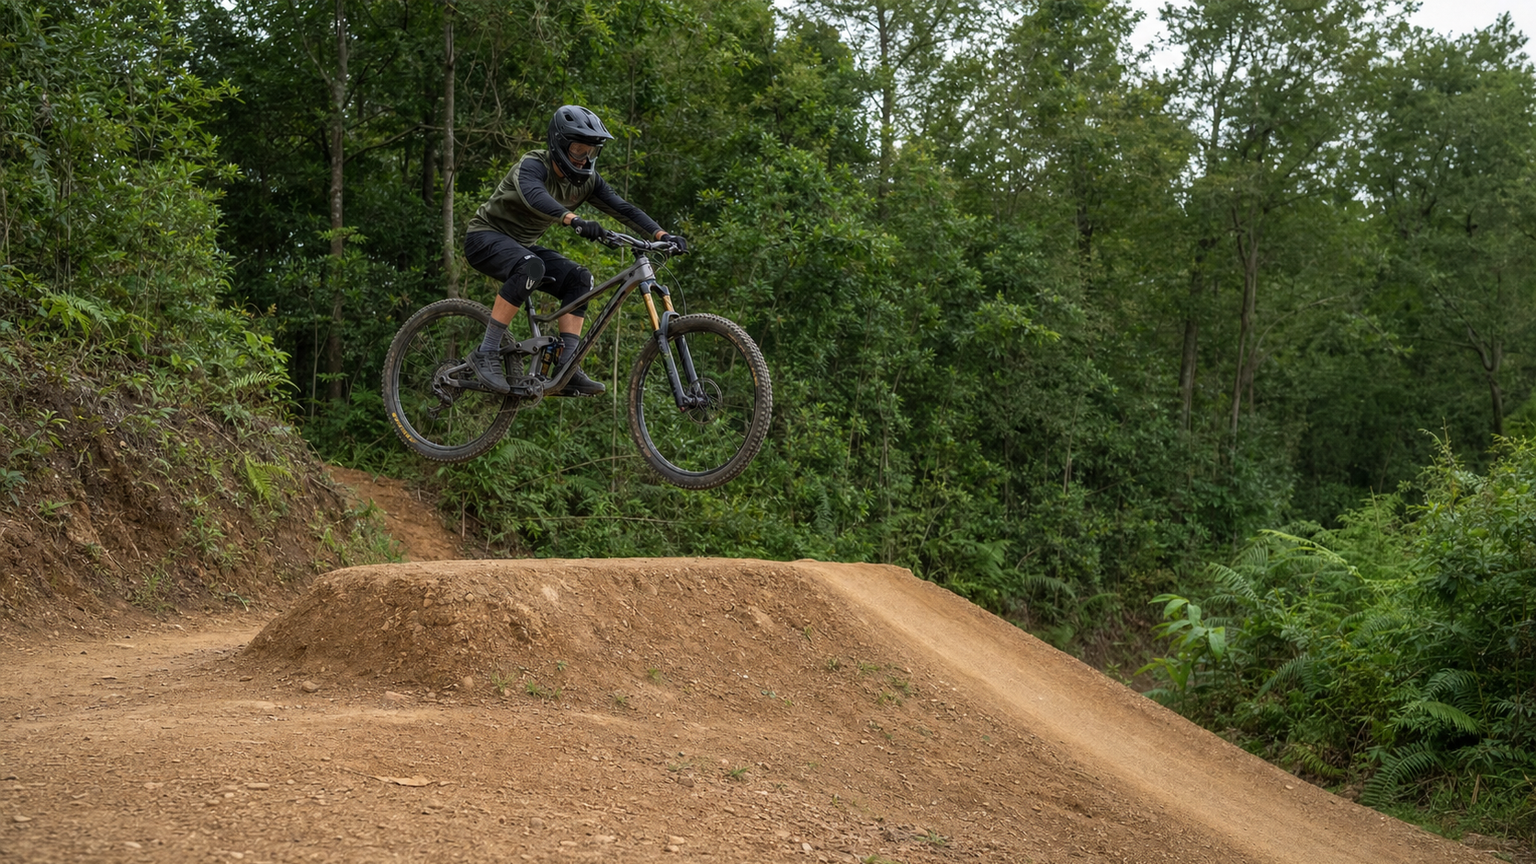
The tabletop is the most suitable obstacle design for beginners learning jumping techniques on MTB trails: its top is a flat “table surface,” so even if your takeoff speed is insufficient, you’ll land on the platform rather than crashing after a failed jump. This forgiving design makes the tabletop the best practice ground for all jumping techniques. Mastering the complete jumping technique on a tabletop is the essential path to progressing toward more advanced jumps.
Basic Understanding of Jumping Technique
On MTB trails in Taiwan (such as those in Shiding, Fengshan, and various locations in Hualien), small tabletops typically have the following dimensions: lip height 60–120cm, table length 150–250cm, and an ideal flight distance of 3–6 meters.
Jumping technique consists of three phases: Takeoff, Air, and Landing. Each phase has its own technical points that must be practiced separately before being integrated.
Judging Entry Speed
The most important judgment before takeoff is “whether your speed is sufficient.” Too slow and you’ll land in the middle of the table; too fast and you’ll overshoot the optimal landing zone on the downramp, increasing impact forces.
Judgment method (for small tabletops):
- On the first pass, ride through at a very low speed (1.5 times walking speed) and observe the shape of the takeoff surface
- Increase speed gradually, adding about 2–3 km/h each time
- When you feel the bike start to get slightly light at the takeoff point, your speed is approximately 80% of the minimum flight speed
- Increase speed a bit more to feel the full flight sensation
Do not attempt: Going full speed on your first try. Going too fast before your technique is ready is the most common cause of injury among MTB beginners in Taiwan.
Takeoff Technique: The Difference Between Pump and Manual
There are two main ways to take off on a tabletop:
Pump (Compression Takeoff)
Before entering the takeoff ramp, use a squatting motion to compress the trail, then spring upward at the highest point of the takeoff. This is the most fundamental takeoff method and the most suitable for beginners.
Specific movements:
- 1–2 meters before entering the takeoff ramp, bend your knees into a squat (about 45–60°), lowering your center of gravity
- When the tires reach the bottom of the takeoff ramp, begin extending your knees from the squat position, “pushing off the ground” with upward extension force
- At the highest point of the takeoff ramp, your knees are nearly straight, and your arms gently guide the front end upward
- After becoming airborne, maintain a neutral position without making unnecessary movements
Manual Takeoff (Advanced)
A manual is a technique that allows the front wheel to lift without relying on terrain features. Using a manual on the takeoff ramp makes the jump smoother. This is an advanced technique; beginners can skip it for now.
| Takeoff Technique | Difficulty | Suitable For | Common Mistakes |
|---|---|---|---|
| Pump | Beginner | All tabletops | Taking off too early or too late |
| Pre-load Manual | Intermediate | Medium tabletops | Lifting the front wheel too high |
| Full Manual | Advanced | Large jumps | Risk of flipping backward |
Takeoff Timing: The Most Common Mistake
The most common mistake among beginners is incorrect takeoff timing: applying force too early (while still entering the takeoff ramp), or thinking about taking off only after reaching the highest point (too late).
Correct takeoff timing perception drills:
- Imagine the takeoff ramp is a springboard—you want to “pop off” the top of the board rather than “jump up” from it
- The point of force application should be the “lip” of the takeoff ramp (the transition where the highest point meets the table)
- Use a “3–2–1” rhythm: 3 pedal strokes before the ramp, squat down; 2 strokes, begin extending; 1 stroke, leave the ground
Maintaining Air Position
A beginner’s instinctive reaction in the air is often panic: locking the arms, leaning forward or backward, and staring blankly. These reactions compromise landing preparation.
Correct air position:
- Keep knees slightly bent (30–40°), not fully extended
- Keep elbows slightly bent, maintaining control of the handlebars
- Look toward the landing point (the middle section of the downramp), not down at the wheels
- Stay relaxed and take a deep breath (this naturally relaxes your upper body)
Body pitch control: In the air, fore-aft pitch is controlled primarily through subtle handlebar adjustments: gently pulling up on the bars keeps the front end slightly higher than the rear (3–5° angle). This angle allows the front wheel to touch down before the rear wheel, which is the safest landing position.
Landing Absorption: Coordinated Knee and Arm Movement
Landing is the most critical and injury-prone part of jumping technique. Proper landing absorption should distribute the impact through your legs and arms rather than concentrating it in the joints.
Correct landing sequence:
- 0.5 seconds before touchdown (when you visually confirm you’re nearing the landing point), actively bend your knees to prepare for absorption
- The moment the front wheel contacts the ground, bend your arms to absorb the front-wheel impact
- When the rear wheel touches down, continue bending your knees to disperse the rear-wheel impact
- After completing absorption, return to your normal riding position
Common mistakes:
- Locked arms: When the front wheel lands, the arms don’t absorb the impact, and the shock transfers directly to the shoulders and spine
- Heels pressed down: Heels too low on the pedals, limiting the knees’ range of absorption
- Landing too deep: Landing at the bottom of the downramp due to excessive speed, dramatically increasing impact forces
Practical Advice for Taiwan Trails
When learning jumping techniques, it’s recommended to:
- On your first visit to a new trail, walk through the jump first to observe the takeoff ramp angle and table length
- Wear full protective gear: helmet, knee pads, elbow pads, and a back protector
- Start with the smallest tabletop; don’t rush into bigger jumps
- Ride with friends who have jumping experience—they can spot technical issues and give you immediate feedback
Conclusion
The learning curve for jumping technique is unique: the first few attempts often feel like nothing clicks, and then suddenly, on one attempt, it “clicks”—you feel the coordination between flight and landing. This moment of breakthrough is one of the most rewarding feelings in MTB riding, and it’s worth the time and patience. Remember: speed should always progress from low to high, and technique should always be mastered before speed.
Related Reading
- MTB Jumping Basics: A Complete Guide to Safe Takeoffs and Landings
- MTB Climbing: Switching Between Seated and Standing Positions and Pedaling Cadence
- MTB Descending Technique: Body Position, Weight Transfer, and Shock Absorption
- MTB Steep Chute Descending Technique: Strategies for Different Gradients
一日北高常見問題大集合 | 攻略 | 路線 | 訓練 | 補給 | 自行車 單車 | 一日雙城 | 雙塔 | TWB北高360 | 屁股痛
6 年前
爬坡ITT實境)台中 魔王 松鼠坡 首航 6:12 大肚山 大三元 科福路
8 年前
滑雪新手們慘摔學習全紀錄(請開字幕),滑雪好好玩 | Snowboard + Ski | 岩原 スキー場 | 滑雪APP使用 | GoPro Max
6 年前
公路車 爬坡 破PR 紀錄 小技巧 分享
6 年前
白沙屯媽祖進香在家走!UREVO 坡度自調走步機 / 可連接訓練遊戲APP MyWhoosh / 邊看直播邊走起來 / CT Yeh
11 個月前
#公路車 #Fitting 靠人工智慧APP 幫你調整單車
6 年前
單車 一日北高 ( 雙城 ) 肥宅雙人瘋狂行 紀錄片 REACTO
10 年前
CT 喇低賽) 武嶺牽車 才是王道 西進牽車四小時內秘訣 攝手位置 如何判斷 防抽筋小秘訣
7 年前