The Complete Guide to Ankle Sprains: From Acute Management to Proprioceptive Training — How to Train So You Don't Keep Rolling It Again and Again
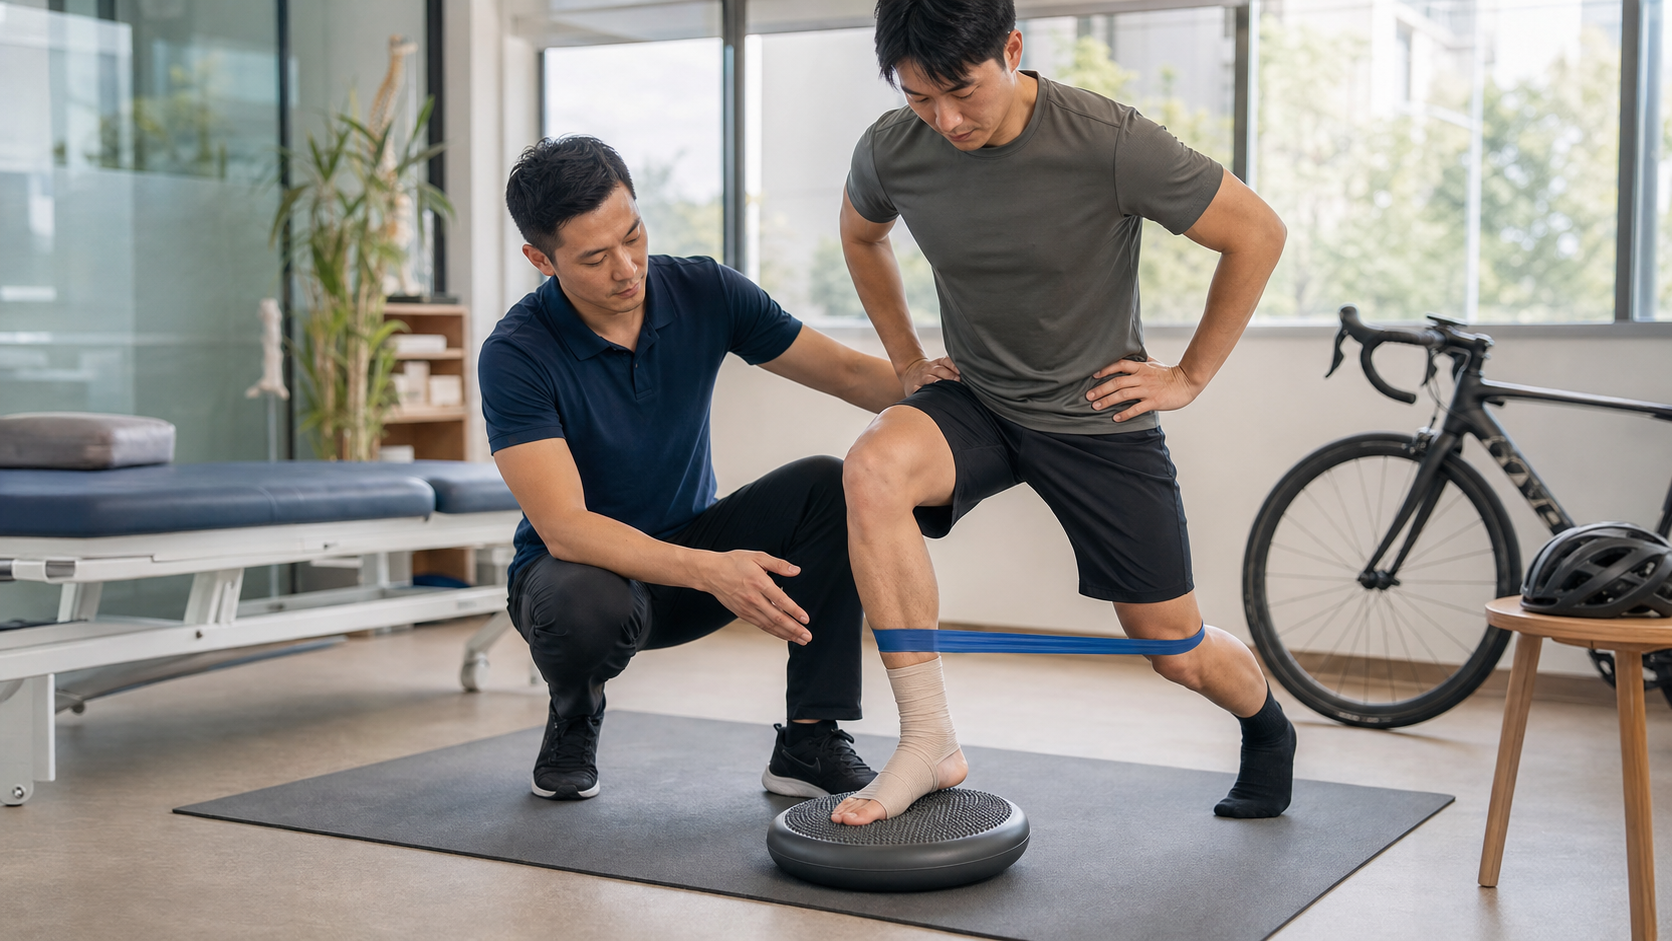
The Student Who “Just Twisted It a Little”
I once coached a road cyclist named A-Zhe, in his early forties, who rode the Yangjin Highway every weekend. One time, as he got off his bike to walk it, his foot slipped and his right ankle rolled inward. He told me, “Coach, it’s just a little twist. I can still walk. It’ll be fine in a few days, right?” He iced it for one night, slapped on some pain relief patches for a few days, and was back clipped in and riding a week later.
And what happened? Over the next year and a half, he rolled that same ankle three more times. Once, he simply stepped on an uneven paving stone in a walkway and it gave way. Eventually, it became what he called his “glass ankle”—any time the road surface was slightly uneven, or he had to put one foot down on the bike at a stop, that foot felt completely insecure.
I’ve told this story countless times in clinics and in the classroom, because it’s almost a perfect缩影 of how ankle sprains play out in Taiwan’s general athletic population: the first sprain is treated too casually, the necessary rehab is never finished, and an acute sprain turns into chronic ankle instability. And the whole thing could have been prevented from the start.
In this article, I want to take the perspective of coaching a student, walking you from “what to do in the moment” to “how to retrain proprioception” and finally to “how to keep it from ever happening again.” It’s on the longer side, but if you or someone around you is stuck in the cycle of repeated sprains, it’s worth reading through carefully.
First, Understand: What Exactly Did You Sprain?
The Most Common Type Is a Lateral Ligament “Roll”
About 90% of ankle sprains are “inversion” injuries—the moment the foot rolls inward and the ankle rolls outward, the lateral ligaments get stretched. The most commonly injured ligament on the lateral side is the anterior talofibular ligament (ATFL), followed by the calcaneofibular ligament (CFL). You can feel the area yourself, just below and in front of the lateral malleolus (the bony bump on the outside of the ankle)—after a sprain, this is usually the most painful and most swollen spot.
Less common but more troublesome is the “high ankle sprain” (syndesmotic injury), where the damage is located slightly above the ankle, near the lower leg bones. These sprains typically take much longer to recover from and are easily dismissed as a regular sprain.
Grading: What You Need to Know About Severity
Clinically, ankle sprains are classified into three grades. Here’s a practical reference so you have some idea what to expect at the moment of injury. But remember: grading is for you to gauge severity and decide whether to see a doctor—it’s not for you to play doctor and diagnose yourself.
| Grade | Ligament Condition | Common Presentation | Approximate Recovery Time |
|---|---|---|---|
| Grade I (Mild) | Ligament fibers overstretched, micro-tears | Mild swelling, tenderness, can still walk and bear weight | About 1–3 weeks |
| Grade II (Moderate) | Partial ligament tear | Noticeable swelling and bruising, painful to walk, joint feels slightly loose | About 3–6 weeks |
| Grade III (Severe) | Complete ligament rupture | Extensive swelling and bruising, unable to bear weight, joint clearly unstable | Several weeks to months; may require more comprehensive rehab or surgical evaluation |
When Should You Definitely See a Doctor?
With Taiwan’s convenient healthcare and accessible NHI, I’ve always advised my students not to tough it out with your own foot. If any of the following occurs, please get evaluated by an orthopedist or rehabilitation specialist (or go to the ER first) as soon as possible:
- You cannot bear weight on the injured foot at all, and walking even a few steps is extremely painful
- Severe pain when pressing directly over the bony bumps on either side of the ankle, raising suspicion of a fracture
- Numbness, paleness, or coldness in the top of the foot or toes
- Extensive swelling and bruising, or obvious deformity
- No improvement three or four days after injury, or the pain is getting worse
Clinically, there’s a set of criteria called the “Ottawa Ankle Rules” that medical staff use to decide whether an X-ray is needed to rule out a fracture. You don’t need to memorize it, but you should know: whether you can bear weight and whether specific bony points are tender are key clues to severity—which is exactly why professional evaluation matters.
One Often Overlooked Point: Swelling ≠ Severity
Many students judge how bad a sprain is by “how swollen it is,” which isn’t very accurate. Some people have only a mild ligament strain but swell up like a puffy bun; others have a more serious tear but only mild swelling. Severity is better judged by “can you bear weight” and “is the joint stable” than by the size of the swelling. That’s also why I always advise: if you can barely stand after the injury, or you’re clearly walking with a limp, don’t guess on your own—go see a doctor.
Taiwan’s NHI has a low barrier to access, and orthopedics and rehab clinics are easy to book. Spending a consultation fee during the acute phase to rule out a fracture and confirm severity is, in my opinion, one of the most cost-effective investments you can make. After all, a poorly managed sprain costs far more in time down the road.
Acute Phase Management: From RICE to POLICE
Most of us were taught RICE (Rest, Ice, Compression, Elevation) growing up. But in recent years, sports medicine thinking has evolved, and the mainstream approach has shifted to the POLICE principle.
What’s the difference? RICE emphasizes “complete rest,” but research has found that not moving at all actually leads to muscle atrophy, joint stiffness, and poorer tissue repair. So the new approach replaces Rest (complete rest) with Protection + OL (Optimal Loading). The core idea is: protect the injured area, but get it moving and bearing weight as early and progressively as tolerated, because appropriate mechanical stimulation actually helps collagen fibers align properly and speeds up healing. (References: POLICE vs RICE explanation, POLICE new guidelines summary)
Breaking Down the Five Steps of POLICE
| Letter | Meaning | Practical Application |
|---|---|---|
| Protection | Protect | For 24–72 hours after injury, depending on severity, use an ankle brace, taping, or crutches if needed to avoid a second injury |
| Optimal Loading | Optimal Loading | Within 24–48 hours, begin gentle joint movement and progressive weight bearing, as long as it doesn’t cause significant pain |
| Ice | Ice | For the first 48–72 hours, ice for 15–20 minutes every 2–3 hours, with a cloth barrier to prevent frostbite |
| Compression | Compression | Use an elastic bandage or compression sleeve to control swelling; tightness should not restrict blood flow or cause toe numbness |
| Elevation | Elevation | Keep the foot raised above heart level as much as possible to help reduce swelling |
“Optimal Loading” Doesn’t Mean Toughing It Out
I want to emphasize the balance of “optimal loading,” because it’s where most people go wrong. It does not mean walking through pain, and it doesn’t mean going back to play ball the next day. Instead:
- Within a nearly pain-free range of motion, slowly move the ankle up and down (dorsiflexion/plantarflexion)
- While seated, use your toes to “write the alphabet” in the air, from A through a few letters, to maintain joint mobility
- Weight bearing starts with “lightly touching the toes to the ground,” gradually progressing to comfortable standing, then walking
The judging principle is simple: if pain and swelling don’t noticeably increase right after the session or the next day, the load is safe. If it gets more swollen and more painful, you’ve overdone it—step back to the previous level.
Practical Tips for the Taiwan Context
- Ice materials: Ice cubes from the convenience store, or a bag of frozen vegetables from the freezer (a bag of frozen peas works great—it conforms to the ankle), but always wrap them in a towel.
- No hot springs, no massage, no alcohol: In the first few days of the acute phase, these all dilate blood vessels and make swelling worse. Taiwanese people are used to “adjusting” a joint or “pushing out the bruise”—absolutely don’t do that during the acute phase.
- Pain relief patches are not treatment: The cooling sensation of a patch mainly masks pain; it can’t replace rehab for mobility and weight bearing.
- For those who eat out: During the repair phase, your body needs adequate protein—roughly 1.2–2.0 grams per kilogram of body weight per day is a common recommended range. Getting enough protein with Taiwan’s eating-out culture isn’t hard—add a serving of tofu and seaweed to your braised dish, grab tea eggs or unsweetened soy milk from the convenience store, or pick up some chicken breast.
Why Does It Keep Rolling? The Key Is “Proprioception”
Back to A-Zhe’s story at the beginning. Why did he keep spraining his ankle? The answer isn’t just “the ligament got loose.” More fundamentally—his proprioception was damaged.
What Is Proprioception?
Proprioception, simply put, is your ability to know where your joints are and where your body is in space even with your eyes closed. The ligaments, tendons, and joint capsule of the ankle are packed with sensory receptors that constantly send signals back to your brain and spinal cord about “what angle my ankle is at right now,” allowing your muscles to reflexively contract and pull you back the instant you’re about to roll.
When you sprain your ankle, these sensory receptors are damaged along with the ligament. If rehab doesn’t retrain this “sense–response” system, you end up with: your ankle reacts half a beat too slow when it’s about to roll, the muscles can’t save it in time, and you sprain again. That’s the core mechanism of chronic ankle instability.
The Good News: Proprioception Can Be Trained Back, and There’s Evidence
This isn’t pseudoscience. The research evidence is remarkably consistent: proprioceptive/balance training significantly reduces the risk of ankle sprain recurrence.
- A meta-analysis of 7 moderate-to-high quality randomized controlled trials with a total of 3,726 participants found that proprioceptive training significantly reduced ankle sprain incidence compared to controls. (Systematic review and meta-analysis)
- An evidence-based review noted that for people with a history of sprains, the number needed to treat (NNT) for proprioceptive training to prevent one additional re-sprain was approximately 13—in plain terms, for roughly every 13 people trained, one additional sprain is prevented. (Proprioceptive training evidence review)
- Effective programs commonly take the form of home-based balance training about 3 times per week, up to roughly 30 minutes per session, for about 8 weeks, and it’s recommended to continue for at least 6 months after the injury. (Clinical summary)
I’m giving these numbers as ranges and approximations because different study populations and protocols produce different figures. But the direction is crystal clear: training is far better than not training.
Why Does Something as Simple as Single-Leg Standing Work?
A lot of people see my single-leg stance program for the first time and pause: “Coach, something this simple counts as training?” But precisely because single-leg standing constantly generates tiny sways and imbalances, your ankle muscles, sensory receptors, and the balance networks in your brain have to detect, judge, and correct many times per second. This repeated cycle of “small imbalance—small correction” is exactly the most effective stimulus for rebuilding the sense–response loop.
Closing your eyes makes it harder because you lose the “cheat tool” of vision. Normally, a large part of why we stand steadily is that our eyes lock onto a fixed point to make corrections. Once your eyes are closed, your body is forced to rely far more on ankle proprioception, so the training effect is naturally stronger. That’s why the progression from “eyes open” to “eyes closed” isn’t about making things difficult for you—it’s about precisely adding difficulty where you need it most.
In Practice: Staged Rehab and a Proprioceptive Program for Ankle Sprains
Below is the staged framework I actually use with my students. Treat it as a “map” rather than a “timetable”—everyone recovers at a different pace, and the condition for moving to the next stage is meeting the capability criteria, not hitting a date on the calendar.
Stage Overview
| Stage | Approximate Timing | Primary Goal | Representative Exercises |
|---|---|---|---|
| Stage 1: Protection & Swelling Control | 0–3 days after injury | Control swelling and pain, maintain basic mobility | POLICE, toe alphabet, gentle dorsiflexion/plantarflexion |
| Stage 2: Restore Mobility & Strength | About 3–14 days | Restore joint range of motion, begin foundational strength | Theraband in four directions, calf raises, seated weight bearing |
| Stage 3: Proprioception & Balance | About 2–6 weeks | Rebuild the sense–response system, single-leg stability | Single-leg stance, soft surface balance, perturbation training |
| Stage 4: Function & Return to Sport | About 4 weeks onward | Dynamic stability, jumping and cutting, return to cycling/running | Jump landings, cutting and direction changes, sport-specific simulation |
Stage 2: Get Strength and Mobility Back First
Before jumping into balance training, you need to secure the fundamentals. The following resistance program using a resistance band in four directions around the ankle is the prescription I write most often.
| Exercise | Direction | Muscles Trained | Recommended Volume |
|---|---|---|---|
| Band dorsiflexion | Pull toes up | Tibialis anterior | 15 reps × 3 sets |
| Band plantarflexion | Push foot down | Posterior calf muscles | 15 reps × 3 sets |
| Band inversion | Pull foot inward | Tibialis posterior | 15 reps × 3 sets |
| Band eversion (most important) | Push foot outward | Peroneal muscles | 15 reps × 3 sets |
I’ve marked eversion training as “most important” because the peroneal muscles are the brakes that “pull the ankle back” during an inversion roll. If this muscle group is strong enough, you have a fighting chance to save yourself the next time you’re about to roll.
Stage 3: Proprioception/Balance Training Is the Priority of Priorities
This is the critical stage that determines whether you become a “glass ankle.” Below is a progressive program you can do at home or in the gym, divided into three difficulty levels. Only advance to the next level once you’ve passed the previous one (can hit the target consistently without compensation).
| Level | Exercise | Target | Advancement Criteria |
|---|---|---|---|
| Beginner | Single-leg stance with both hands on a wall | Hold 30 seconds eyes open without swaying or putting the foot down | Hit the target consistently for 3 consecutive days |
| Beginner | Single-leg stance, no support (eyes open) | Hold 30 seconds, upper body not flailing | Can complete 3 sets consecutively |
| Intermediate | Single-leg stance + eyes closed | Hold 20–30 seconds eyes closed | Barely needs to open eyes to save it |
| Intermediate | Single-leg stance on a soft pad/pillow | Hold 30 seconds eyes open with stability | Can add eyes closed |
| Intermediate | Single-leg stance + drawing circles with the other leg / catching a ball | Maintain balance under “perturbation” | Can complete consecutively without putting the foot down |
| Advanced | Single-leg stance to shallow squat | Slowly squat down and rise on one leg, knee doesn’t cave inward | Movement is smooth and symmetrical |
| Advanced | Jump landing to single-leg stability | Jump and land on one leg, “stick” without swaying | Pain-free landing, no compensation |
10–15 minutes a day, at least 3 times a week, is a solid dose. I usually ask students to fit single-leg stances into spare moments—while brushing teeth, waiting for water to boil, or watching a show—no need to carve out a big block of time.
Stage 4: The Final Gate Before Returning to Cycling and Running
Many cyclists and runners ask me: when can I go back to riding, clipping in, and running? Here’s my “return checklist”:
- Single-leg stance time and eyes-closed balance performance on the injured leg are close to symmetrical with the healthy leg
- Can complete single-leg hops, repeated hops, and simple direction changes pain-free
- Strength feels similar between the two legs in calf raises, squats, and other movements
- Walking and jogging are completely pain-free and swelling-free
For road cyclists, I add an extra reminder: the moment of clipping in/unclipping and putting one foot down is exactly the highest-risk scenario for rolling an ankle, so balance and peroneal training are especially important for riders. In the early return phase, I recommend starting on safe, flat roads, loosening the cleat tension, or switching to flat pedals temporarily to adapt.
A-Zhe’s Recovery Timeline (Grade II Sprain Example)
To give you a concrete picture, here’s the timeline of A-Zhe’s progress during his second serious round of rehab. Again, this is a single case—your actual progress may be faster or slower; everything is based on meeting capability criteria.
| Time | Status & What He Could Do | Training Focus |
|---|---|---|
| Days 0–3 | Obvious swelling and pain, walking with a limp | POLICE, toe alphabet, gentle up-and-down ankle movement |
| Days 4–10 | Swelling half gone, walking more steadily | Begin band work in four directions, seated weight bearing, gradually normal walking |
| Weeks 2–3 | Walking pain-free, can jog lightly | Add hands-on-wall single-leg stance, calf raises, continue increasing strength work |
| Weeks 4–6 | Daily life unaffected, wants to return to sport | Progress to eyes-closed single-leg stance, soft surface balance, perturbation training |
| Weeks 6–10 | Balance symmetrical, pain-free | Jump landings, direction changes, return to cycling after passing the return checklist |
| Months 3–6 | Already back to sport | Balance training at a “maintenance dose” of 2–3 times per week to consolidate gains |
You’ll notice that even after “daily life was pain-free” (around week 4), I still had him continue training through month six. That’s not being overly fussy—it’s what the evidence supports: proprioceptive training is recommended to continue for at least 6 months after injury to minimize recurrence risk.
Ankle Brace, Taping, or Nothing at All?
In the early return-to-sport phase, many people ask whether they should wear an ankle brace or kinesiology tape. This is a question of “tools, not crutches.” Here’s a table to clarify the role of each option.
| Option | Advantages | Limitations | My Recommended Role |
|---|---|---|---|
| Rigid/semi-rigid ankle brace | Strong protection, limits excessive inversion | Hotter, may reduce mobility | Early return-to-sport phase, high-risk movements |
| Elastic ankle brace/sleeve | Provides proprioceptive feedback, light support | Limited protection | Everyday activity, later transition phase |
| Athletic taping/kinesiology tape | Customizable, provides feedback and psychological reassurance | Effect diminishes with time and sweat, requires proper technique | Supplementary for specific competitions or high-risk situations |
| Nothing at all | Forces your body to stabilize with its own ability | Higher risk if capability isn’t there yet | After rehab goals are met, low-risk daily activities |
Core concept: These aids are scaffolding to help you “safely get through the transition period,” not permanent pillars. The more actively you train proprioception, the sooner you can take the scaffolding down.
No Facility? Pool and Home Versions
Taiwan’s summers are hot and humid, and many people don’t want to exercise at home, or their ankle isn’t ready for full weight bearing yet. In that case, the pool is an excellent transitional environment: water buoyancy reduces the load on the ankle, while water resistance gently trains strength. Water walking, water calf raises, and ankle mobility exercises holding the pool edge are all well-suited to the mid-recovery phase. Taiwan’s sports center pools are widespread and affordable—a seriously underrated rehab resource.
No equipment at home? No problem—a resistance band (a few dozen NT$), a pillow or folded towel (as a soft surface), and a wall are enough to complete the vast majority of exercises in this article. Training results come from “consistency and progression,” not expensive equipment.
Common Mistakes and Fixes
In all my years of coaching, I’ve seen the same mistakes over and over. This section will help you avoid the most common landmines.
Mistake 1: No Pain Means You’re Healed
This is the biggest trap. Pain disappearing only means the inflammation and acute phase are over, but proprioception, strength, and balance may still be far from recovered. A-Zhe is the classic example—he went back to cycling once the pain was gone, without ever rebuilding the sense–response system, essentially riding with a ticking time bomb.
Fix: Use “meeting capability criteria” rather than “does it hurt” as your recovery standard. Finish the Stage 3 and 4 balance and functional tests before considering yourself ready.
Mistake 2: Aggressive Massage and Heat in the Acute Phase
Taiwanese people love to “adjust” joints and “push the blood through.” During the acute phase (first few days), blood vessels are still leaking. If you get a deep massage, apply heat, or soak in hot water, you’ll only make the swelling worse.
Fix: For the first 48–72 hours, stick to POLICE—ice, compression, elevation, and gentle movement. Save heat therapy and deep massage for the later phase after swelling has subsided, and ideally under the guidance of a professional.
Mistake 3: Complete Rest and No Movement at All
This is the opposite extreme—some people wrap the whole foot up and don’t move it for weeks. The result is muscle atrophy, joint stiffness, and slower recovery.
Fix: Remember that the core of POLICE is “optimal loading”—start progressive movement and weight bearing as early as possible within a pain-free range.
Mistake 4: Skipping Proprioceptive Training and Only Doing Strength
Some people are diligent with the resistance band and calf raises—strength comes back—but they never do any balance training. Strength is “power”; proprioception is “reaction timing”—no matter how strong you are, if your reaction is half a beat slow, you’ll still roll.
Fix: The balance/perturbation training in Stage 3 must be completed fully, and maintained for at least 6 months.
Mistake 5: Wearing an Ankle Brace Forever as a Crutch
Braces and taping are great helpers in the early return-to-sport phase, providing protection and feedback. But if you treat them as a permanent crutch and never train your own stability, your muscles and sensory system will get increasingly “lazy.”
Fix: Treat the brace as a “training-phase aid” while actively training proprioception, with the goal of eventually having your ankle stabilize on its own without external support.
Mistake 6: Rushing Back and Skipping Functional Tests
“Coach, I have a race/group ride on Saturday—can I go?” This is the question I get most often, and it’s the most difficult one. Too many re-injury cases happen in the early return phase when someone “feels like they’re probably okay” but hasn’t actually met the criteria. Swelling gone and walking pain-free is still a long way from “can jump, can cut, can land on one leg steadily.”
Fix: Use the Stage 4 “return checklist” as the gate—only return after passing it. If there’s truly an event you can’t miss, lower the intensity, wear an ankle brace, avoid high-risk movements, and don’t push it.
Special Considerations for Different Groups
Middle-Aged and Older Athletes
As we age, proprioception and reaction speed naturally decline, which is why falls are more common in older adults. If you’re in your forties, fifties, or beyond, balance training becomes more important, not less—it’s not just about preventing another sprain; it’s daily maintenance for preventing falls. Start with the most supported version, hands-on-wall single-leg stance. Safety first, progress gradually.
People with Repeated Sprains Who Roll Even on Flat Ground
This is usually already “chronic ankle instability.” Beyond doing a solid block of proprioceptive training, I strongly recommend getting an individualized assessment from a rehab physician or physical therapist to determine whether the issue is ligament laxity, muscle weakness, or motor control problems—targeted treatment is far more efficient. Only a small number of cases that fail conservative treatment need further discussion of imaging or surgery, and those decisions are made by physicians, not by self-diagnosing on the internet.
People Who Frequently Move in Wet, Slippery Environments
Taiwan is humid and rainy. Tile floors, wet markets, riverside trails, and leaf-covered mountain paths are all high-risk surfaces. Beyond balance training, these people should also pay attention to their gear: slip-resistant soles, well-fitting shoes, and slowing down in the rain are all cheap and effective prevention.
| Group | Top Priority | Special Reminder |
|---|---|---|
| Middle-aged and older | Start balance training with support | Also focus on fall prevention; safety first |
| Chronic instability | Add proprioceptive training + get professional assessment | Don’t guess at the cause yourself |
| Those in wet/slippy environments | Balance training + slip-resistant gear | Slow down in the rain, choose good shoes |
| Cyclists/runners | Peroneal strength + dynamic balance | Watch the single-leg plant moment |
Actionable Advice for Readers at Different Stages
If You’re in the Acute Phase (Within Days of the Sprain)
- Immediately implement POLICE: Protection, Optimal Loading, Ice, Compression, Elevation.
- If you have any of the “must see a doctor” red flags listed earlier, don’t hesitate—book an orthopedist or rehab specialist.
- No massage, no heat, no hot springs, no alcohol in the first few days.
- Do toe alphabet and gentle up-and-down ankle movements within a pain-free range to keep the joint from stiffening.
If You’re in the “Repeated Sprain” Chronic Instability Group
- What you need most is proprioceptive training—for most people, the problem is that this piece was never completed back then.
- Start with single-leg stance, follow the Stage 3 program step by step, at least 3 times a week for at least six months.
- Strengthen the peroneal muscles (eversion)—these are your brakes.
- If the instability is severe and you roll even on flat ground, see a rehab physician or physical therapist for an individualized assessment. Don’t try to DIY it.
If You’re Currently Uninjured and Want to Prevent It (Especially Cyclists, Runners, and Ball-Sport Enthusiasts)
- Make single-leg balance training a daily habit—2–3 times a week, 10 minutes per session, is already very valuable.
- Do a dynamic warm-up before exercise; don’t go from cold to full effort.
- Choose the right environment and gear: Taiwan is rainy, and slippery tiles, leaf-covered riverside trails, and gravel on mountain roads are all high-risk zones for rolling an ankle. Watch where you step.
- Don’t wear shoes until the soles are completely worn flat—tread and support are underrated preventive factors.
One-Week Introductory Maintenance Example (For the Uninjured, Prevention-Focused)
| Day | Content | Time |
|---|---|---|
| Monday | Single-leg stance (eyes open → eyes closed) + band eversion | 10 minutes |
| Wednesday | Soft surface single-leg stance + single-leg shallow squat | 12 minutes |
| Friday | Single-leg stance + perturbation (catch/throw, circles) + calf raises | 12 minutes |
| Weekend | Normal cycling/running, with a proper dynamic warm-up beforehand | — |
FAQ
Q: Should I ice after a sprain? I’ve heard some people say ice doesn’t work.
A: Current mainstream practice still recommends icing during the acute phase to help with pain and swelling control, but the key is don’t use icing as an excuse to stay completely still. Ice is a supporting player; optimal loading and subsequent rehab are the main event.
Q: The swelling is gone and it doesn’t hurt anymore. Do I still need to train balance?
A: Absolutely—this is exactly what most people skip, and it’s the most common reason for recurrence. No pain doesn’t mean proprioception has recovered. At minimum, complete Stage 3 fully and maintain it for six months.
Q: How long should I wear an ankle brace?
A: Treat it as an aid for the early return-to-sport phase, gradually reducing reliance as your own stability improves—not as a lifelong crutch.
Q: I’ve sprained it many times. Is the ligament already too damaged to save?
A: Chronic instability is indeed more challenging, but through solid proprioceptive and strength training, most people improve significantly. If it’s severe and training isn’t helping, see a rehab physician or physical therapist for evaluation. Only in rare cases is further imaging or surgical discussion needed.
Q: Can I train while it still hurts?
A: Training can involve “mild, tolerable, non-aggravating” sensation, but it shouldn’t be significant pain. If pain and swelling increase right after a session or the next day, that’s a signal to step down a level.
Q: How long after a sprain can I go back to cycling or running?
A: There’s no standard number of days—it depends on severity and your rehab progress. Rather than watching the calendar, look at whether you’ve met the “return checklist”: symmetrical balance, pain-free jumping and cutting, similar strength in both legs, and no pain or swelling with walking and running. A mild sprain might take two to three weeks; more severe ones can take longer.
Q: Do I need to take any supplements to help ligament repair?
A: No supplement has been proven to “accelerate ligament healing” to a clinically meaningful degree. The most practical approach is: eat a balanced diet, get enough protein, sleep well, and do your rehab properly. If you want to supplement for your specific situation, consult a physician or dietitian—don’t make supplements the main character.
Q: My ankle makes a “clicking” sound after a sprain. Is it broken?
A: A painless, subtle sound is common and usually not a problem. But if it’s accompanied by pain, catching, obvious instability, or repeated rolling, get it evaluated. Don’t scare yourself, and don’t dismiss it either.
Q: Should I train both ankles or just the injured one?
A: I recommend training both. First, it gives you a side-by-side comparison to identify asymmetries. Second, the other ankle is also “preventing” future sprains for you. Balance training is a good investment for both feet.
Conclusion: Turn One Sprain into an Upgrade
Back to A-Zhe. Eventually, he seriously completed a little over three months of proprioceptive training, progressing from hands-on-wall single-leg stance all the way to jump landings that stuck solidly on one leg. Over the past year and a half, that former “glass ankle” hasn’t rolled once. Even he says the “sense of security is back” when he puts a foot down on descents.
Ankle sprains are one of the most common injuries in sports and daily life, but they are absolutely not a minor thing you can just “wait for it to heal on its own.” Handle it well, and you’re just resting for a few weeks. Handle it carelessly, and you might trade it for years of repeated sprains and a gradually deteriorating joint.
Just remember three key points: handle the acute phase correctly with POLICE, make sure you complete proprioceptive training in the middle and later phases, and treat prevention as daily maintenance. May every roll you take become an upgrade, not an old wound.
This article is educational content and does not replace individual diagnosis or treatment advice from a physician, physical therapist, or dietitian. If you have significant pain, inability to bear weight, deformity, or repeated instability, please seek medical attention early for an individualized evaluation.
References
- Proprioceptive Training for the Prevention of Ankle Sprains: An Evidence-Based Review (PMC)
- The effectiveness of proprioceptive training in preventing ankle sprains: systematic review and meta-analysis (ScienceDirect)
- RICE method vs PRICE vs POLICE for injuries (OSSO)
- “POLICE”: New Management Guidelines For Ankle Sprains (Performance Sport Care)
Related Reading
- Running Rehab After Ankle Sprain: Four Stages of Proprioceptive Training and a Safe Return-to-Run Protocol
- Ankle Sprains in Road Running: Acute Management and Rehab Training Plan
- Ankle Proprioceptive Training: The Key to Zero Sprains in Trail Running
- Ankle Sprain Grades I/II/III: A Complete Sideline Management Guide for Basketball Players
Never Stop 西進武嶺 前後雙機 完整全程錄影 訓練台 實境
8 年前
再一組! 全碳幅條 碟煞/無內胎輪組 開箱! 到底好騎嗎? UNAAS X40 | 公路車 | CT Yeh
4 年前
碟煞公路車 銑面器 !? 原來銑完差這麼多! 降低蹭碟機率! | TIME 公路車 保養小記錄 | CT Yeh
3 年前
CT 喇低賽) 武嶺牽車 才是王道 西進牽車四小時內秘訣 攝手位置 如何判斷 防抽筋小秘訣
7 年前
滑雪新手們慘摔學習全紀錄(請開字幕),滑雪好好玩 | Snowboard + Ski | 岩原 スキー場 | 滑雪APP使用 | GoPro Max
6 年前
大禹嶺 到 武嶺牌樓 全程前後實況錄影 | 北進武嶺 | 東進武嶺 | KOM | 訓練台 | 坡度分析 | Taiwan KOM Last 10 km HARD | 公路車
6 年前
一日北高常見問題大集合 | 攻略 | 路線 | 訓練 | 補給 | 自行車 單車 | 一日雙城 | 雙塔 | TWB北高360 | 屁股痛
6 年前
[教學] Premiere 影片 手震 修正 教學 防抖 單眼 影像 GoPro 穩定 Video Stabilization
8 年前